
Take effective meeting minutes
Introduction (00:04)
Whenever you have a meeting you need to make sure that someone is taking proper meeting minutes. Taking effective meeting notes is quite difficult; you need to capture all the key points, at the same time as you are actively engaging in the meeting.
In this video you’ll learn how to use OneNote to take effective meeting minutes. You’ll learn how to use tags to keep track of follow up action items, you’ll learn how to convert handwritten notes to text and how to share meeting notes with others.
Inserting Outlook meeting details from OneNote (00:36)
Today I have a meeting with a customer, and as always I will take meeting minutes in OneNote. I have all meeting minutes gathered in a notebook dedicated for work-relates notes, under the section group called “Meeting Minutes”. To create a new page for this customer meeting, under the “Customer Meeting” section I’ll click the plus sign to create a new page. If you have information about the meeting in your Outlook calendar you can insert it directly into the page.
To insert Outlook meeting details into your notes, on the ”HOME” tab in the “Meetings” section click ”Meeting Details”. Here you will see all meetings scheduled for today.

If you want to insert meeting information from another date just click ”Choose a meeting from Another day”. Here you can click the arrows to go back and forth between different days. Click the little calendar icon to select a date from the calendar. I’ll click Today to go back to today’s date and select the 10 am Office Adoption Program meeting and click “Insert Details”.
The meeting name, the date, location and the names of the invited attendees are inserted, as well as a link to the Outlook meeting invitation and the invitation message. Click “Expand” next to the invitation message to see the full message. Here I can see the agenda that was included in the invitation.
Another way to do this is to open up the meeting invitation in Outlook. Under the “MEETING” tab, in the “Meeting Notes” section click “Meeting Notes” and then select “Take notes on your own”. Select where you want to place the meeting notes. Here I’ll select my Customer Meeting section and click OK. A page for your meeting notes is created in OneNote.

Preparing your notebook for handwritten notes (02:25)
Now I can start taking my meeting minutes. I strongly recommend that you take meeting minutes by hand. If you have a device with a digital stylus, you can take handwritten notes directly on your device using OneNote.
To support my writing I’ll add lines to the paper by clicking the “VIEW” tab and then under “Page Setup” I’ll click “Rule Lines” here I’ll select rule lines with an appropriate width for my handwriting.
Turn your device and OneNote automatically converts to writing mode, hiding all unnecessary menus. If you want to change the pen settings, click the three periods to open up the ribbon menu, under the “DRAW” tab, select the type of pen you want to use. Just tap on the page to go back to full page mode.
Taking handwritten notes on a digital device (03:13)
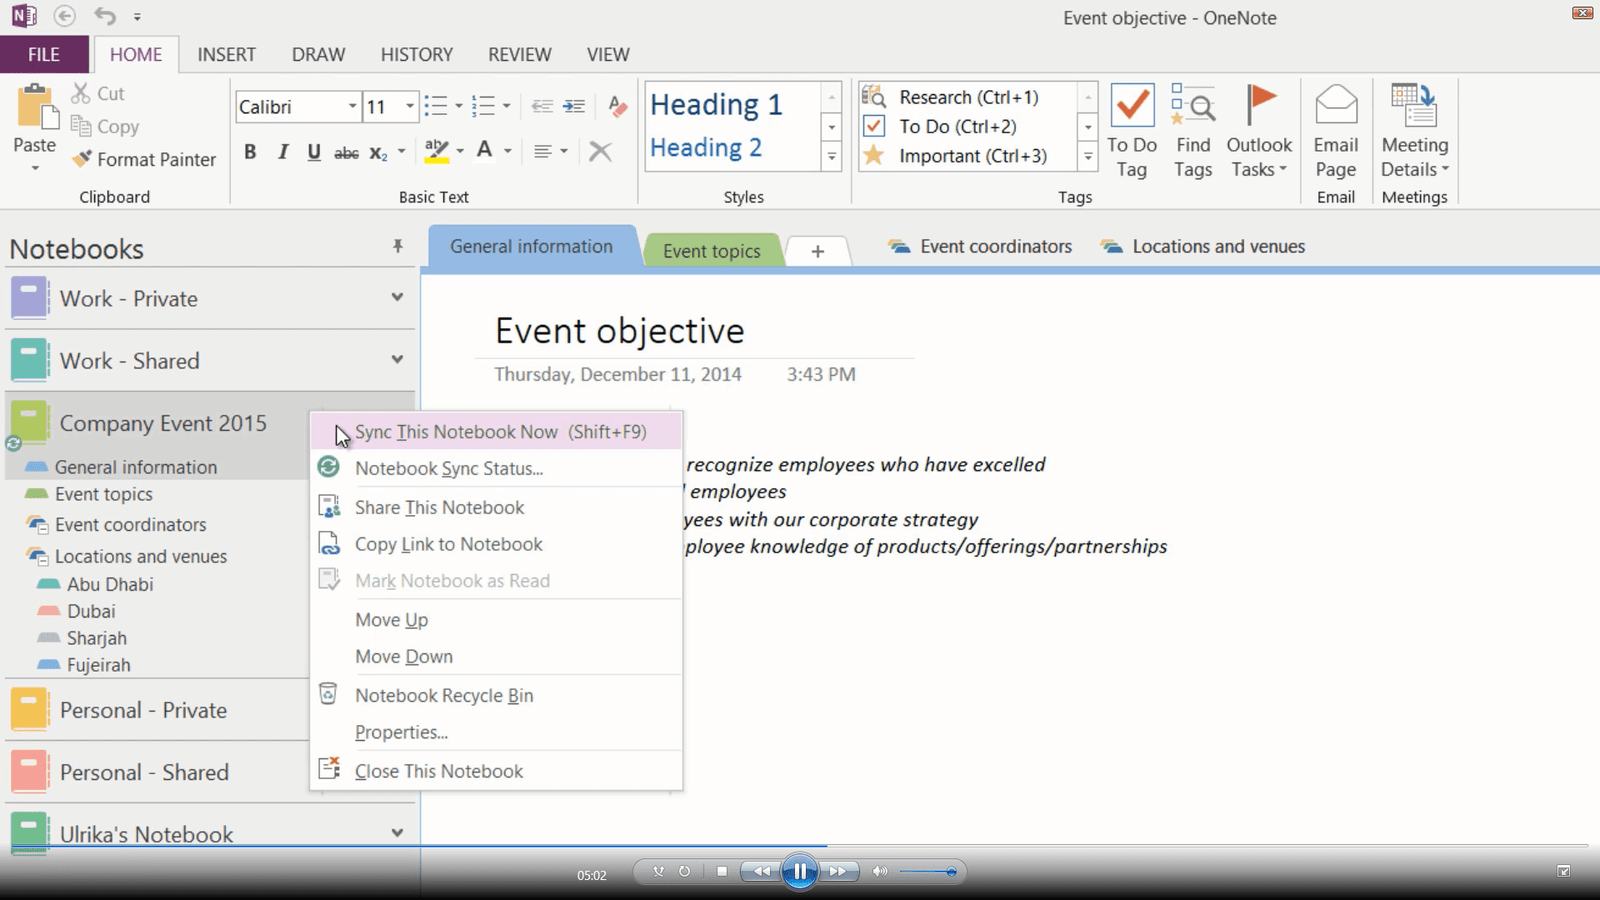
When you take meeting minutes you should make sure to write down the most important things such as action items, deliverables, decisions and so on. You won’t be able to write down everything people say. Use abbreviations and symbols as much as you can. I use the “@” symbol for action items and an arrow or triangle for decisions made. You can spend more time after the meeting to clean up your notes so just make sure you capture the key points. When I’m done taking my notes on my device, I’ll synchronize the notebook by touching the notebook name and pressing “Sync This Notebook Now” before I close it down.
Converting your handwriting into text (03:52)
Directly after the meeting, while I still have the details from the meeting fresh in my mind, I’ll spend some time to clean up my notes. The notes I took on my device have synchronized to OneNote on my laptop.
To keep a copy of your handwritten notes as a reference, right-click the page tab and select “Copy”, right-click again and select “Paste”. I’ll right-click the copied page and select “Make Subpage” so that I know the pages belong together. Before I convert the handwriting into text I will remove the ruler lines by clicking the “VIEW” tab, and under “Rule Lines” I’ll select “None.”
Now I want to convert my handwriting into text. To convert handwriting into text, click the “DRAW” tab and then in the “Convert” section click “Ink to text”.

Everything that is handwritten on the page is converted to text. If you have used a lot of abbreviations and symbols the converted text won’t be perfect, but it will at least be a good starting point. You can now spend some more time to clean up your notes, making them easier for others to understand.
Tagging notes for easier follow up (05:03)
To keep track of all action items and decisions made you can tag them in Outlook. I’ll remove the @ symbol and on the “HOME” tab I’ll click the “To Do Tag”. I’ll do the same for all action items. For the decision made I’ll mark it with a customized tag I’ve created called “Decisions made”. I’ll make some final modifications before I’m ready to share the meeting minutes with all meeting attendees.
Sharing meeting minutes via email (05:26)
To send your meeting minutes in the body of the email click “FILE”, “Send” and then “Email page”. The meeting attendees are automatically added to the addressee field and your meeting minutes are inserted in the body of the email.
If you want to share the meeting minutes as a PDF attachment instead, click “FILE” and then “Send” and select to “Send as PDF”.

The meeting minutes are converted into a PDF document and attached to an email addressed to all meeting attendees. The PDF document is identical to the OneNote page. I’ll write a short note and then send off the email with the attached meeting minutes.
Sharing meeting minutes in a shared notebook (06:06)
Later today I have a meeting with some colleagues regarding our Company Offsite. If you have frequent meetings with the same people it is very beneficial to use a shared notebook where you can all access meeting minutes from your meetings. We have a notebook called “Company Event 2015” where we share everything related to the planning for the event. Here we also have meeting minutes from all of our meetings.
Checking notebook permissions (06:30)
In order to use OneNote to share meeting notes with meeting participants you need to make sure that everyone who is invited to the meeting has permissions to access the notebook.
To check permissions of a notebook, click the “FILE” tab and then “Share”.

Here I can see who has access to the notebook and what permissions they have. If you have invited someone to the meeting that should have access to the notebook just add their email address here to invite them to share the notebook. When you are sharing notebooks it is all or nothing, meaning you can’t just give access to the section with the meeting minutes, the whole notebook will be shared.
Sharing notes in an Outlook meeting invitation (07:09)
To share notes with other meeting attendees, open up the Outlook meeting request. If you haven’t already done so when you sent out the meeting invitation, on the “MEETING” tab, click “Meeting Notes”, select “Share notes with the meeting”.

Select where you want the meeting notes to be located. Here I’ll select our shared “Company Event” notebook and the “Meeting Minutes” section and click OK. Two links are inserted into the meeting request, one link that opens up the meeting minutes in the OneNote application and one link which opens up the meeting minutes in a browser using OneNote Online. This way anyone who has access to the shared notebook can access the meeting minutes whether they have OneNote installed on their device or not.
I’ll send an update of this meeting invitation with the link to the meeting minutes. When it is time for the meeting, I’ll click the link to open up the meeting minutes.
Even though OneNote supports coauthoring, meaning that everyone can take notes on the same page at the same time, this can become quite hard to manage, so in my experience it is better that you dedicate one person to take the meeting notes.
Reviewing previous action items and decisions made using tags (08:16)
I’ll expand the meeting invitation to see the agenda for the meeting. The first agenda item is to review action items from previous meetings. Since we have all our previous meeting minutes organized here, it is easy to access decisions made and action items that have been assigned.
By using tags in OneNote you can easily summarize this information. To get a summary of all your tagged information in your meeting minutes on the “HOME” tab click “Find Tags”. I’ll select to only look at tags in this section with meeting minutes. Here you can see a summary of all the decisions that have been tagged during our meetings and the action items that have been assigned.
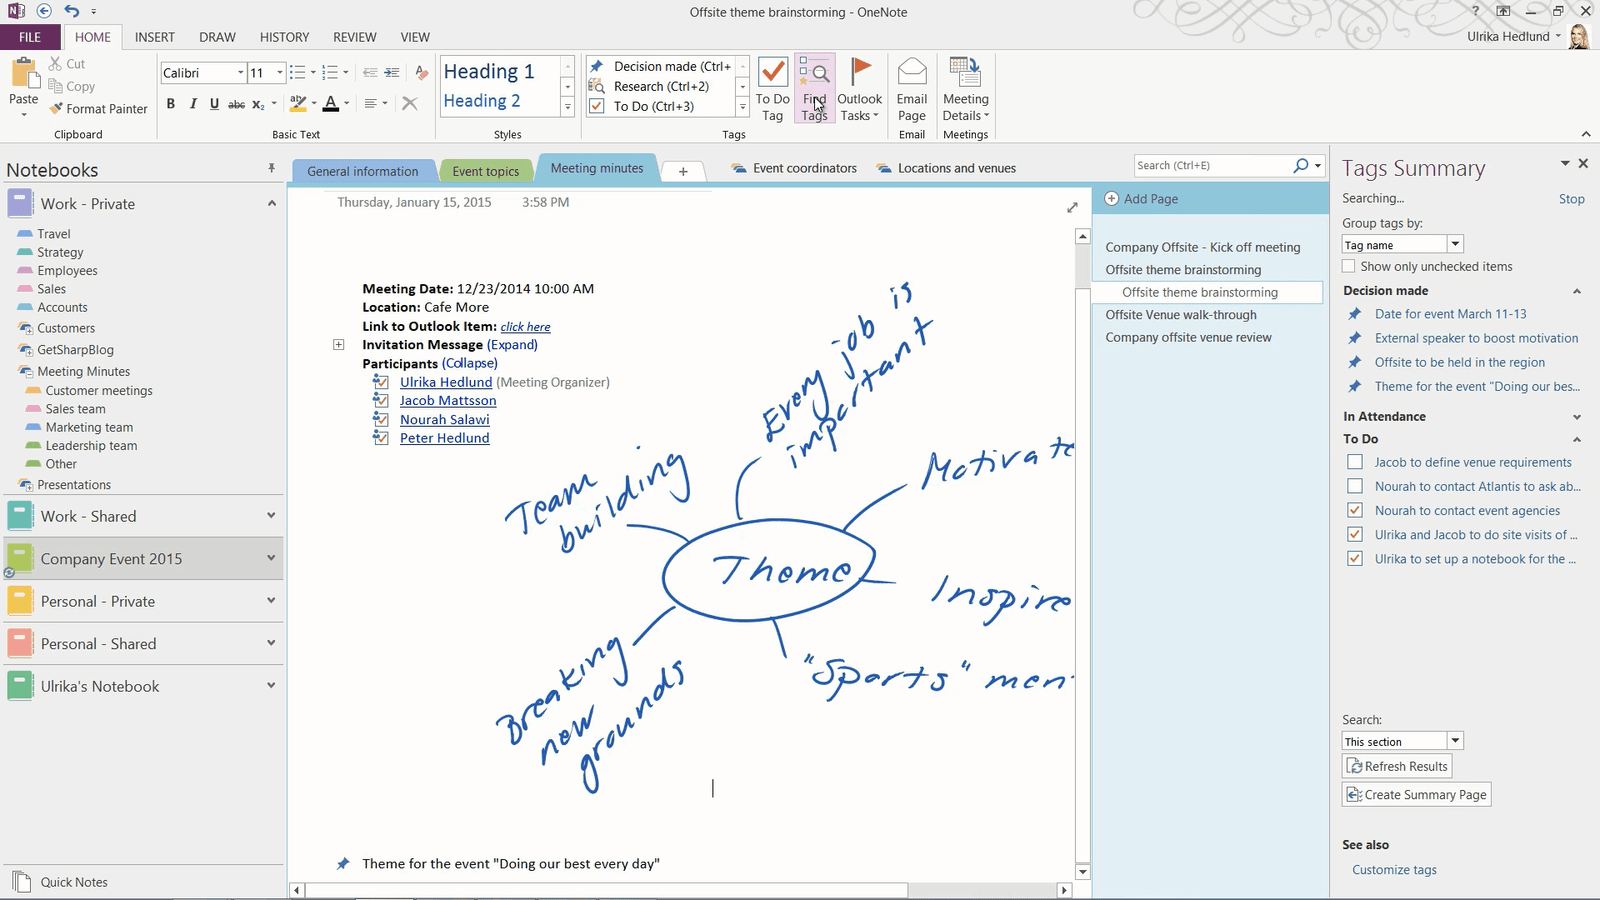
To only see the action items that have not been marked as complete, check the option “Show only unchecked items”. In the meeting we will spend some time to discuss the outstanding actions, and if they have been completed, you can mark them as complete here in the summary pane. Click “Refresh Results” to only display the unchecked actions items. We will continue the meeting taking notes in our shared notebook.
Closing (09:24)
As you can see, having access to all your meeting minutes in one place using OneNote can help you save time and make your meetings more effective.
Take creative notes across devices
Introduction (00:04)
With this version of OneNote you can be more creative than ever before. You can now take smart and effective notes using a wide range of different devices. In this video you will learn how to use the OneNote Windows app, with its new innovative interface designed for touch screens. You will also learn how to use more advanced tools in OneNote 2013 to really take your notes to a whole new level. Let me show you!
Taking handwritten notes with the OneNote Windows App (00:31)
I’m going to use the OneNote Windows app on my Surface device to take notes when I’m out visiting possible venues for our company offsite. The OneNote Windows app is free to download if you have Windows 8 or later from the Windows store.
To open up the OneNote app on your Windows touch screen device, press the tile called “OneNote”. If you have saved your notebooks to OneDrive, they will automatically be synchronized to your various devices.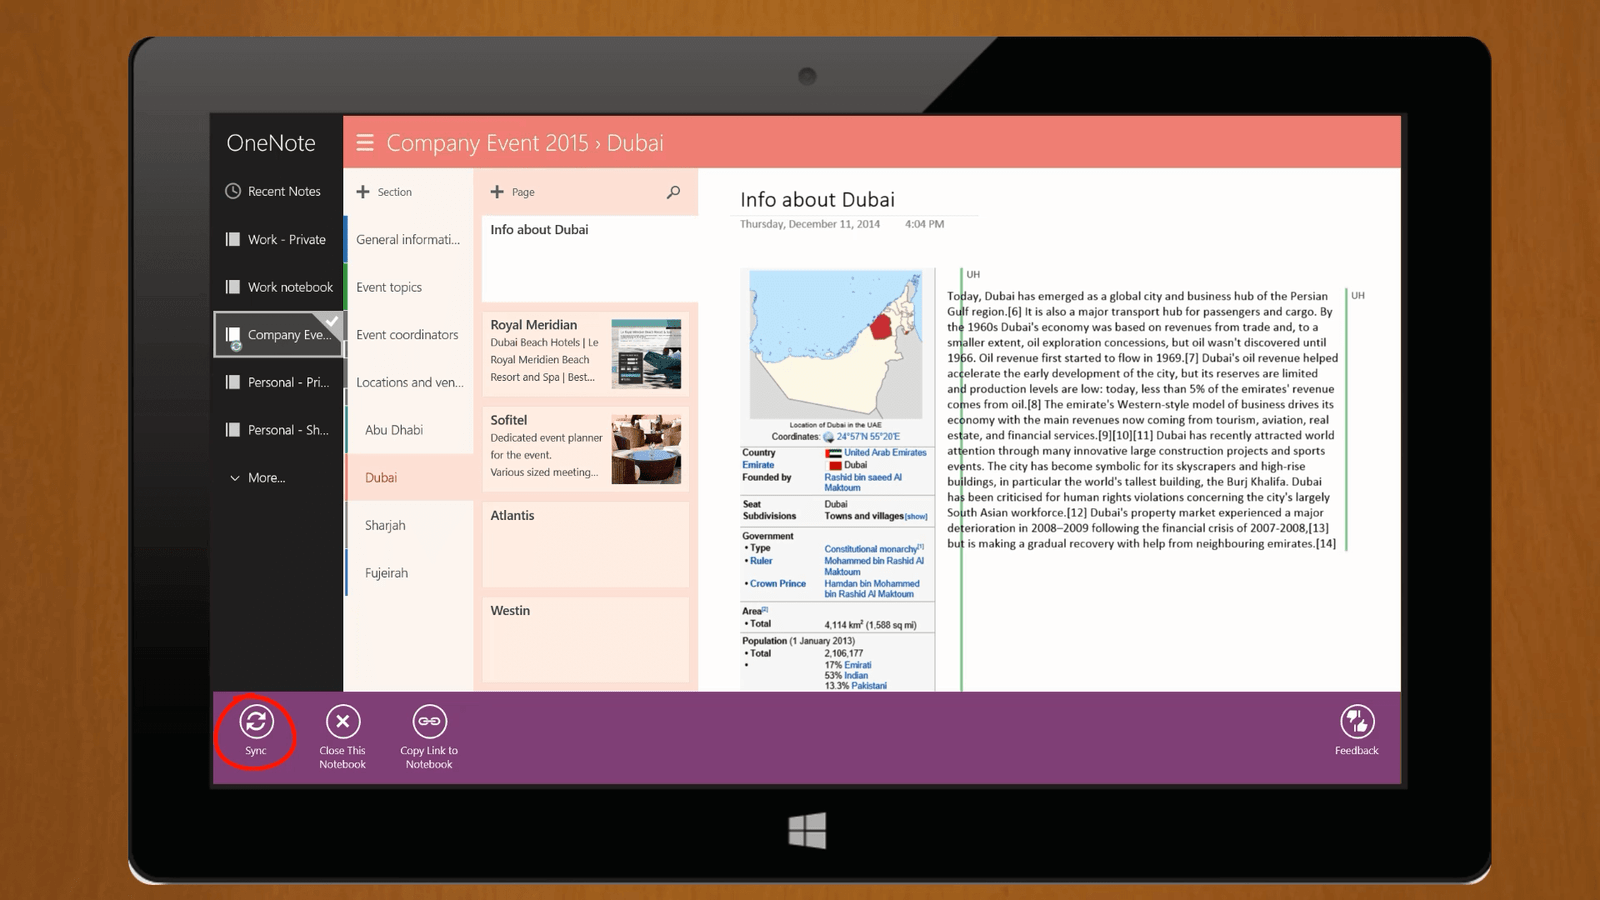
The OneNote app is designed with simplicity in mind. Here you can easily navigate the notebook using your finger. I’ll touch the page with notes about Sofitel to open up that page.
I’ll create a new page by pressing the “Plus Page” sign. I’ll name it “Onsite visit”. I want to take handwritten notes so I want to add lines to the paper. To open up the options menu, swipe from the bottom, press “Paper” and select “Show Rule Lines”.

Now lines are added making it easier to write by hand.
When I turn my device, OneNote automatically flips to portrait mode. If you have a stylus you can just start writing on your device right away just like on paper. If you want to change the pen settings, or if you want to write using your finger tap the screen so that the Radial Menu opens up. The Contextual Radial Menu was introduced in the OneNote app to make it easier to navigate OneNote using touch.
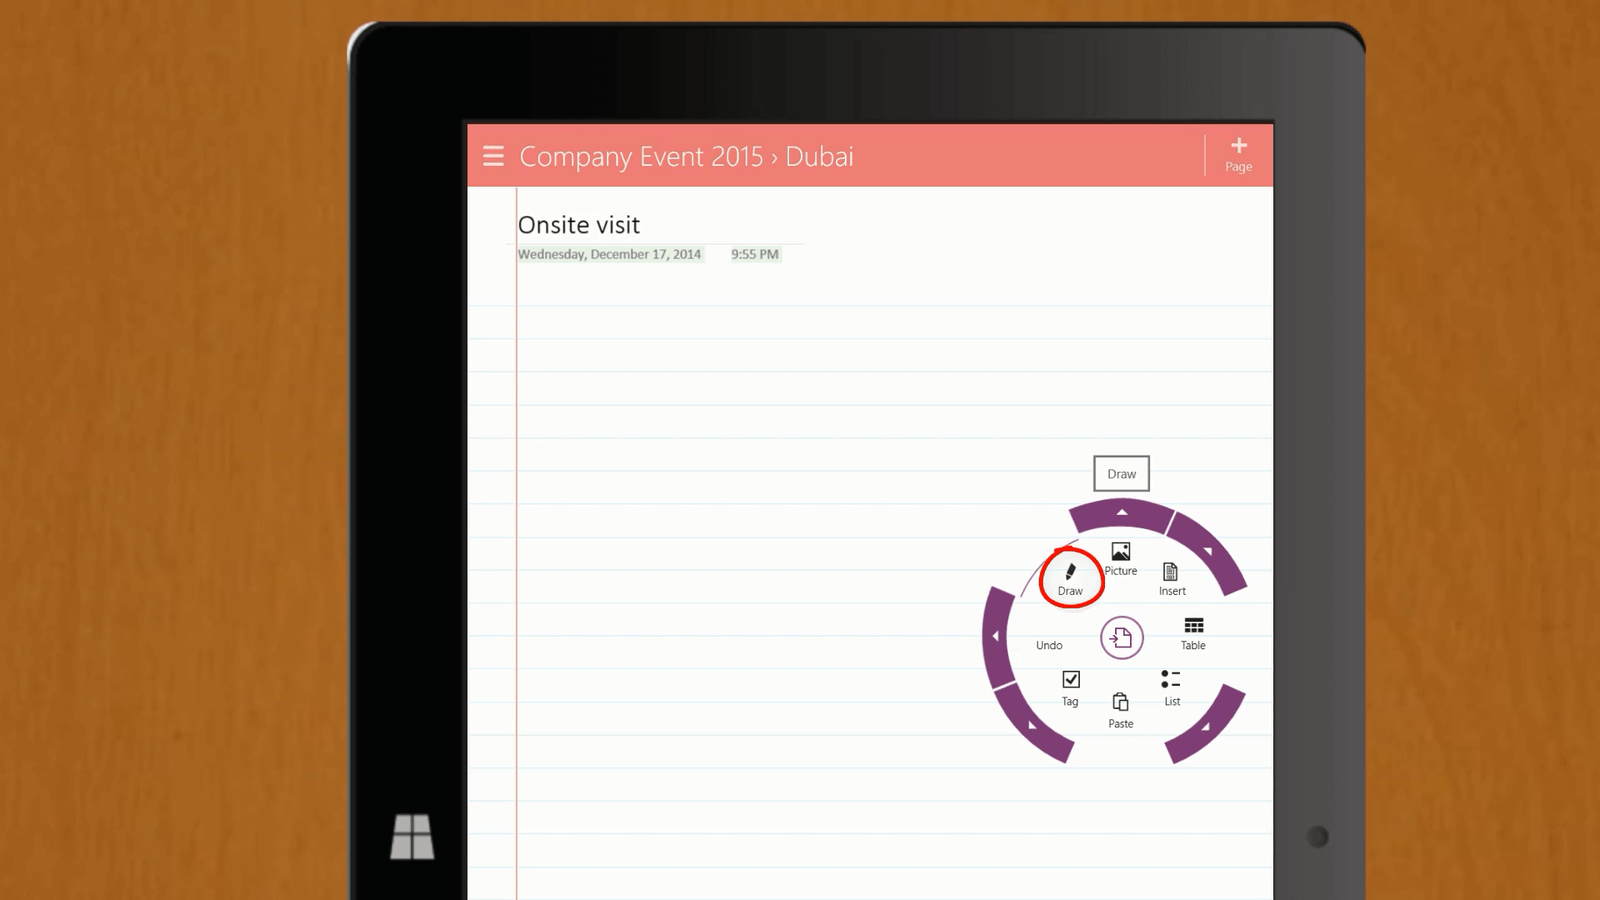
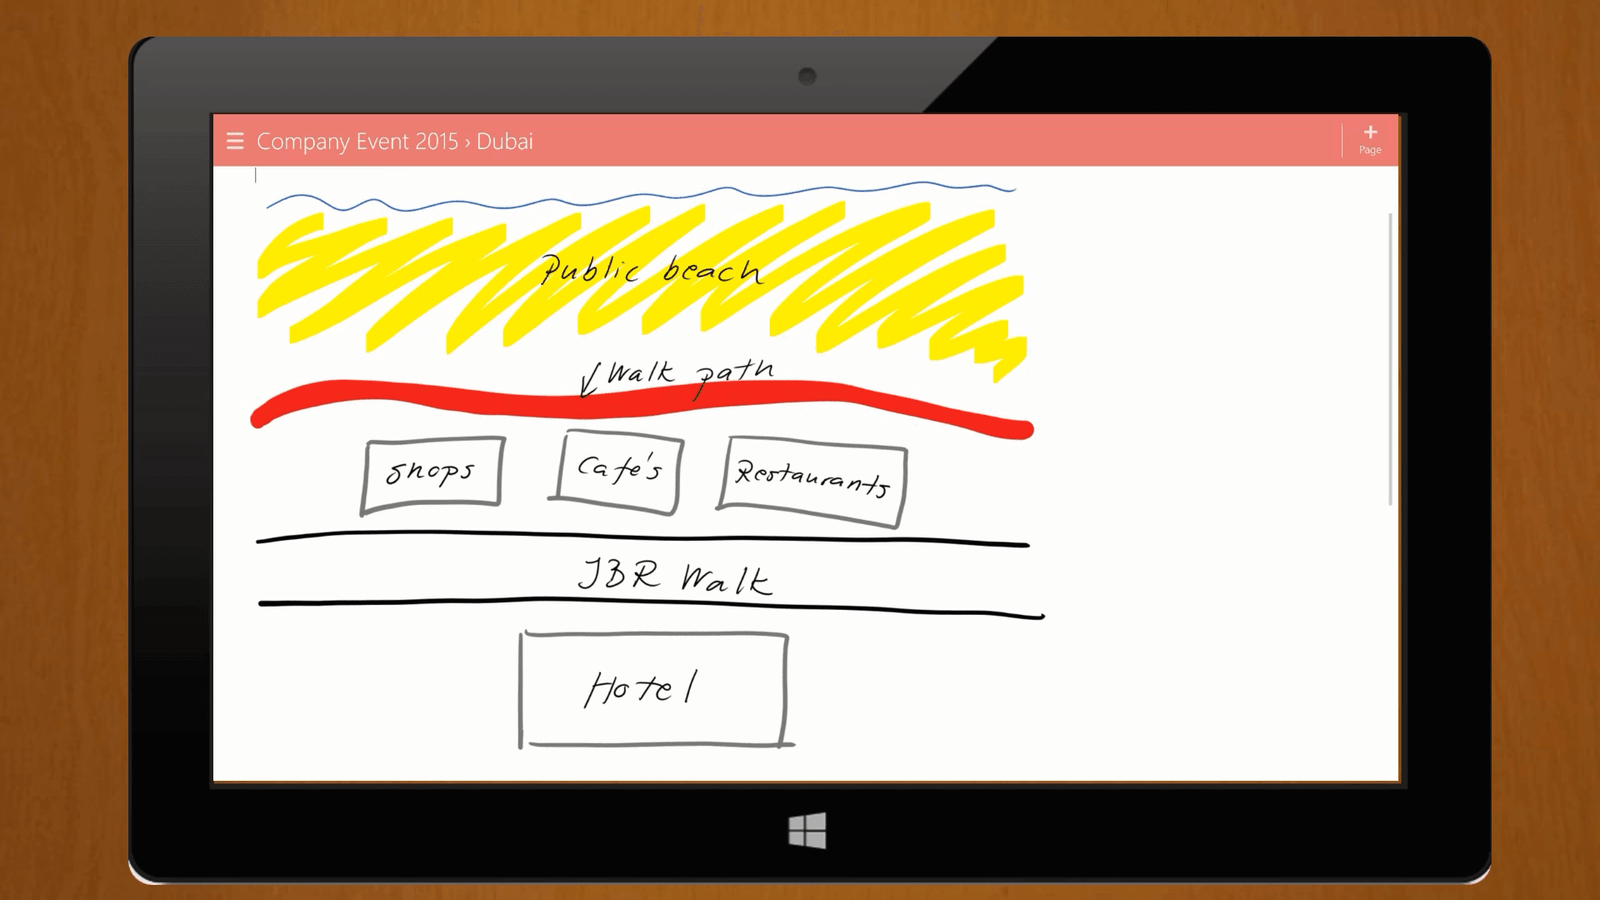
Here I’ll select “Draw” and then I can select between various pen options, I’ll pick a blue pen. Here I’ll take some handwritten notes while I’m looking at the premises and talking to the hostess. Next I want to draw a location map so I’ll turn my device to landscape mode again. OneNote adjusts the layout accordingly.
I’ll press the plus sign to create one more new page. I’ll name the page “Location map” using the touch keyboard. I’ll tap the page to open up the Radial Menu again.
I’ll select the pen tools and change the pen option to a highlighting pen with “Medium” width. Now I’ll draw a picture of the hotel location surroundings using various pens and colors. Using the drawing tools in OneNote you can really be creative.
Next I want to take some photographs and add to my notes.
Inserting camera shots using OneNote Windows App (03:03)
To take photographs using the OneNote Windows app on your tablet device tap the screen until the Radial Menu appears, select “Picture” and then “Camera”.

To take a picture just press the little camera icon. Here I’ll take a couple of pictures of the hotel surroundings by just positioning my Surface device and then pressing the camera icon. To insert the photos into your notes press “Insert All”.

The pictures are inserted into my notes.
Using the Lasso Selection Tool (03:36)
Back in the office I open up my notes on my PC in the full OneNote desktop client. The notes I took while out and about using my Surface device have been synchronized.

Now I can re-arrange my notes a bit. I’ll mark them all while holding down CTRL and then move them so that they’re all under “Sofitel”, then I’ll right-click and select “Make Subpage”.
I’ll remove the page ruler lines by clicking the “VIEW” tab, “Rule Lines” and then selecting “None”. I want to insert the location map I drew under the first paragraph but to do that I need to insert more space. To insert more space in a page click the “INSERT” tab and then “Insert Space”. Position your mouse pointer where you want to add more space, here I’ll position my mouse cursor under the first paragraph. Hold down the left mouse button and drag the mouse down. Everything underneath the double-sided arrow will be moved down providing you with more space.

I’ll go to the page where I have my location map drawing. To see the whole drawing I’ll click the “VIEW” tab and then zoom out a bit clicking the “Zoom Out” button.
Using the Lasso Select tool (04:58)
To select something handwritten or drawn on your page you can use the Lasso Selection Tool. To use the Lasso Selection tool, click the “DRAW” tab, and then “Lasso Select”. A little cross is shown next to your mouse cursor, hold down the left mouse button while circling the item or items you want to mark.

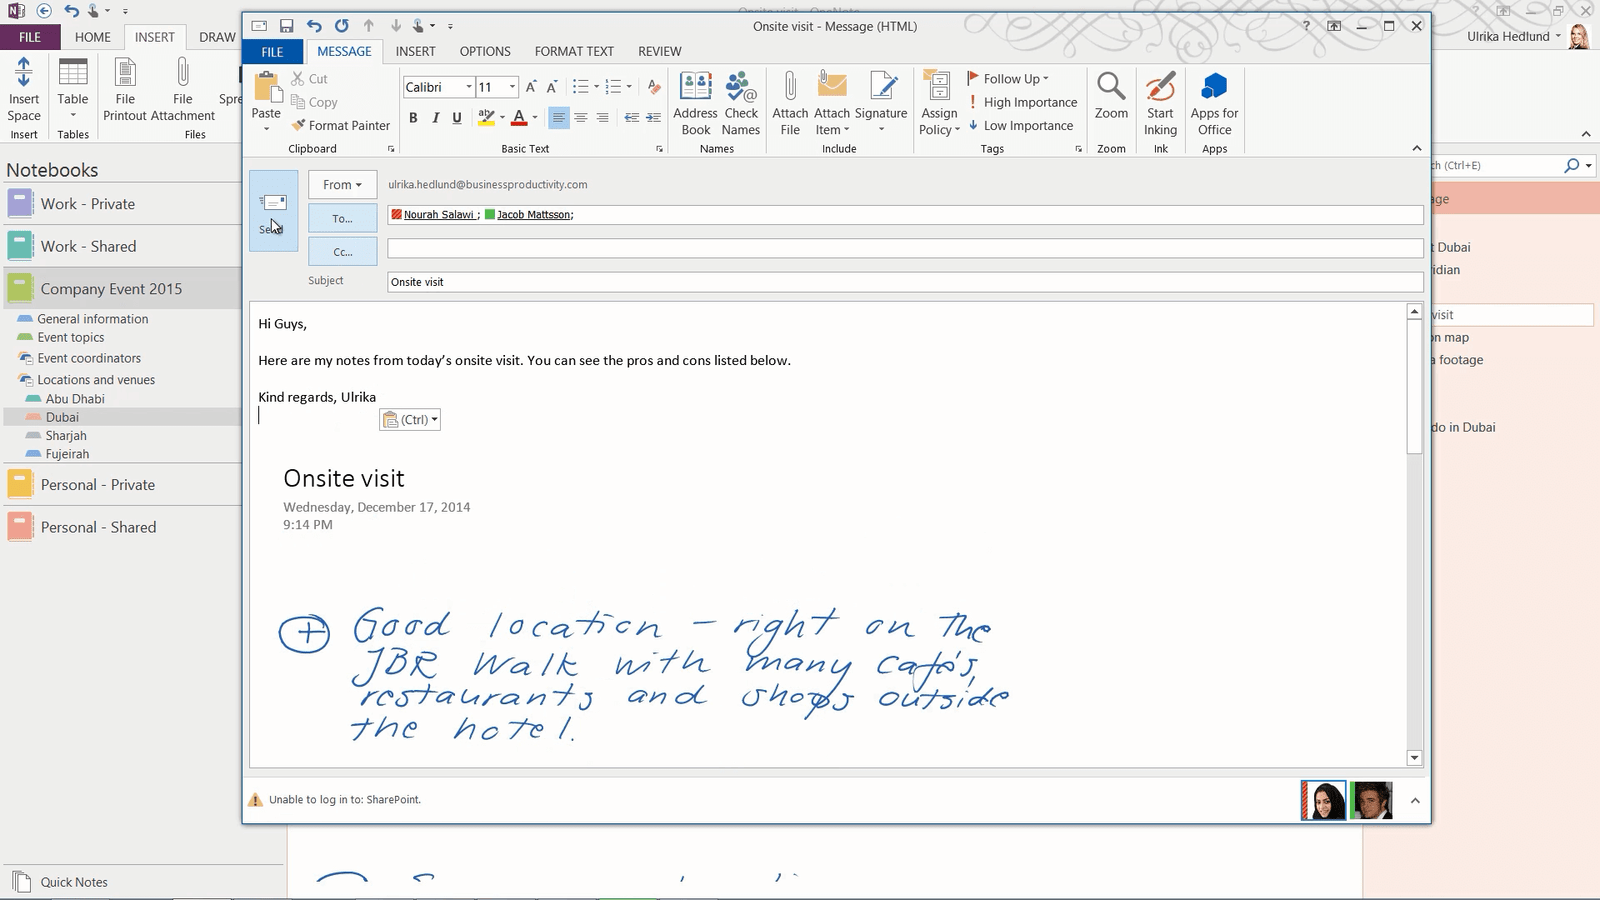
When everything is marked release the mouse button. To exit the Lasso Select tool, on the “DRAW” tab click “Lasso Select” again or click “Type”. I’ll right-click the marked drawing and select “Copy”. I’ll zoom out again by clicking the “VIEW” tab and selecting 100% then I’ll go back to the “Onsite visit” page to paste in my drawing. I’ll right-click and paste in the drawing. I’ll also copy in one of the pictures I took of the construction outside the hotel.
Now I want to share this page with my colleagues Nourah and Jacob.
Emailing pages from OneNote (05:52)
To email a page from OneNote, click “FILE”, “Send” and then “Email Page”. If you are using Outlook, a new email opens up where the contents of the current OneNote page is included in the body of the email message. Add the recipients you want to share the page with. You can add more text to your email, I’ll just write a short message before I send off the email by clicking “Send”.
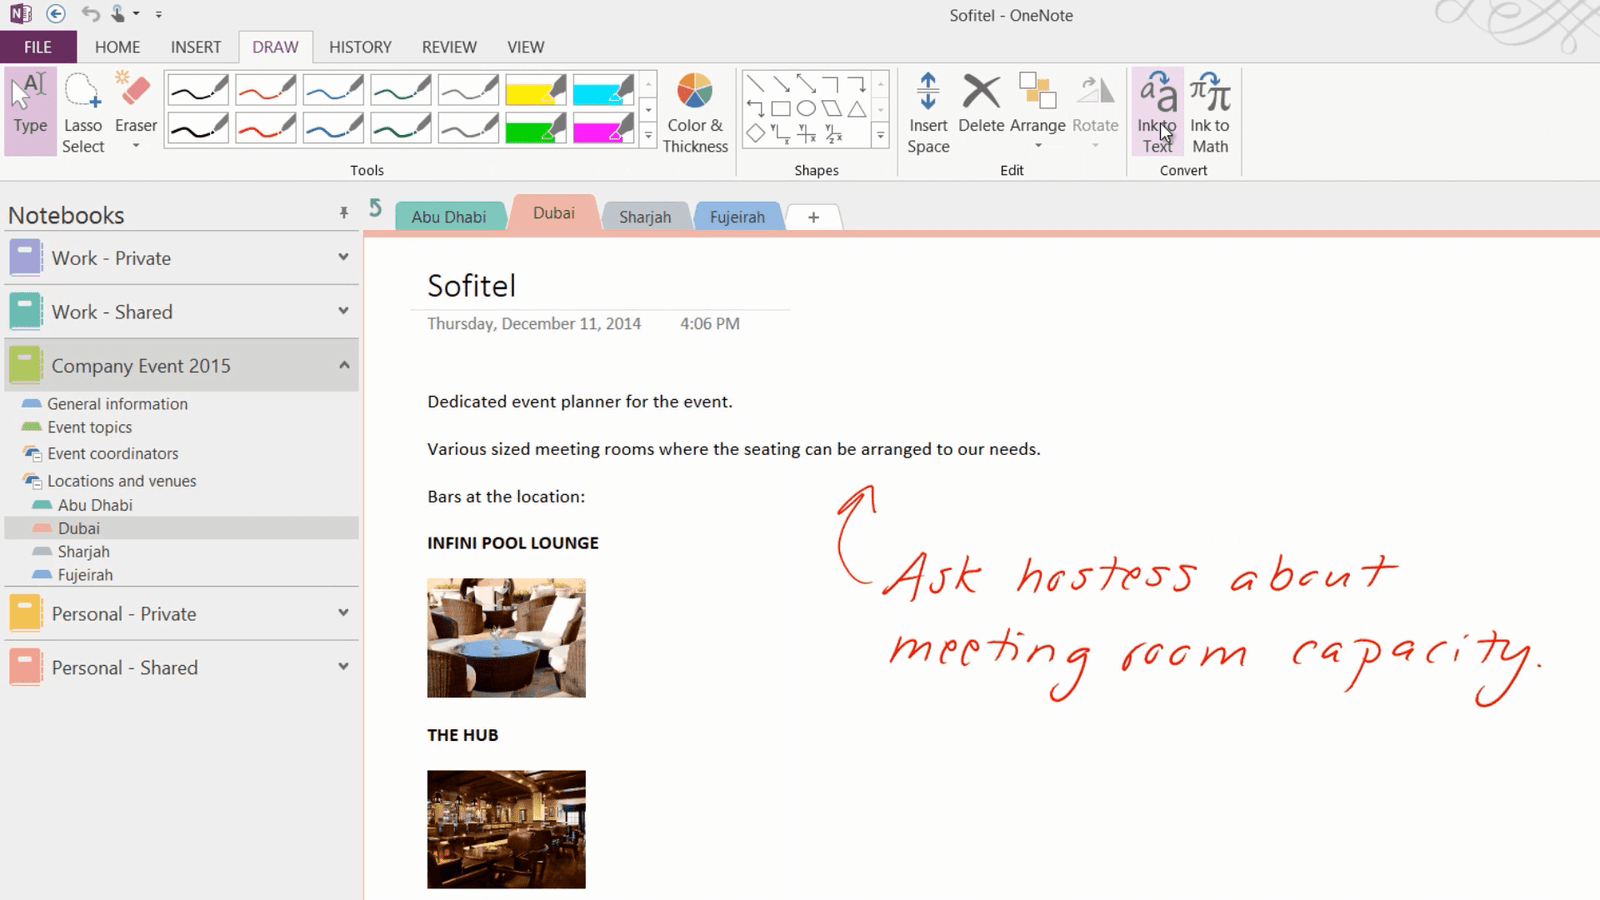
Creating Outlook tasks from OneNote (06:20)
While looking through my notes I can see that I’ve written down a reminder to ask the hotel hostess about the capacity of their meeting room. To make sure you keep track of tasks in OneNote you can synchronize them to Outlook. First I’ll convert my handwritten note to text. To convert ink to text, click the “DRAW” tab and then click “Ink to text”.
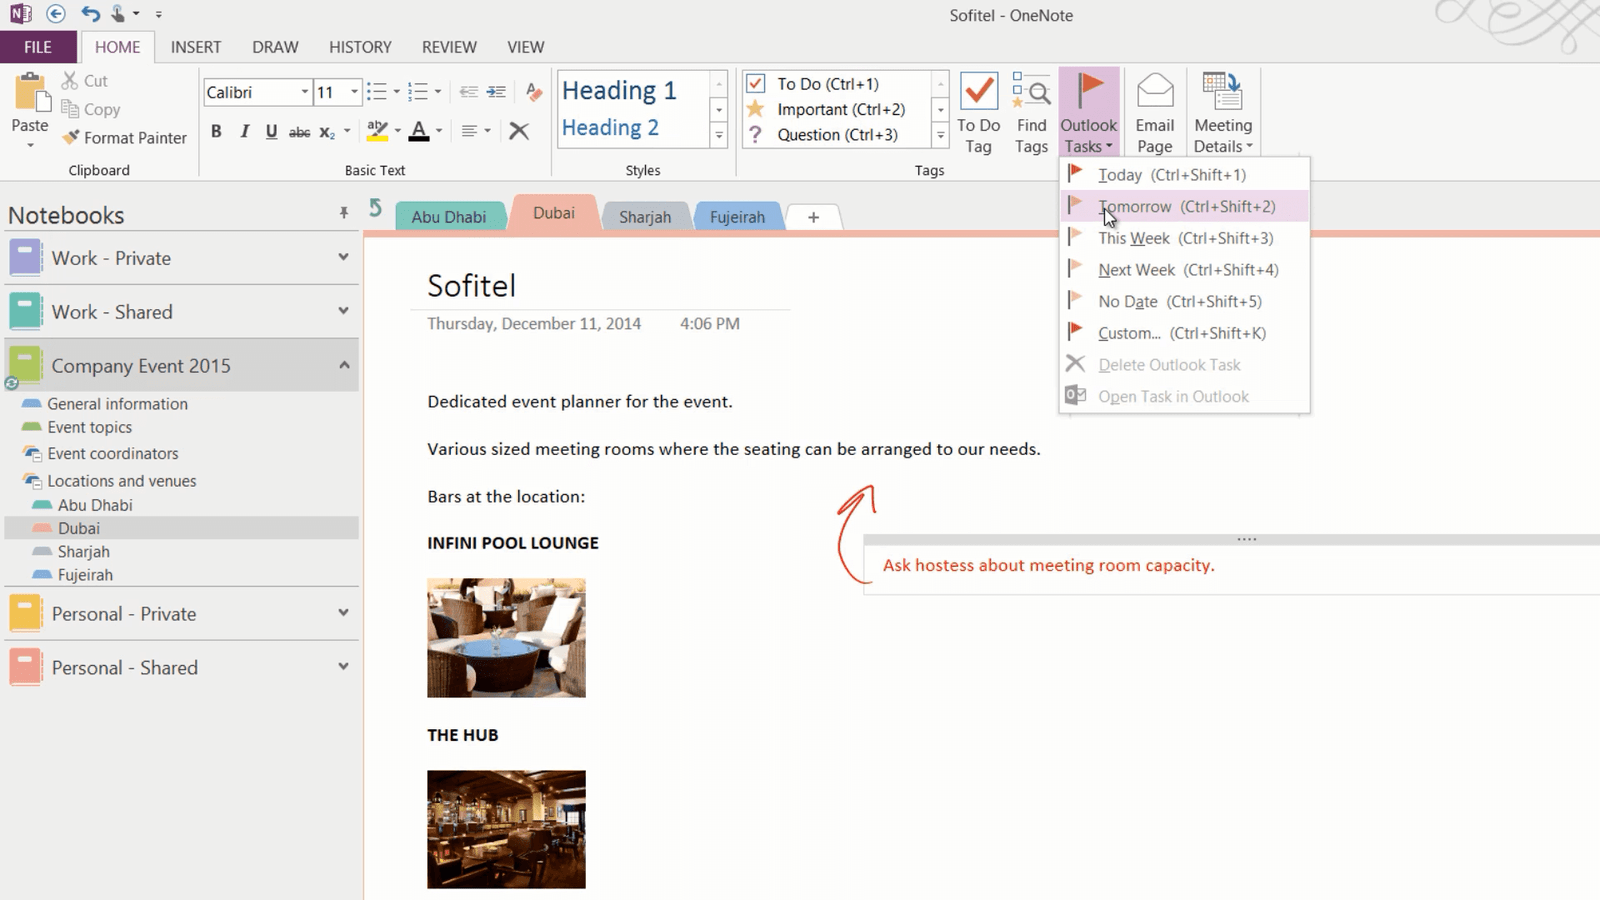
All handwritten ink on the page is converted to text. Now I want to make this into an Outlook task. To create an Outlook task from within OneNote, type in your action or mark the text you want to convert into a task. On the “HOME” tab, click “Outlook Tasks”, select when the task is due. Here I’ll select “Tomorrow”.
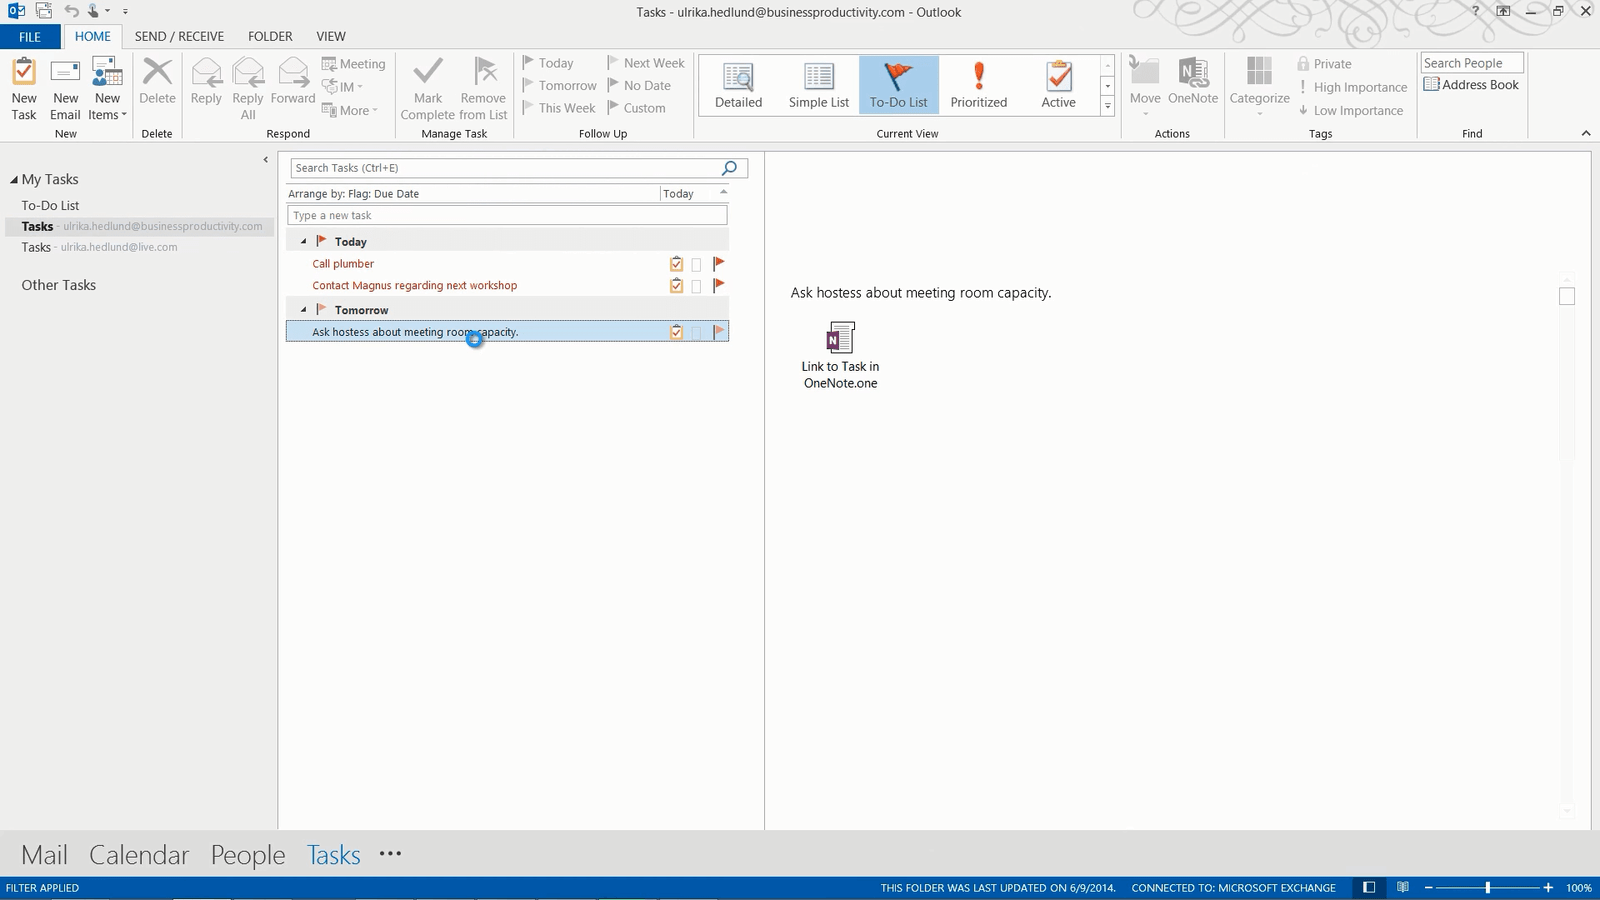
If you switch over to Outlook, you can see that the task has been added to your task list.
When you have completed the task you can mark it as complete in Outlook. When you open up OneNote again the task has been marked as complete. Similarly, if you mark the action as complete in OneNote it will be updated in your Outlook task list as well.
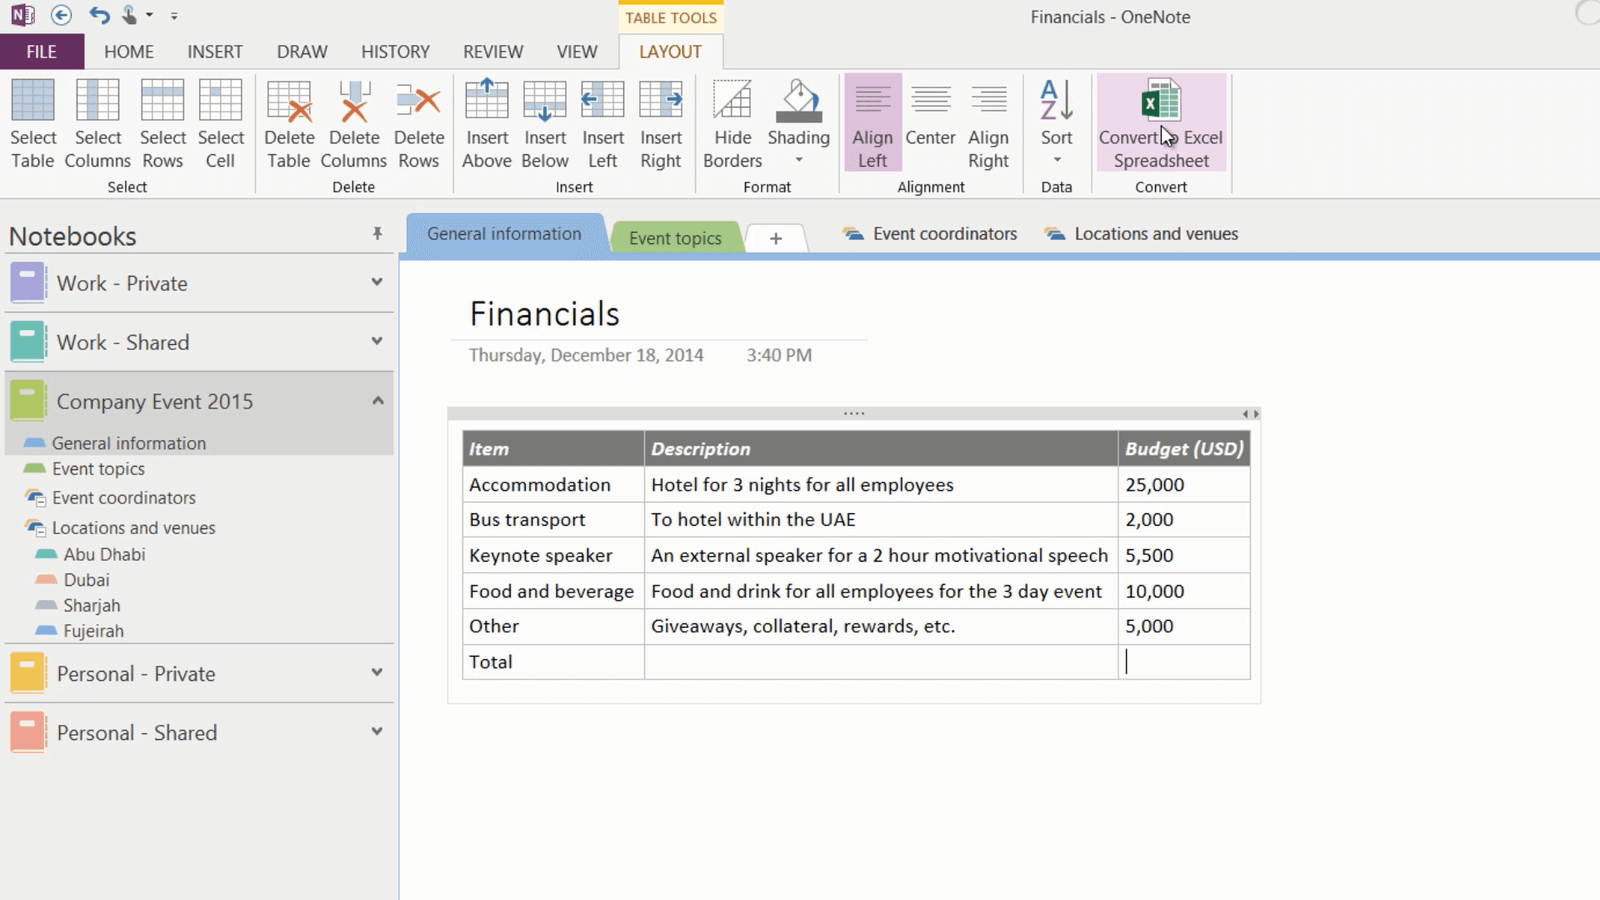
Inserting tables into your notes (07:32)
Now I need to add a page where I can keep track of our budget and costs for the event. I’ll create a new page that I’ll name “Financials”. To insert a table click the “INSERT” tab, and then “Table”. Select how many rows and columns you want in your table. I’ll start filling out the table with my information. When you have your cursor placed in the table the “TABLE TOOLS” appear on the Ribbon. On the “TABLE TOOLS” “LAYOUT” tab, I’ll click “Shading” and change the color of the first row to grey, then I’ll mark the text, right-click and on the mini-toolbar I’ll change the font to white, bold and italic.
Performing simple calculations (08:12)
You can perform simple calculations in OneNote. To calculate numbers, just type what you want to calculate using common math operators. Here for instance I want to know what the total accommodation budget is broken down per day, so I’ll type in 25000 divided by 3 equals, and OneNote shows the result.

This works fine for simple calculations, but quite often you need to perform more advanced calculations. Here for instance I would like to calculate the total budget.
Using Excel spreadsheets in your notes (08:47)
In OneNote 2013 you now have support for Excel spreadsheets. You can either import a spreadsheet you have already created, or you can convert a table to a spreadsheet or start from scratch. To convert a table to a spreadsheet, place your marker anywhere in your table. On the “TABLE TOOLS” “LAYOUT” tab, click “Convert to Excel Spreadsheet”.
Your table will be converted into an Excel spreadsheet and inserted into your notes. To edit the spreadsheet click “Edit” in the top left corner. Now you can use all the familiar calculation tools in Excel. Here I’ll sum up the total budget using Autosum.
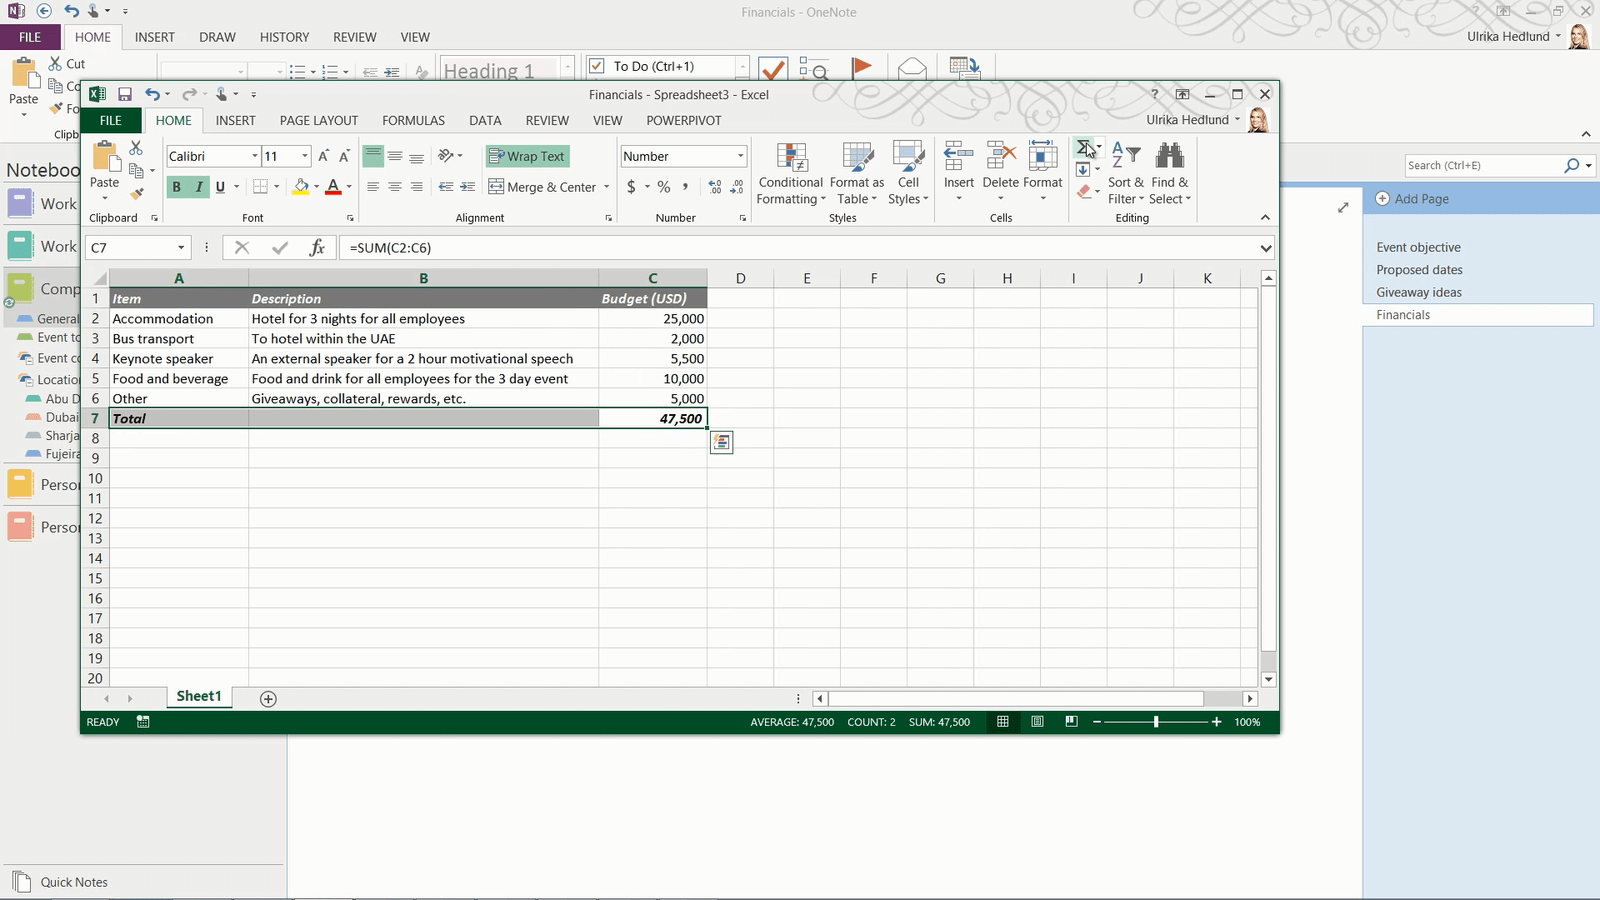
Then I’ll save my changes and close down the spreadsheet and the changes are updated in my notes.
Closing (09:36)
As you can see, OneNote provides you with numerous options for taking creative notes on a wide range of different devices.
Stay up to date with a shared notebook
Introduction (00:04)
When working with others on a project or an initiative you need to share a lot of information with each other – meeting minutes, research, action items, and so on. A great way to keep everyone on the same page is by using a shared notebook in OneNote.
In this video you’ll learn how to share a notebook with others, you’ll learn how to access your notes from anywhere and how to stay up to date to changes others might have made to the notebook. Let me show you!
Sharing a notebook with others (00:33)
Here I have a notebook that I’ve created for a company event we’re planning. Since we’re multiple people working on planning this event, I want to share this notebook.
To share the notebook, click the “FILE” tab and then “Share”.
Before you can share a notebook you first need to make sure that it is saved in a place where it’s accessible to others like for example OneDrive which is an online cloud-based file sharing service provided by Microsoft or SharePoint which is a company collaboration platform.
Here I can see the link to where the notebook is stored. This notebook is saved to my OneDrive Business Account. In our organization we can share information with external business partners using OneDrive. Make sure you know what the policies and requirements are in your organization to share company information internally and externally.
Type in the email addresses of the people you want to share the notebook with. I’ll add two of my colleagues Nourah and Jacob. Click the drop down, next to the addressee field to set the permission level. Here you can decide if the invited participants should have editing rights to the notebook or just viewing rights. I’ll leave the default which is editing rights since I want all of us to collaborate on the contents of the notebook. I’ll type in a personal message and then click “Share”. An email is sent with the link to the notebook to all addresses.
Changing permissions to the notebook (02:02)
On the Share tab you can easily see who you have shared the notebook with. At any point in time you can add or remove people and change permissions. To remove a user or change their permission, right-click the user and select “Remove user” or select “Change permission”.

To go back to the notebook click the back arrow.
Accessing a notebook via OneNote Online (02:23)
Let’s switch over to Nourah to see what this looks like for her. Nourah is accessing her email via the browser through Office 365. Here is the email with the link to the shared notebook. To open the notebook she just clicks on the link. The notebook opens up in OneNote Online. OneNote Online is a web application provided by Microsoft free of charge, to enable anyone to access and collaborate on OneNote notebooks from anywhere. You don’t’ have the same rich editing experience as in the rich desktop version of OneNote, but you can still perform a number of actions.

Nourah navigates to the page with recommended keynote speakers and starts adding some of her own suggestions to the list. You never have to worry about saving your changes when you are using Office Online since your changes are saved automatically.
Sharing access to anonymous users (03:17)
Let’s switch back to my PC again. I want to send an email to a business partner called Ariel with a link to the notebook we are using to plan the event. She will not actively be participating in the planning so she doesn’t need editing rights, but I want her to be able to read what we share in the notebook.
To share a notebook with someone, without requiring them to authenticate themselves, click the FILE tab and then “Share” and then “Get a Sharing link”.

Here you can decide if you want the person to just have viewing rights or if you want them to have editing rights. If you provide editing rights to someone using a Sharing Link, you won’t be able to see the name of the person who has done the changes since they won’t be authenticated. Since I want to share a viewing link I’ll click “Create Link” where it says “View Link”. I’ll copy the link and then paste it into my email to Ariel and send off the email.
Accessing a notebook using a shared viewing link (04:15)
Let’s switch over to Ariel to see what this looks like for her. Ariel receives the email to her Gmail account. From here she can click the link to open up the notebook. Since she doesn’t have to log in to authenticate herself, OneNote just treats her as a “Guest Reader”. She has no ability to edit the notebook, all the editing menus are removed. But she can freely browse the notebook to stay up to date on all the changes that are made.
Synchronizing your shared notebook (04:44)
Now let’s switch over to my PC again. I can see a little green turning circle that indicates that the changes that have been made to the notebook are synchronizing to my PC. As soon as someone makes any change, my notebook is synchronized. You can also force a synchronization by right-clicking the notebook and selecting, “Sync This Notebook Now”.
To see the status of the synchronization right-click “Notebook Sync Status”. Here I can see the status of all my notebooks. When all changes have been synchronized you will see message “Up to date” next to the notebook. I’ll close down this window to look at the changes.
Staying up to date on changes made by others (05:26)
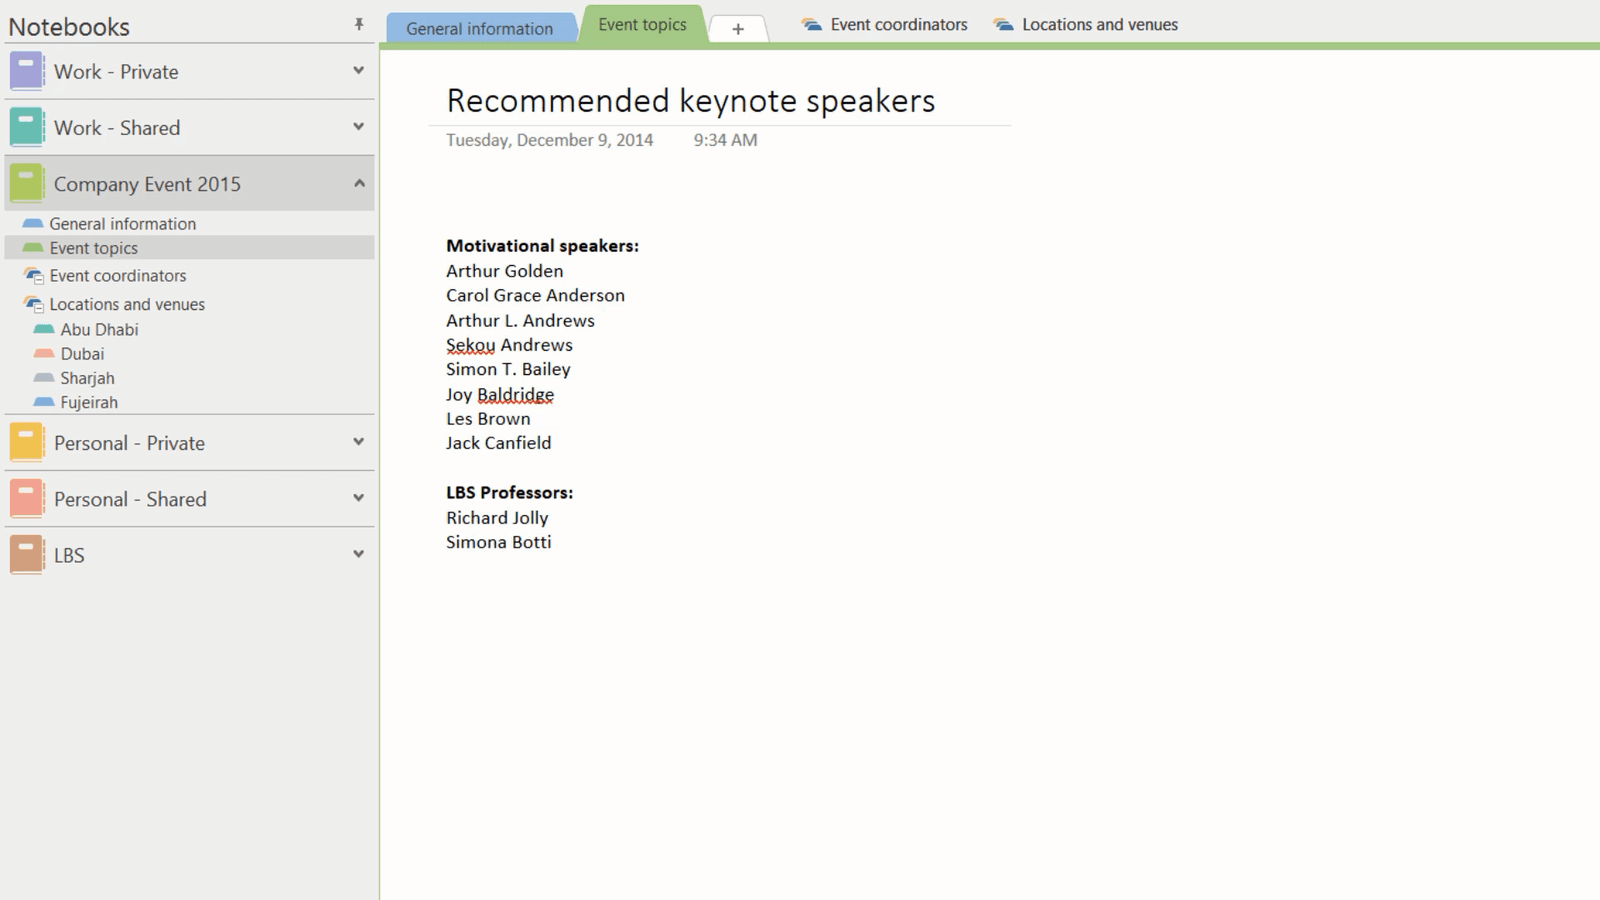
All sections and pages that have been changed are highlighted in bold. Here I can see that Nourah has added some more names to the “Recommended keynote speakers” list. All changes are highlighted in green. I can also see Nourah’ s initials next to the text and if I hover over her initials I can see when the modifications where made.
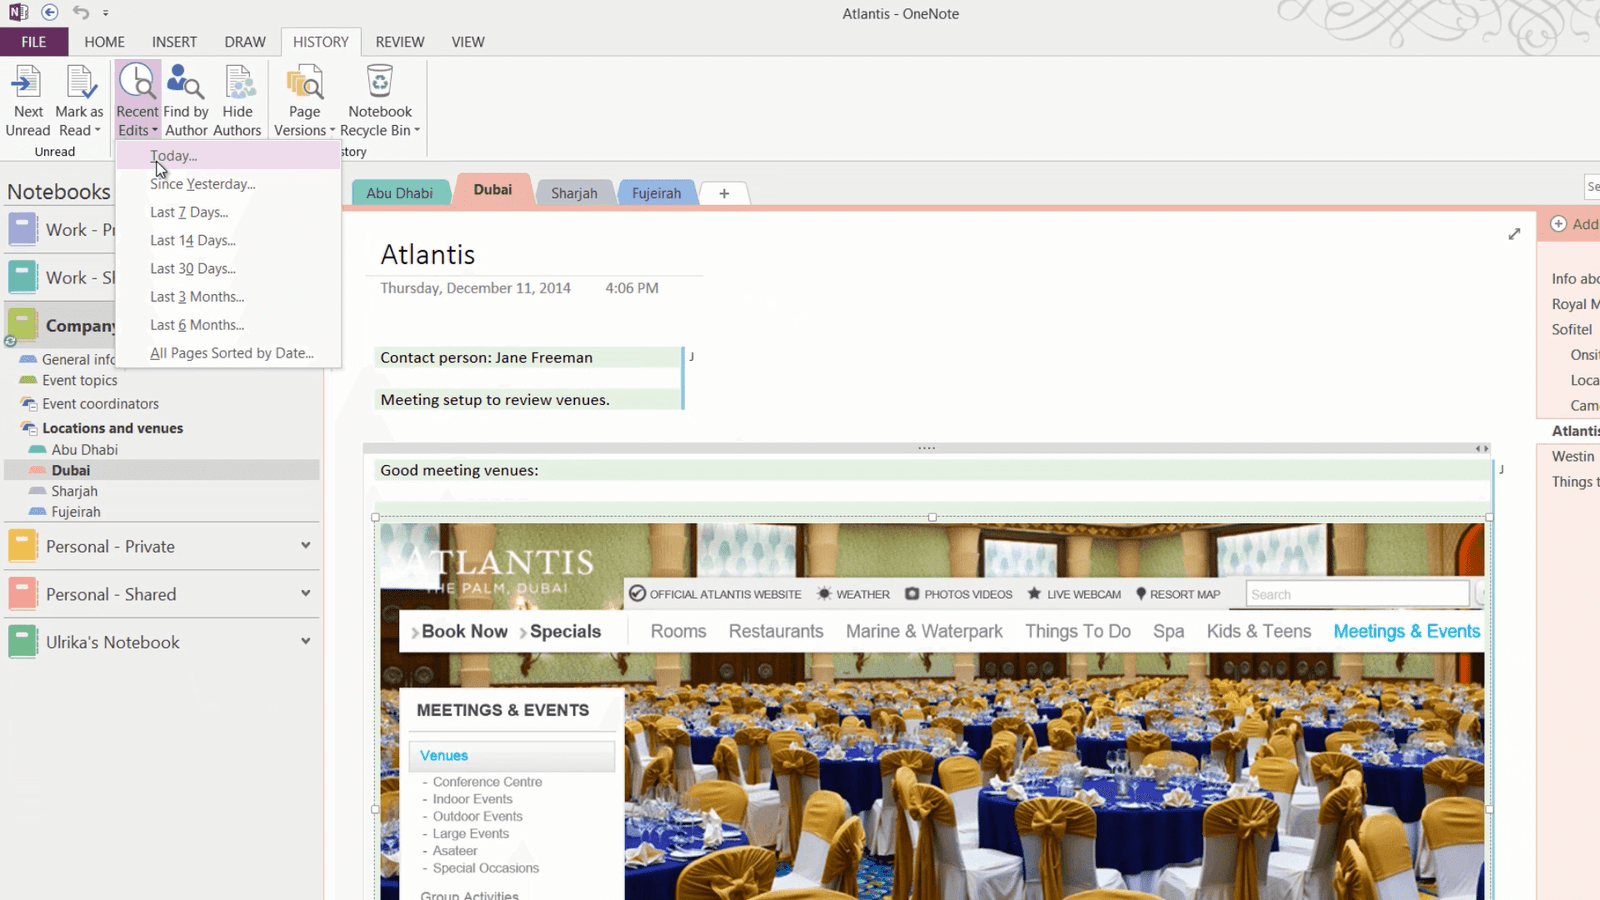
I’ll go to the next section called “Dubai” that is also in bold and go to the page named “Atlantis”. Here I can see changes made by Jacob. To get a good overview of all the changes made to a notebook, click the “HISTORY” tab and then “Recent Edits”.
Here you can select the time frame. I’ll select “Today”. The Search Result panel opens up. You can select how you want the changes sorted, by location in the notebook, by date or by author. I’ll leave the default which is by date. In the search pane I get a summary of all the pages that have been modified and I can easily step through them one by one.
To remove the green highlighting, on the “HISTORY” tab click “Mark as Read”. Here you can select between marking the page as read, or marking the whole notebook as read removing all green highlighting and bold page and section titles. Only the initials of the authors remain. If you want to hide the initials, on the “HISTORY” tab, click “Hide Authors”.
I’ll close down the search pane with the recent edits.
Co-authoring in real-time (06:57)
When you are collaborating on a notebook you don’t have to worry about logging out of the notebook before someone else can make changes. Everyone can make changes at the same time. Here for instance I can see that both Jacob and Nourah are adding text to the same page. Being able to co-author notes together in real-time is extremely powerful and can be beneficial in a number of different scenarios. Once I’m up to date on all of their changes I’ll click “Mark as Read” to remove the green highlighting.
Using page versioning (07:29)
If multiple people are working on the same notebook there might be occasions where you want to go back and see what the initial page looked like before any changes were made. Here I’d like to see if any names have been removed from the initial list of speakers I added. To see previous versions of a page, click the “HISTORY” tab and then “Page Versions”.
You will see subpages of the current page marked with dates. Every time someone makes changes to a page a new subpage is created. To see the original page click the subpage at the very bottom. Here I can see the original page I created with the list of speakers. To restore a previous version of a page, right-click and select, “Restore Version” you can also make a copy of the page if you want to keep both versions.
Here I just wanted to see if any names had been taken off the list, but all names remain. To only show one version of the page again, click “Page Versions”.
Saving a snapshot of your notebook (08:33)
Now I want to share a snapshot of the notebook with a potential vendor. I don’t want to give continuous access to the notebook since I don’t know if we will be working with the vendor or not. To export a snapshot of your notebook to for example a PDF file , click the “FILE” tab and then ”Export”.

Select what you want to export – a single page, a section or the entire notebook. Here I’ll select the entire notebook. Then select which format you want to export the notebook to, here I’ll select PDF and then click “Export”. You notebook is converted into a pdf document with multiple pages. Now you can easily share the pdf document with others. I’ll add the pdf file as an attachment to my email and send it off.
Closing (09:25)
As I hope you have seen, sharing a notebook with others using OneNote is extremely flexible. You can share notebooks in a number of different ways to make sure everyone stays up to date on the information they need.
Prepare and conduct professional job interviews
Introduction (00.04)
Conducting a professional job interview can be quite challenging. You need to prepare properly for the interview and then you need to capture everything that is being said.
In this video you will learn how you can use OneNote to prepare and conduct a professional job interview. You’ll learn how to gather and organize candidate information, how to protect sensitive information using passwords and how to record what is being said during the interview.
Organizing job interview notes (00:33)
In my work notebook that I share with a number of my colleagues I’ve created a Section Group called “Job Interviews”. Here we have sections for each new open position we need to fill. Here we have a section for a new Sales Representative that we are looking to hire.
On the first page in every section we have written down the job description, on the second page the questions I’ve prepared to ask the candidate. I like having a set of prepared questions to ask the candidates, this way I don’t have to improvise during the interview and it’s easier for me to compare their responses.
Saving a page as a OneNote template (01:10)
You can save a page as a template in OneNote to have easy access to it from all your notebooks. To save a page as a template click the “INSERT” tab and then “Page Templates”.
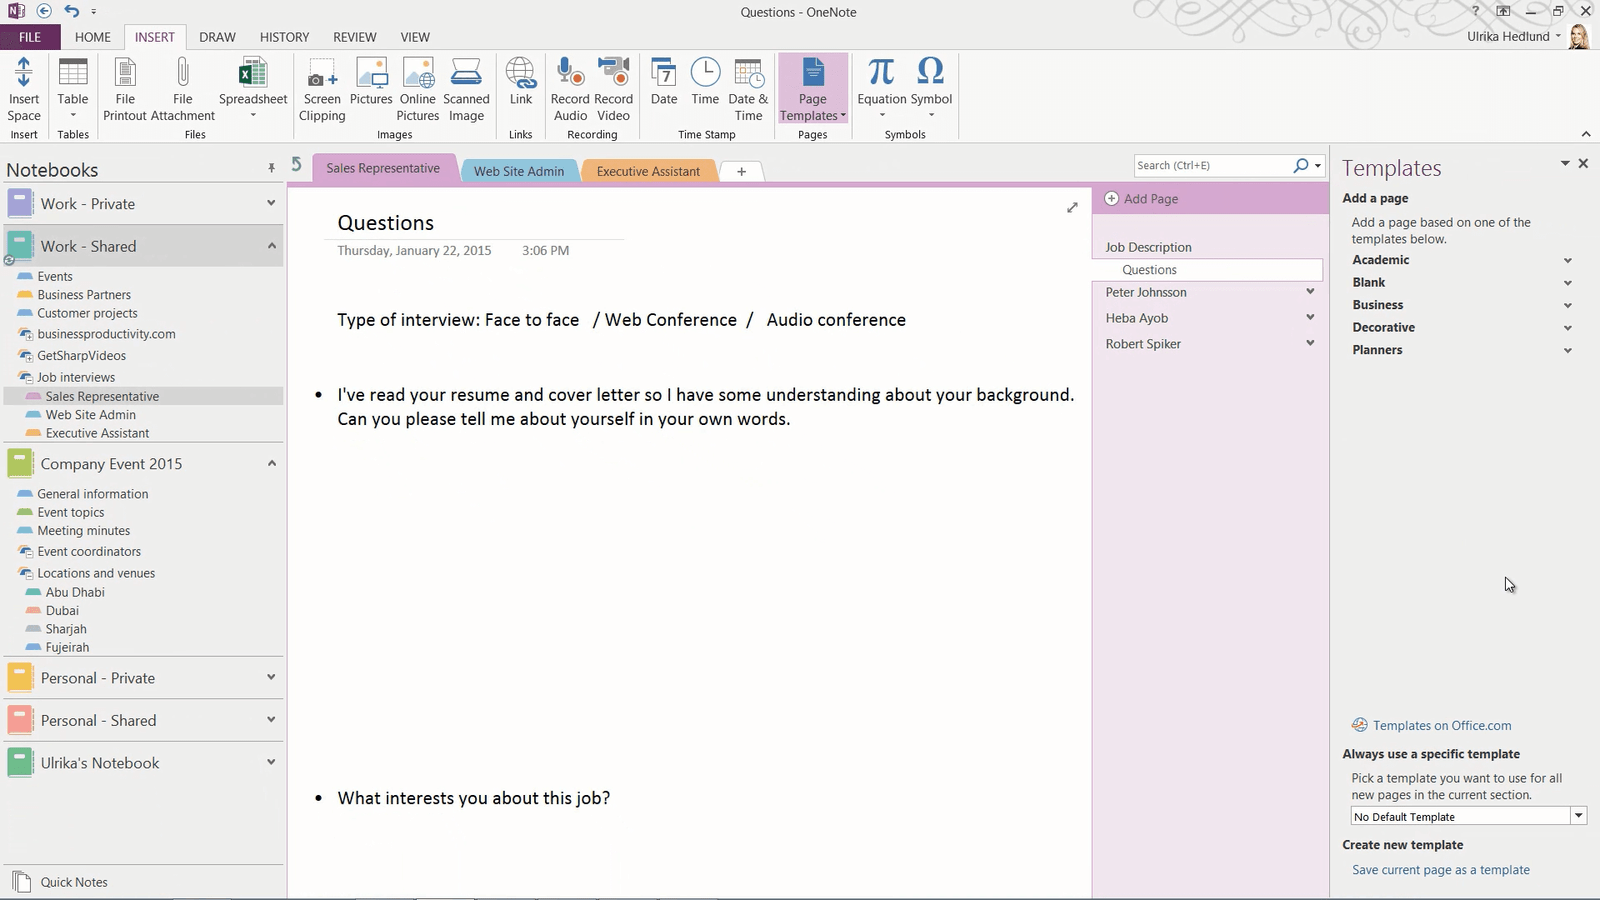
Here you will find a number of online templates that you can use. You can expand the different categories to see the names of the templates in each category. To save your own page as a template go to the very bottom and click “Save current page as template”. Give your template a name, I’ll name this “Job interview questions” and then click “Save”. A new category is created called “My templates” where you can find your newly created template. I’ll close down the template pane to go back to my notes.
Organizing notes for each candidate (01:53)
For each candidate that has applied for the job we create a number of pages. The first page with the candidate name, contains a file print out with their resume and cover letter. Here I take notes if there is anything that I want to bring up during the interview. I also have a page with recommendations. Here you can see that I have received an email from a business partner who is recommending Robert for this position. I have a page with other online research and a page with my handwritten notes that I have taken during the interview. I use a device with a digital stylus so that I can take handwritten notes directly on the screen in OneNote during the interview. I would not recommend that you take notes by typing on a keyboard, if you do this you will distract the candidate and you won’t be able to make eye contact.
Finally I have a conclusion page where I write down whether or not we should proceed with the candidate, pros and cons and areas for further probing.
Creating pages for a new job candidate (02:50)
Today I have an interview with a new candidate for the Sales Representative position. I’ll click “Add Page” and then write her name. To insert a resume, on the “Insert” tab, in the “File” section I’ll click “File Printout”.
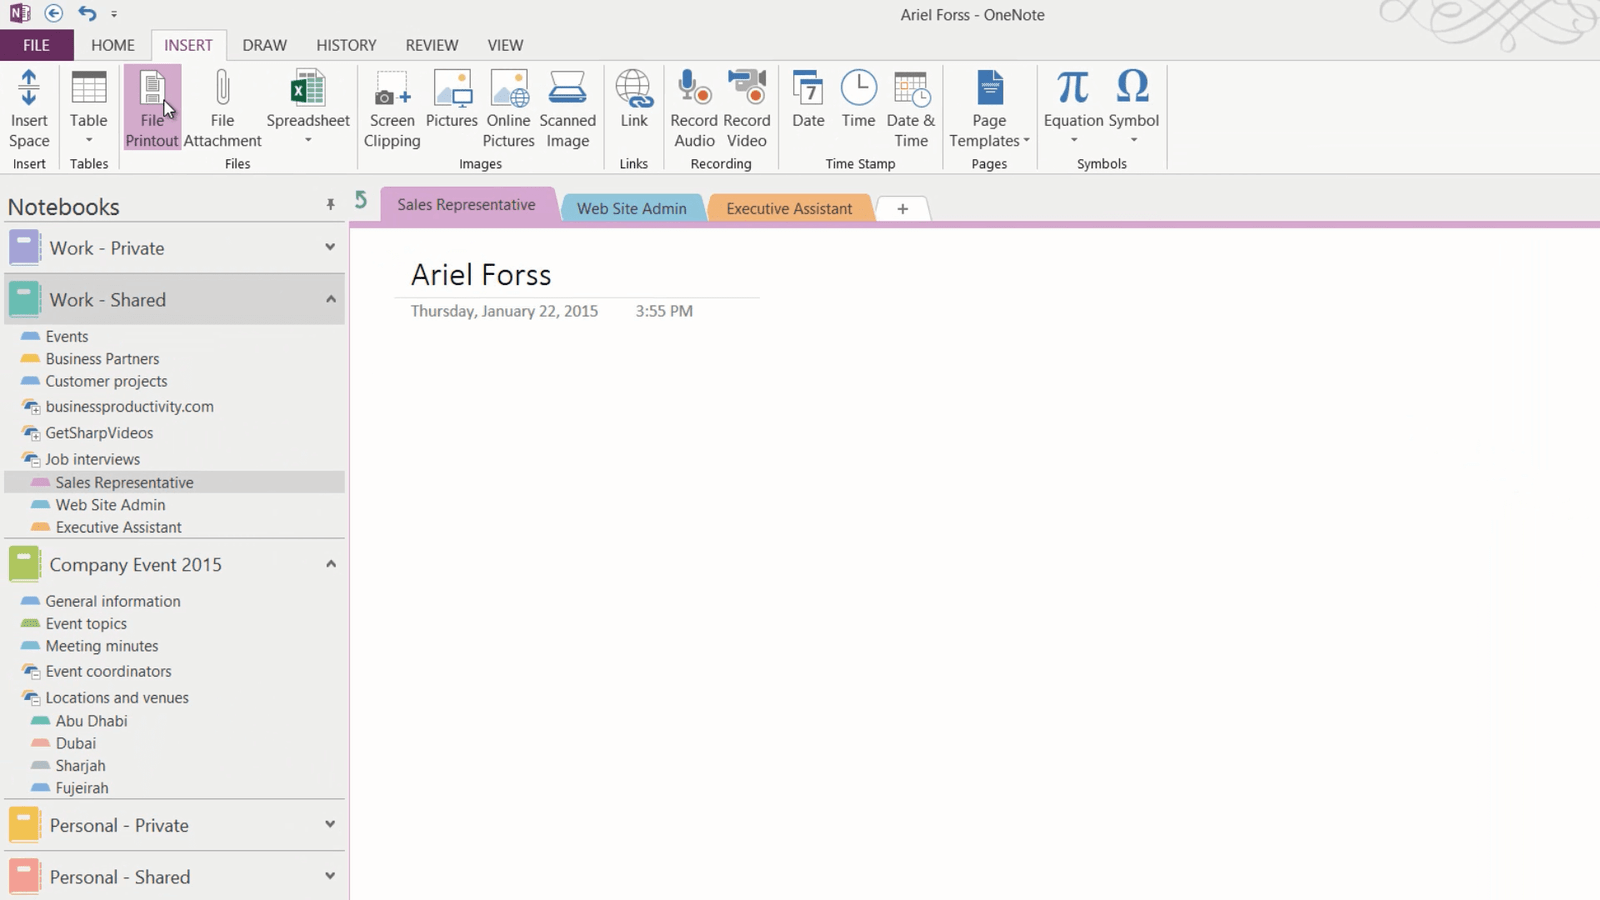
I’ll select Ariel’s resume and click “Insert”. The link to the actual document is inserted to my notes as well as images of her resume so that I can easily take notes on top of her resume. I’ll click File Printout again and insert her cover letter as well.
I’ll add one more page by right-clicking and selecting “New Page”. You can also use the keyboard shortcut CTRL N. I’ll right-click the page and make it into a subpage by clicking “Make Subpage”, then I’ll name the page “Recommendations”.
I’ll open up Outlook where I have an email from an acquaintance who recommends Ariel for the job. Under the “HOME” tab in Outlook I’ll click “OneNote” to send this email into my OneNote notebook.
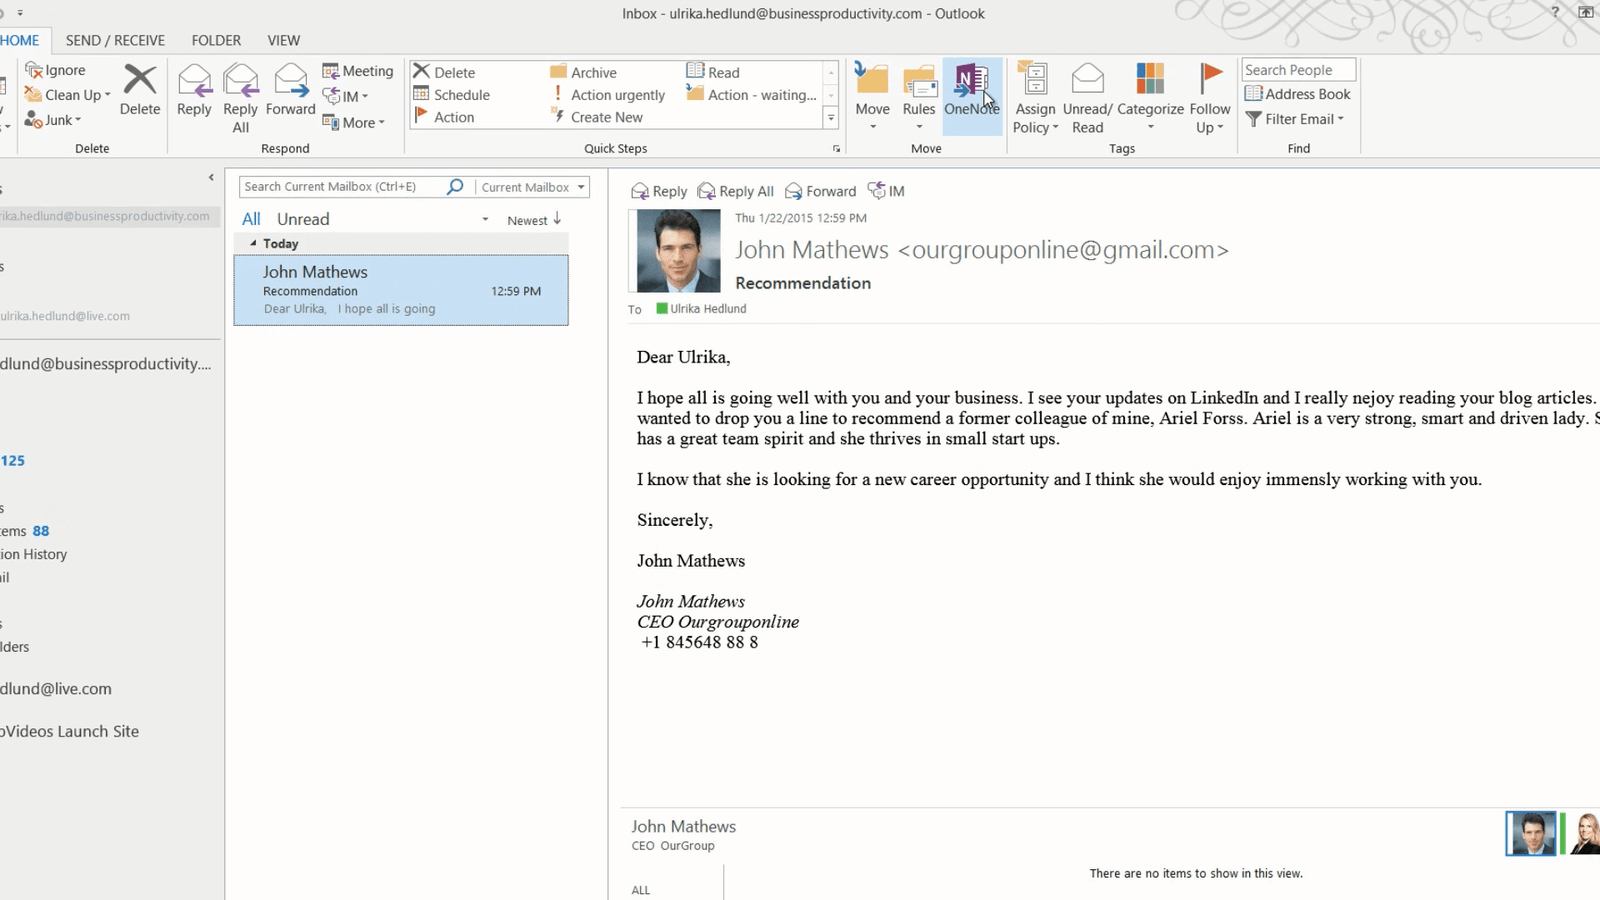
I’ll select to send it to the current page I just created called Recommendations and click OK. The email is sent to my notes where I will keep it as a reference.
Add online research notes to your notebook (04:06)
I’ll create another page called “Other Research”. Here I want to collect some information about the candidate on the Internet. To dock my notes while I do research on the web I’ll click the “VIEW” tab and then “Dock to Desktop”. OneNote resizes to make room for me to open up a web browser. Here I’ll choose to open up LinkedIn. I’ll do a search for “Ariel Forss” – and here I can see her profile picture and her current employer.
To insert this into my notes on the “INSERT” tab I’ll click “Screen Clipping”. I’ll insert the part of the page I want to insert into my notes, and the clip along with the web address is pasted into my notebook. Here you might want to do some additional research on other sites to get more background information on the candidate you are going to meet.
I’ll click the double-sided arrow to go back to full screen mode.
Inserting templates (04:59)
Now I want to insert a page with questions. To insert a page from a template click the “INSERT” tab and then “Page Templates”. I’ll open up My Templates and select the template called Job Interview Questions.
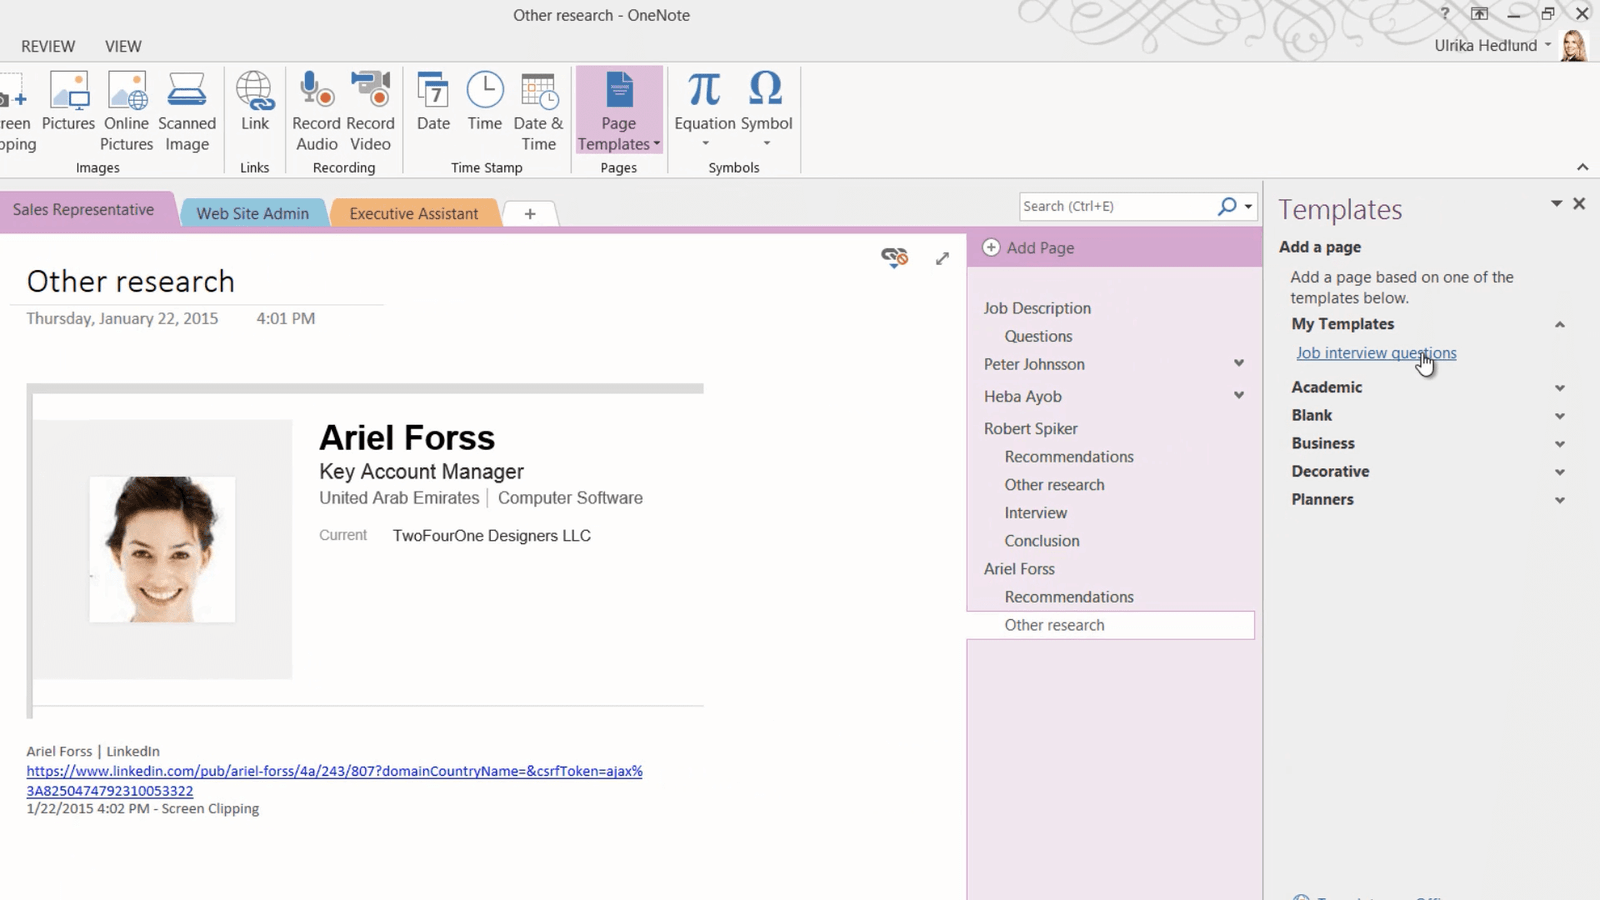
The page is inserted into my notebook. Here I’ll close down the Template Pane and make the page into a subpage.
Taking handwritten notes (05:21)
Right before the interview I’ll glance through Ariel’s resume again on my tablet device. Here I can see that there is a gap in her resume so I’ll just make a note to remind myself to ask her about it. I’ll also change the pen settings by selecting a highlighting pen to make some highlights in her resume.

When it’s time for the interview I’ll open up the Questions page and start taking handwritten notes directly into OneNote.
Recording audio during a meeting (05:48)
In addition to taking notes in OneNote you can record audio. This might be useful in certain interview situations where you want to make sure to capture exactly what is being said. You always have to ask the person you are meeting with if he or she is ok with being recorded. To start recording, on the “INSERT” tab, in the “Recording” section click “Record Audio”.

A recording icon with a time stamp is inserted into your notes. At any time you can open up the recording menu where you can select to pause or stop the recording. When you are done with the interview click “Stop”. The recoded audio is saved with your notes.
Reviewing your notes (06:30)
After the interview I’ll spend some time to review my notes. When you click on a page that has audio recorded a PLAYBACK menu appears where you have option to listen to the recorded audio.

You can play the entire recording from the beginning by clicking “Play”, or if you want to listen to what was being said at the moment you wrote something down, you can move your mouse cursor over your notes. You will see little Play buttons, just click on a play button to listen to what was being said at the point in time when you took those notes.
”Former athlete you say? In what sport?”
Click “Stop” to stop the playback. The audio quality will vary depending on your device and the room where you took the recording.
Once I’ve gone through my notes and added some additional thoughts on the first impression, my perception of her communication skills and so on I’ll write down my final conclusions on whether or not to proceed with the candidate and a summary of the pros and cons.
Protect sensitive sections with a password (07:31)
The notes related to job candidates are quite sensitive and even though I’ve only shared this notebook with a selected number of team members I can choose to protect the contents of the notebook even further by adding a password.
To add a password to protect your notes, right-click the section tab and select “Password Protect This Section”.

You are unable to protect entire section groups, so you need to set passwords for each section you want to protect.
The Password Protection panel opens up where you have the option to set a password. Click “Set Password”. Type in a password of choice, confirm it and then press OK. All the pages in the section are protected and can’t be opened without providing the correct password.
Let’s switch over to Nourah to see what this looks like when she tries to access the section. I have previously shared the notebook with Nourah so she can access the full notebook. However, when she tries to open up the section on notes related to the candidates for the Sales Representative role, the pages are not visible. She needs click the page and then enter the password and click OK.

By password protecting your sections in OneNote you have even more control of who gets to see what.
Closing (08:50)
Organizing your notes like this for interviews is one way of preparing and conducting an interview. I hope you got some ideas and inspiration for how you can use OneNote during your interviews.
Get organized with a digital notebook
Introduction (00:04)
Most of us collect a lot of information on a daily basis. We take meeting meetings, we collect articles of interest, and we jot down ideas and thoughts. No matter if you have modern tablet or if you’re working on a traditional PC, OneNote is a fantastic tool for organizing information. In this video you will learn how to get started with OneNote, how to create notebooks, how to effectively organize your notes and how to quickly find what you’re looking for.
Getting an overview of OneNote notebooks (00:34)
We are planning an offsite company event. I’m going to create a OneNote notebook to gather information related to the event. To open up OneNote on my Windows 8 laptop, I’ll just search for it. I’ll open up Windows Search by pressing the keyboard shortcut Windows key + S and start typing in OneNote. The full desktop version with the richest functionality is called “OneNote 2013”.

OneNote always opens up where you last left off. On the left hand side, in the navigation pane, you can see a list of all currently active notebooks. Here you can see that I have 4 notebooks. Click on the arrow next to the notebook name to expand the view to see the full contents. The first notebook contains my work-related notes.
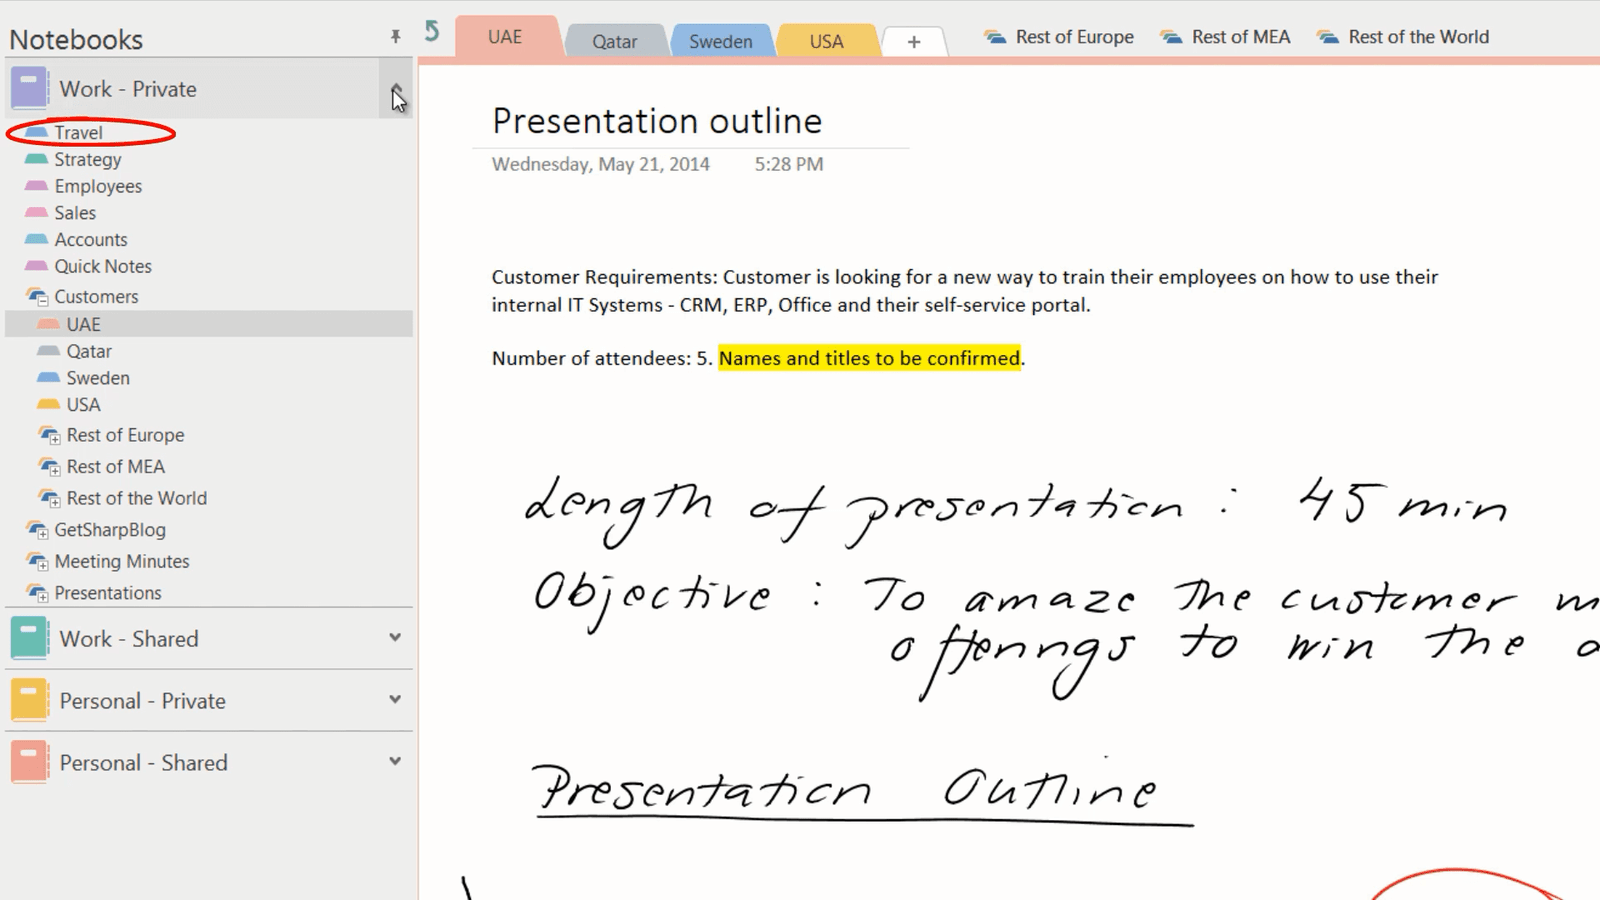
Here I gather information related to my travel, thoughts and ideas on strategy, customer information, blog articles and so on.
Notebooks are organized into sections, pages and subpages. You can also create section groups that contain multiple sections and more section groups.
I have one more notebook for work. This is a shared notebook that members of my team have access to and that we collaborate on.
I have a personal notebook where I keep notes related to purchases I’ve done, personal development and so on. The last notebook contains personal information that I share with my husband, things related to the family, investments and vacations.

If you don’t want to see the full list of notebooks, you can collapse it by pressing the push pin. To select which notebook to use, just click the drop down arrow. Personally I prefer seeing the notebook navigation so to open it up just press the drop down arrow and press the push pin again.
Creating a new notebook (02:31)
Now I want to create a new notebook for the off-site company event. To create a new notebook, click “FILE” and then ”New ” Here you need to decide where to save the notebook. By saving your notebook to SharePoint or OneDrive you can access it from a wide range of devices, your notebook is securely backed up and you can share it with others. Here I’ll select to save it to my OneDrive business account in a folder I’ve created for my notebooks.

I’ll give the notebook a name, “Company Event 2015” and then click “Create”. Once the notebook has been created you’ll be asked if you want to invite other people to share the notebook with you, here I’ll select “Not now”.
Creating Section Groups, Sections, Pages and sub-pages (03:17)
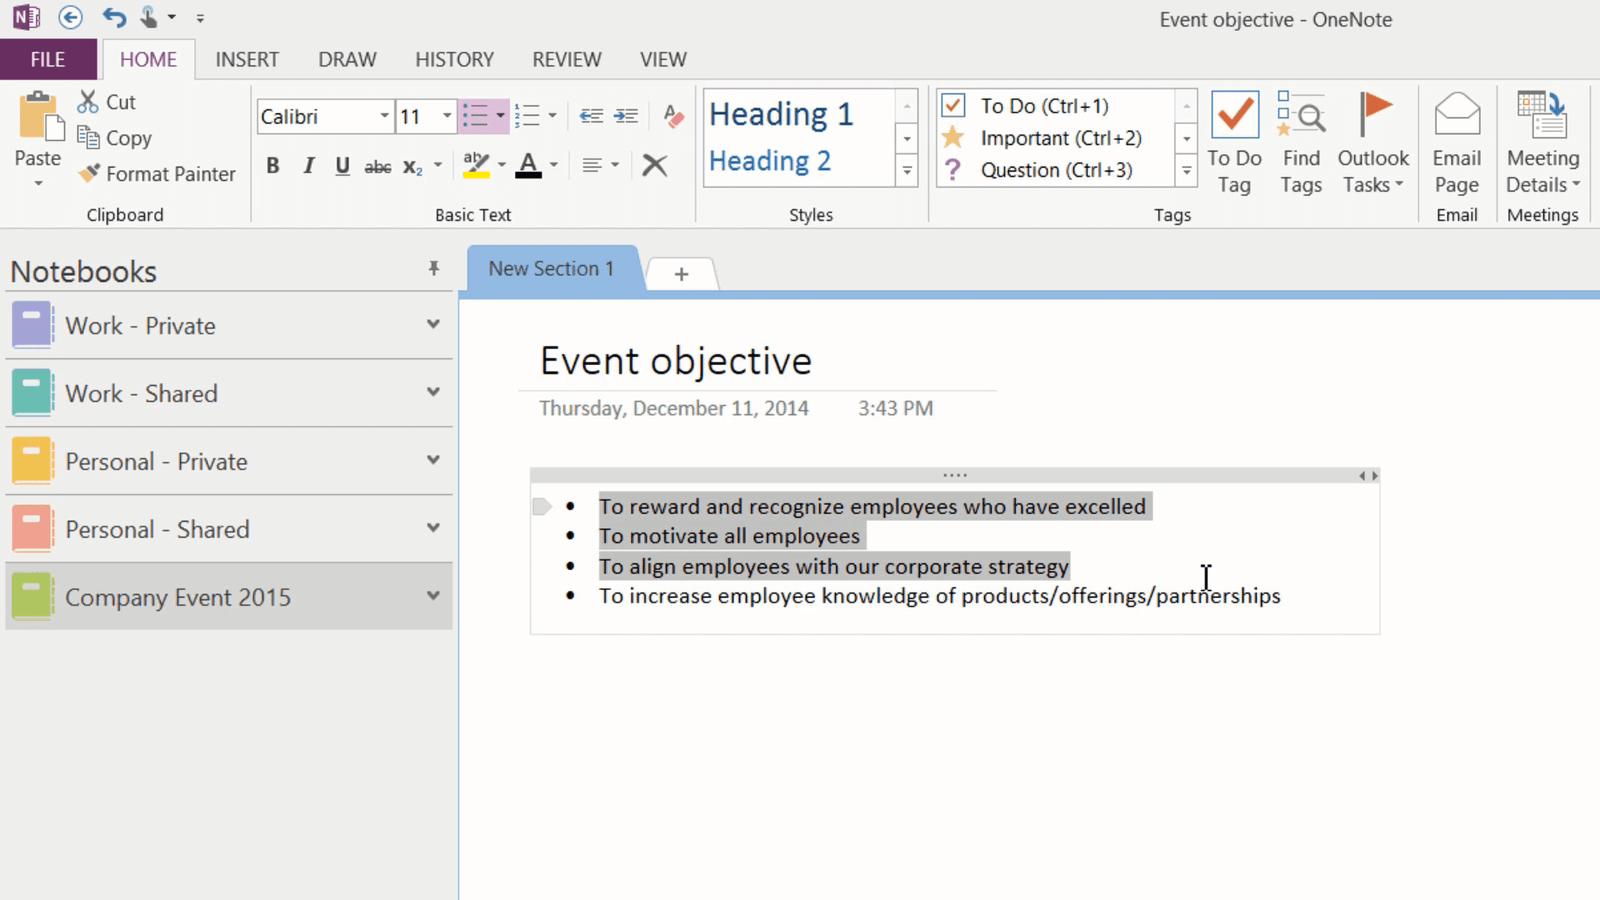
When you create a new notebook a section and a new page is automatically created for you.

Every time a page is created in OneNote, the date and time of creation is added to the page. Here I’ll write the page title “Event objective” and list some of the key objectives for the event.
Unlike in other Office applications, you never have to think about saving your work in OneNote. Everything is automatically saved for you. I’ll right-click the “Section” tab and select “Rename”.

I’ll name this section “General information”. To add a new page click the plus sign where it says “Add Page”. Here I’ll add a page with proposed dates for the event.
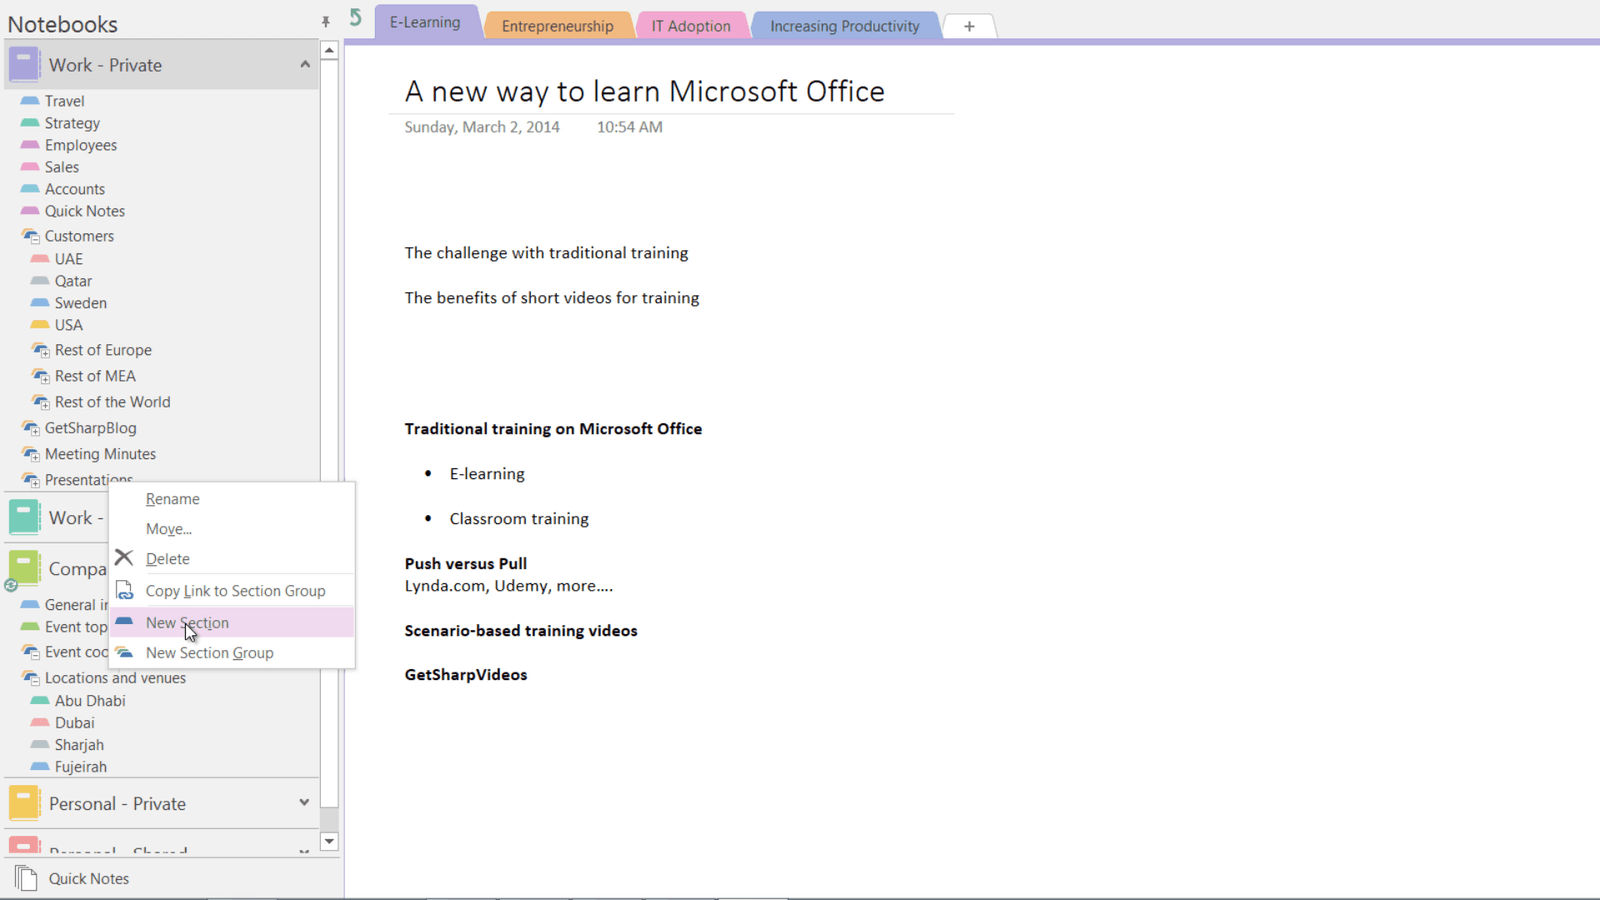
To add a new section click the tab plus sign and give it a name, I’ll name this “Event topics” and then I’ll add some initial thoughts about the keynote.
To create a section group, right-click above the page and select “New Section Group”. I’ll name this “Locations and venues”.
Inserting screen clips (04:24)
I’ll name the first section “Abu Dhabi” and create a page with general information about Abu Dhabi from Wikipedia.
To insert a screen clip into OneNote open up the web page or application you want to take the screen clip from, here I’ll open up Internet Explorer and do a search for Abu Dhabi on Wikipedia. Here, I’ll scroll down to see the information I want to take a screen clip of. Open up OneNote again, click the “INSERT” tab, and then “Screen Clipping”. The most recent application opened will go white, hold down the left mouse button and select your clip.

The clip is saved to your notes together with the link to the web page, as well as the date and time the clip was taken. Another, quicker way to do this is to open up the window you want to capture a screen clip from, press the keyboard shortcut Windows key + S or Windows key + Shift + S if you are using Windows 8.1 or later. You will be asked where you want to place the screen clip. I’ll select the current page. If you always want to place the screen clip in the current OneNote page, mark that option and then check the box, “Don’t ask me again and always do the following”. Then click “Send to Selected Location”.
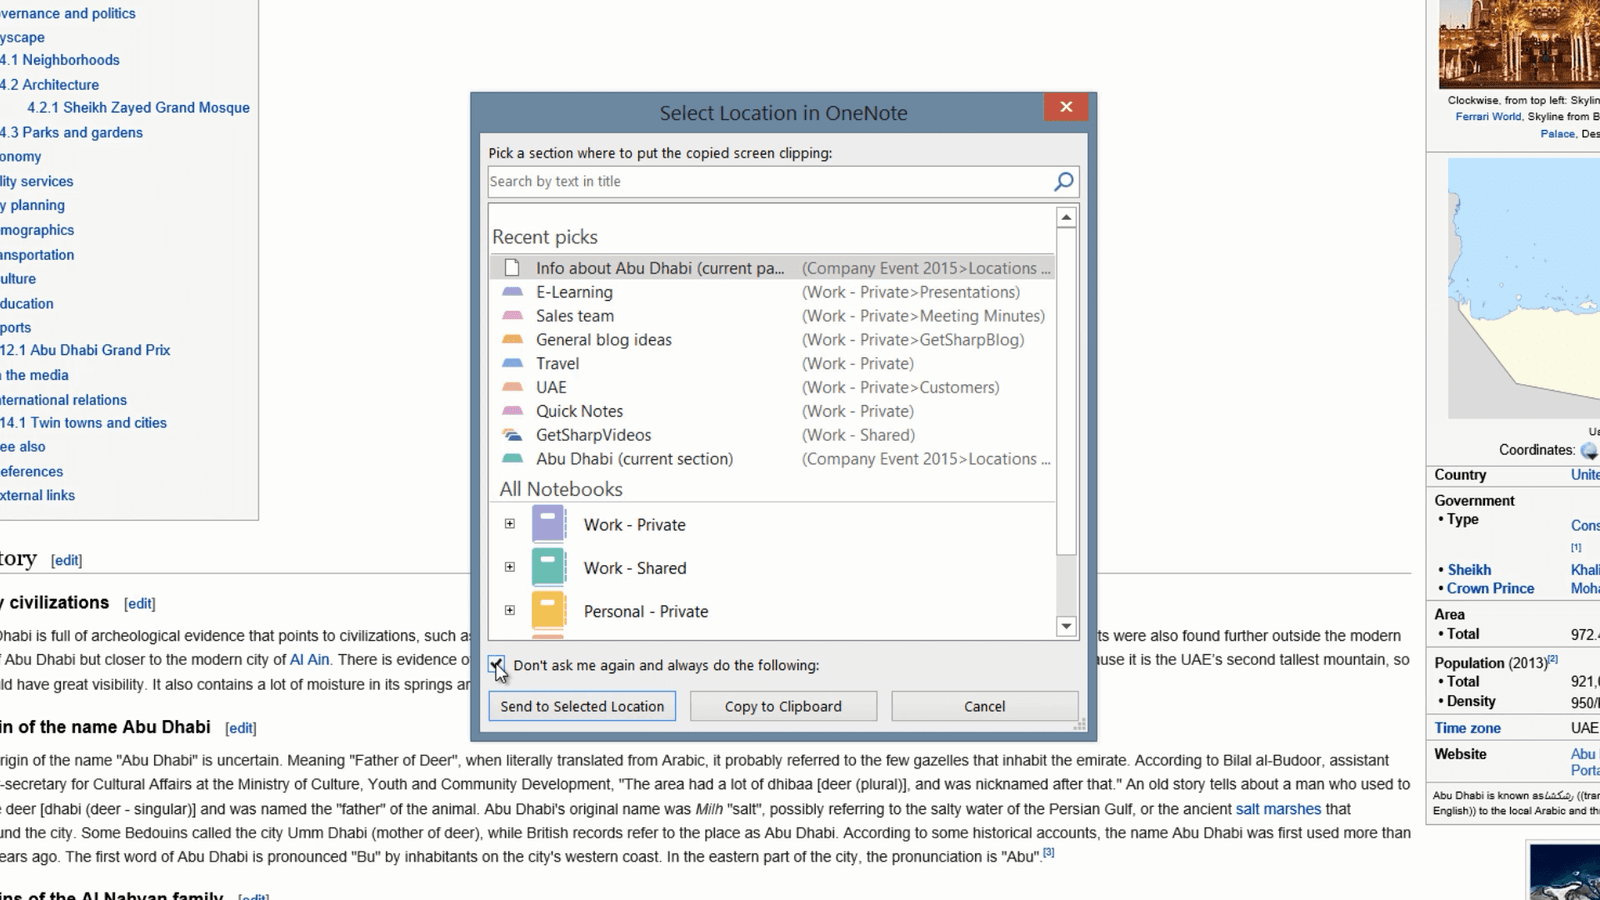
Open up OneNote and there is the screen clip.
I’ll continue to add more information about the planned event to the notebook.
When you add a new page, the page is placed at the bottom of your page list. If you want to place a new page somewhere else, place your marker where you want to add the page and click the little arrow with a plus sign.

Here I’ll add a page about things to do in Abu Dhabi.
Re-arranging your notebooks (06:10)
You can easily re-arrange notebooks, sections and pages. To move a notebook, hold down your left mouse button and drag it to where you want it. You can also right-click and select to move it up or down.

To move a section hold down the left mouse button and drag and drop it to the desired location in the notebook navigation pane, or open up the section group and re-arrange sections there.
Unfortunately you can’t change the order of section groups, these are sorted alphabetically by OneNote.
To move a page within the same section just drag and drop it within the page list. To move a page to another section you can drag and drop it onto the desired section. The page is moved to the end of that section page list. Another way to move a page is to right-click and select “Move or Copy”.

A window opens up where you can select where you want to move the page. Select the desired location and click “Move”.
You can also arrange pages into different levels using subpages. To organize pages into subpages, mark the pages while holding down “CTRL” on your keyboard, right-click and select “Make Subpage”.
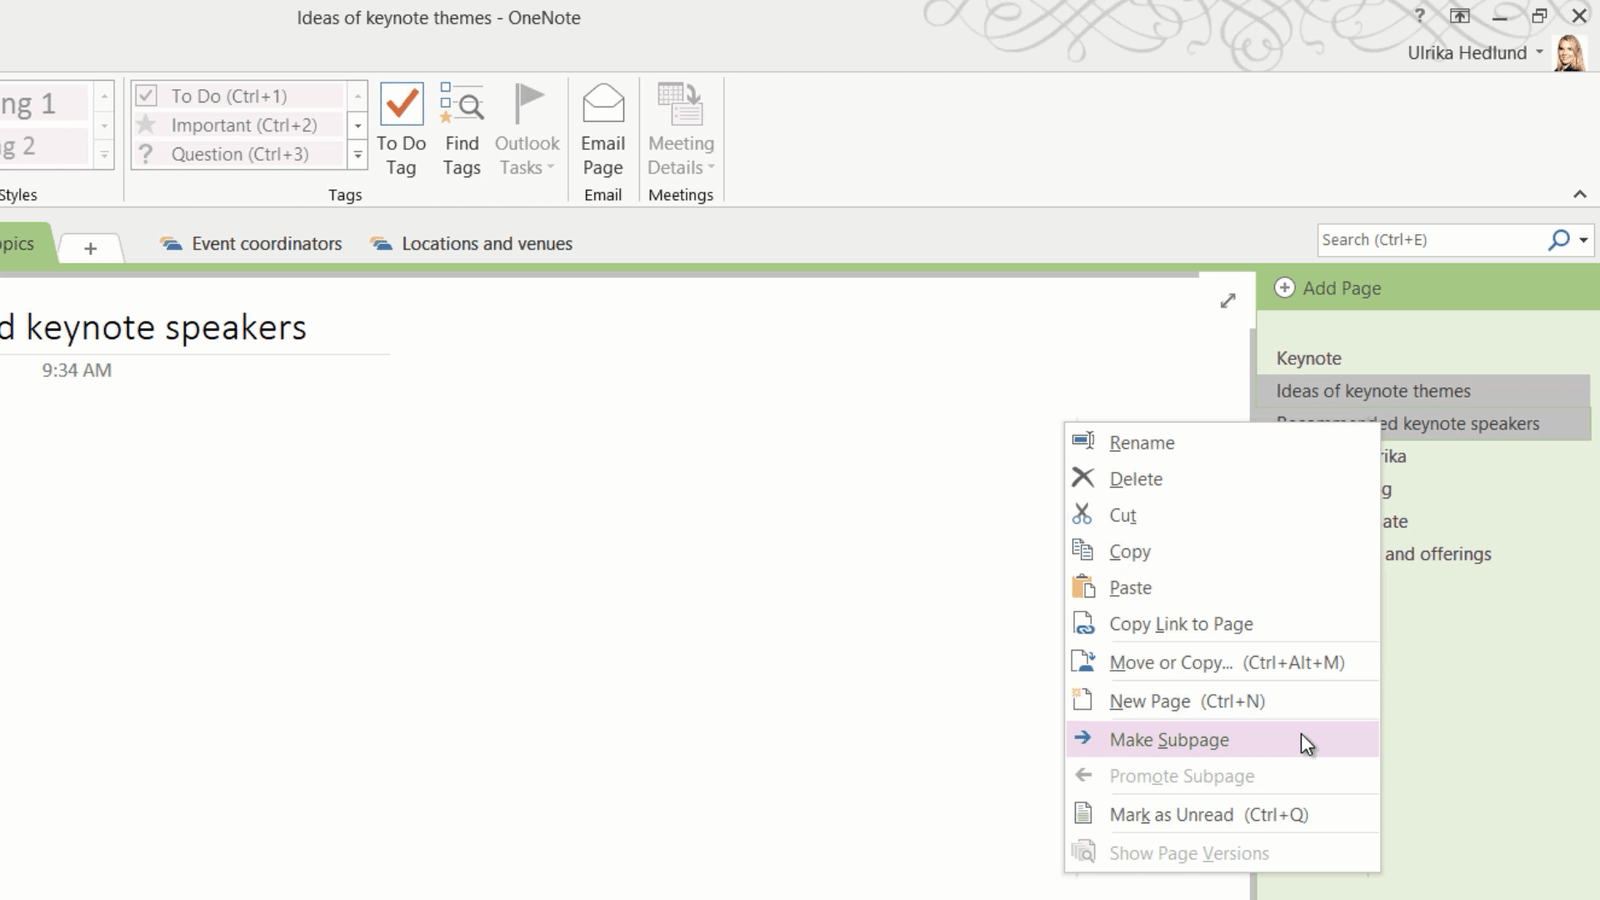
The pages are indented so that you can clearly see that they belong to the page above. You can collapse your subpages by clicking the arrow on the top page, to expand the pages again just click on the arrow and the subpages become visible.
Opening an old notebook (07:48)
I’d like to invite some external inspirational guest speakers for the keynote. Here I’d like to add the name of the professor I had in Brand Management at London Business School. I don’t remember her name, but since I can access notebooks from years back in time I’ll open up my old notebook from when I did my executive MBA. To open up a notebook click “FILE” and then “Open”, navigate to the folder where the notebook is located. Here I’ll select my “Archived notebooks” folder and my notebook from LBS.

Select and click “Open”. My old notebook is added to OneNote.
Searching your notes (08:27)
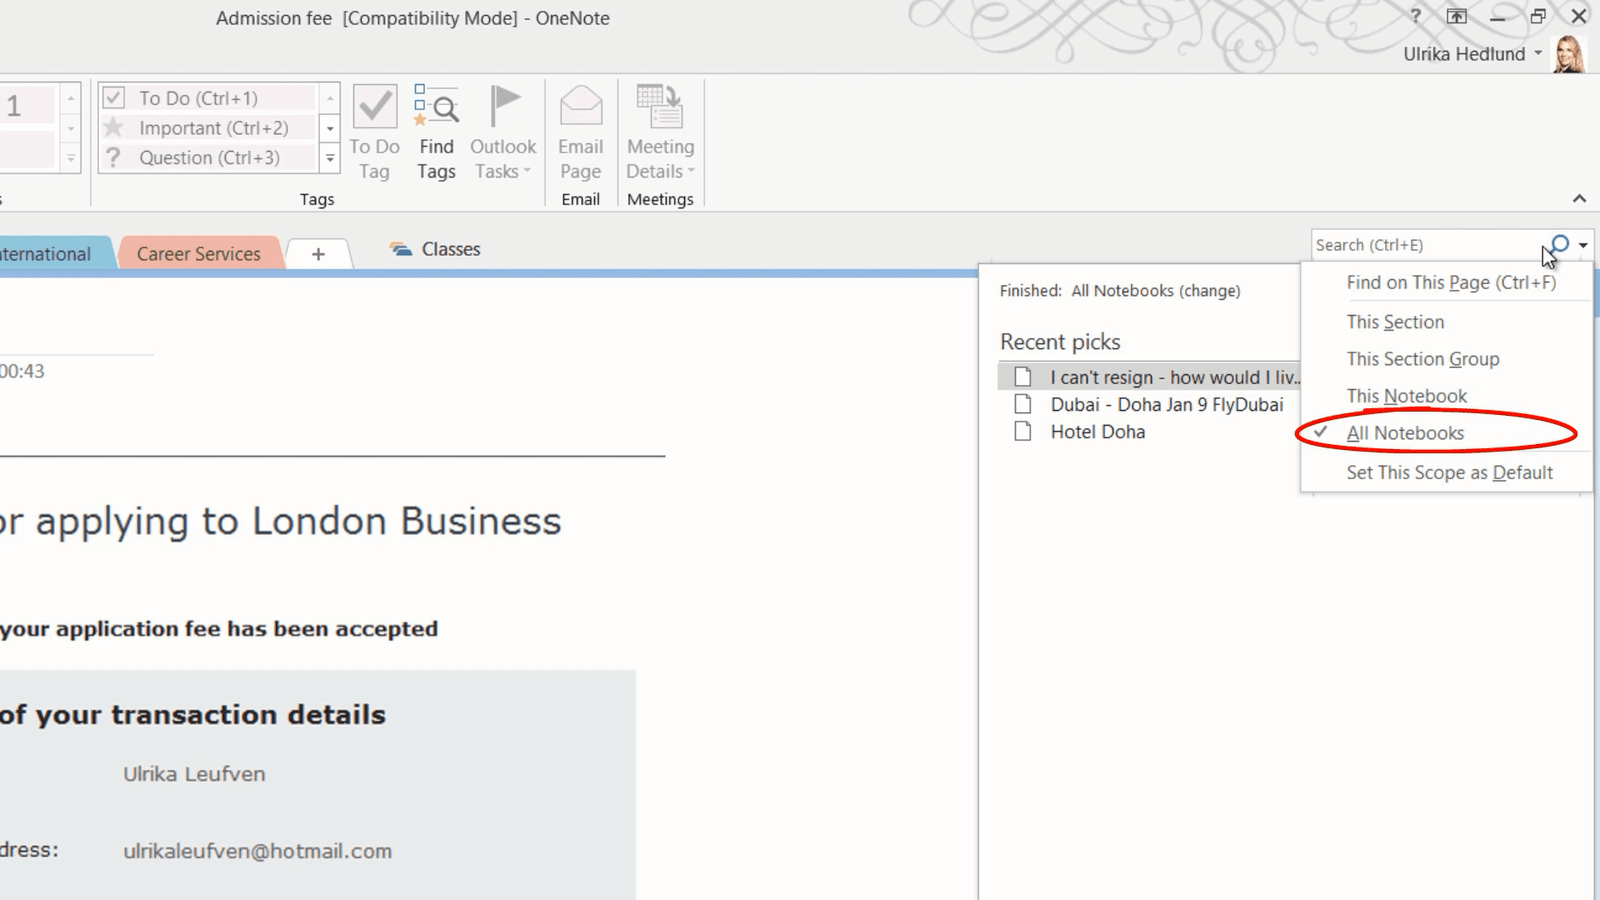
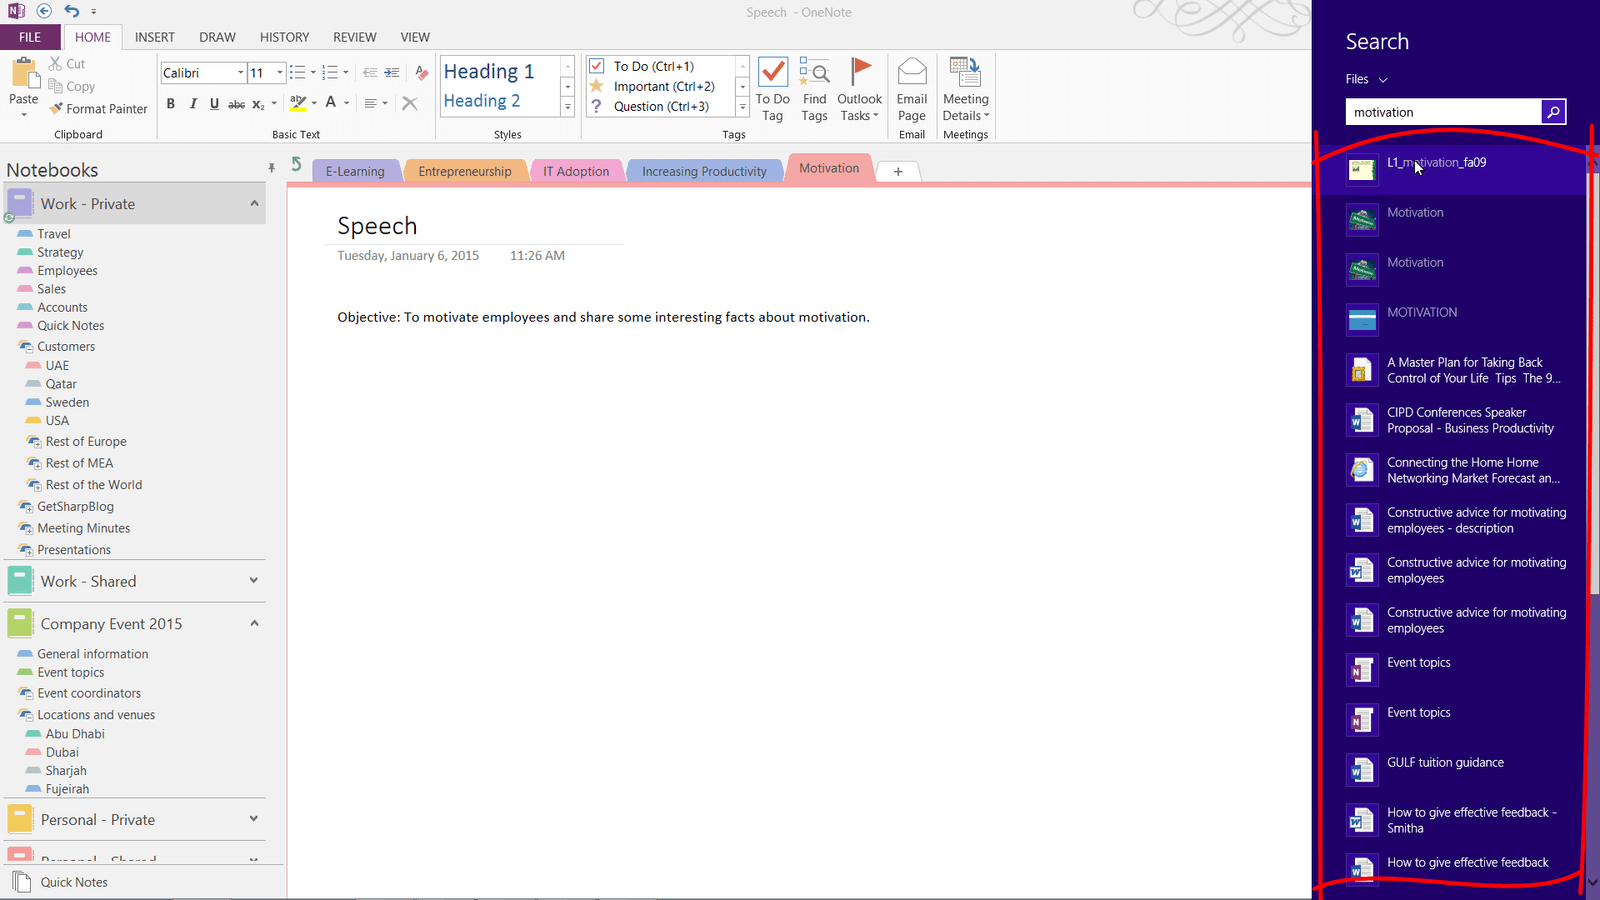
To search your notes, type in what you are looking for in the little search text box in the upper right corner, or press the keyboard shortcut CTRL + E. To change the search scope, click the little arrow next to the search field. I’ll leave the default which is “All Notebooks”.
To find the name of the professor I had in Brand Management, I’ll search for “Professor Brand”. I’ll select this page called “Elective Walkthrough”. Even though I’ve taken these notes by hand, OneNote can search them. To dock the “Search” pane, click “Pin Search Results”.

Here I can see that I’ve written down the professor’s name for Brand Management, however, I don’t know if this is the correct spelling. I’ll do another search for “Simona”. Here I have a screenshot from her lecture. The search engine is very powerful. It can even search for text in images. Here I can see that her name is written in the bottom of the lecture slide. Now I can go back to my page of potential guest speakers and add her correct name to the list.
Closing a notebook (09:37)
Since I don’t need the notebook from LBS anymore I’ll close it down. To close down a notebook, right-click and select “Close This Notebook”. This doesn’t delete the notebook, it just removes it from the notebook list view.
Closing (09:52)
Now that you know how to organize your notes, you’ll save a lot of time.
Gather and keep track of your research
Introduction (00:04)
In most jobs you need to do some kind of research. You might want to research a topic for a presentation you’re delivering, a product you want to purchase or an article you’re planning to write.
In this video you’ll learn how to use OneNote to effectively structure your research. You’ll learn how to collect information from various places, how to keep track of online sources and how to summarize everything you need to follow up on. Let me show you!
Typing notes in your notebook (00:33)
I’m giving a presentation about motivation at our company offsite. I’ll open up OneNote to start collecting information about the topic. I’ll open the notebook that I use for work. Under the “Presentations” section group I’ll create a new section for my research. To create a new section, right-click the section group where you want to create the section and select “New Section”, or go to the Section Group and just click the tab plus sign.
Here I’ll create a section called “Motivation”. I’ll write a short objective for my speech. Now I want to gather some more information on the topic. I know that I have some good information about motivation already on my PC.
Sending documents to OneNote (01:20)
I’ll press the keyboard shortcut Windows button F to open up the file search in Windows 8. I’ll search for “motivation.” Here I can see a number of different results.
I’ll open up this PowerPoint presentation on “The Simple Secrets of Motivation” by Professor Henry Moon at London Business School. I’d like to include this into my notes. To insert a document printout into your notes, press the keyboard shortcut Windows key N to open up the “Send To OneNote” tool. Click on the second icon to send the current file you have open as a file printout to OneNote.
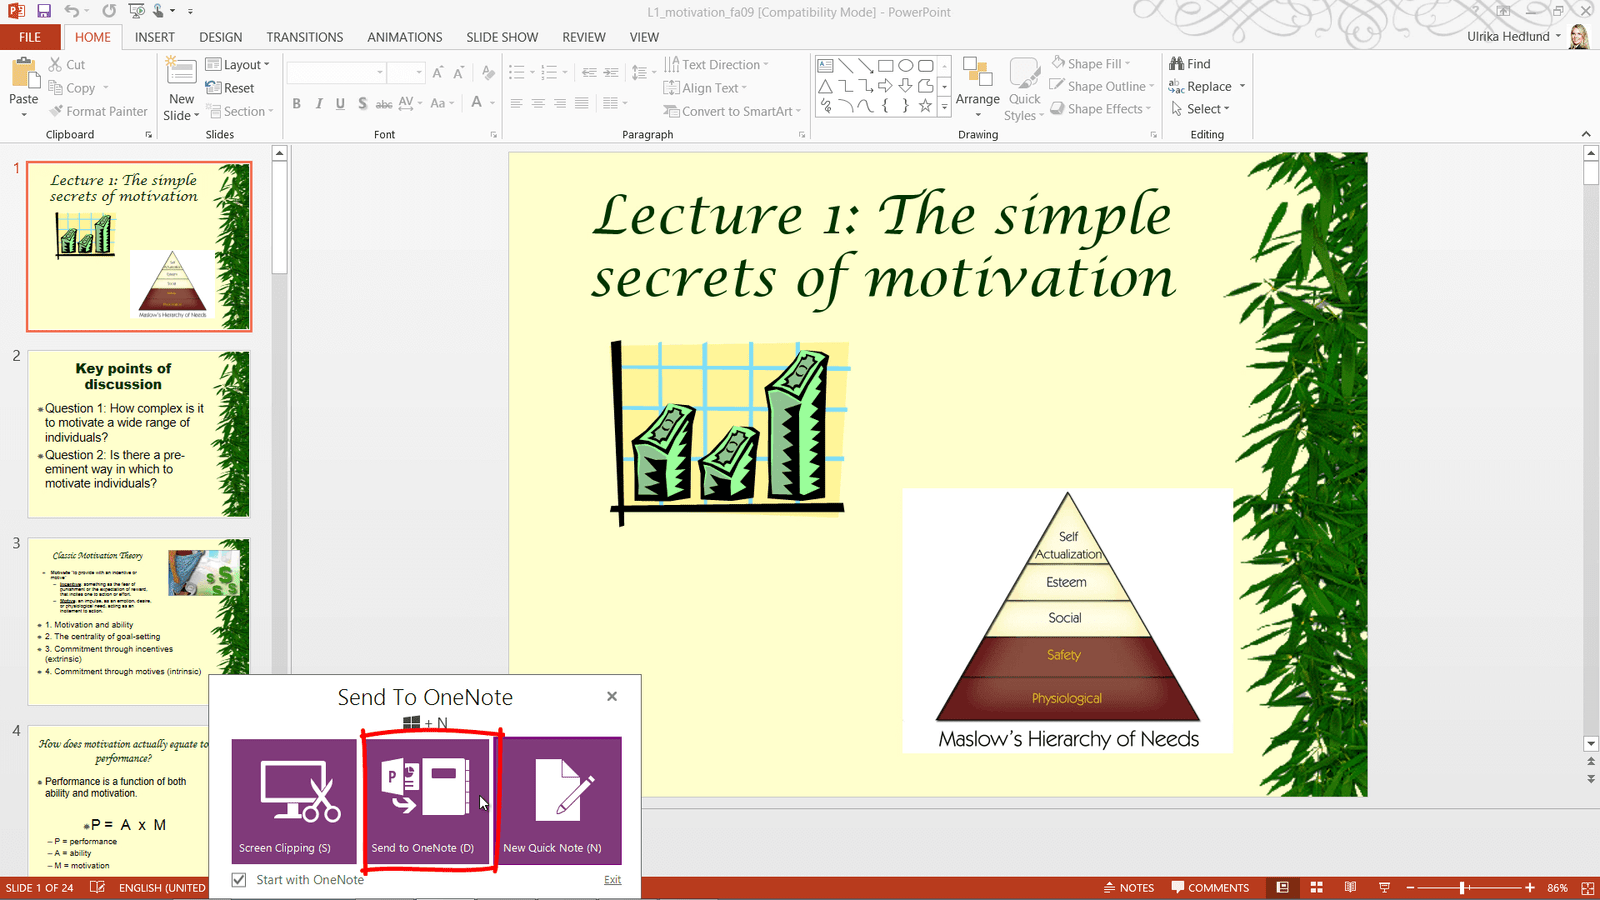
Here I get to select where I want the printout to be sent. I’ll select the current section and click “OK”. The document is converted into images and inserted into my notebook.
If you have a long document the pages or slides will be organized as sub-pages with one page or slide on each page. You can collapse the subpages by clicking the arrow on the first page.

If you prefer to have all the pages or slides inserted in a single notebook page you can change the settings by clicking the “FILE” tab, “Options”, “Advanced” and at the very bottom in the “Printouts” section, uncheck the option to insert long printouts on multiple pages and click “OK”.

With this setting applied, all the images will be inserted into one single page if you send the documents to OneNote.
Another way to send file printouts to OneNote is to go to the “FILE” tab and select “Print”, in the “Printer” selection select “Send to OneNote 2013” and then click “Print”. You can see the pages being printed in the notification bar. Open up OneNote and select where to insert the printout. I’ll select the current section. The pages are converted to images and inserted into your notes.
Since I already have the printouts, I’ll delete this page.
Sending email to OneNote (03:38)
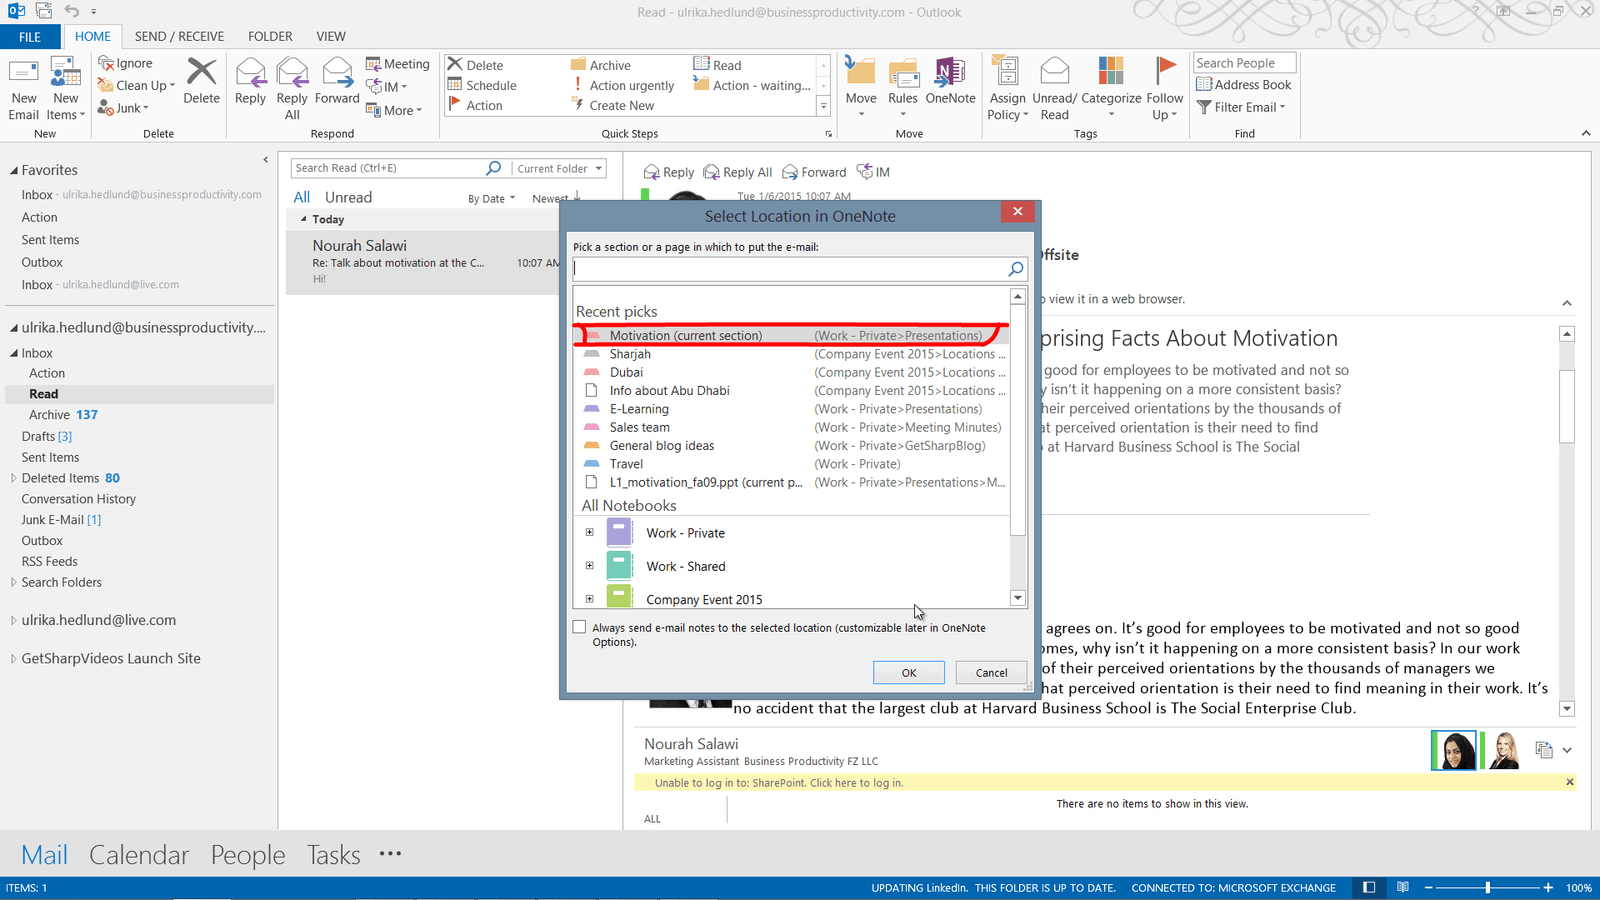
I have received an interesting article from Nourah called “The surprising facts about motivation”, that I’d like to include into my research notes. You can send any email from Outlook directly to OneNote. Under the “HOME” tab, in the “Move” section click “OneNote”. Select where you want the email to be inserted, I’ll select the current section and click “OK”.
The entire contents of the email including the subject, who it’s from and the date of the email is copied into your notes.
Sending email to OneNote from anywhere (04:12)
Sending email to OneNote is a great way to collect information. But sometimes you want to send information from an email client other than Outlook where you don’t have a “OneNote” button.
During my lunch break I’m watching a great Ted talk on a tablet device where I don’t have Outlook installed. I want to add this web page to my research notes. You can set up OneNote to receive email from defined email accounts from any device. To register one or multiple email accounts with OneNote go to https://www.onenote.com/emailsettings. Here you can define which email addresses you want to accept email from. Your primary Microsoft Account Address is visible here. You can add multiple email addresses by adding them to your “Microsoft Account Email Alias” list. I’ll just leave my default business address and click “Save”.
To send an email to OneNote, open up the email client. Here I’ll use Windows Mail. Address the email to me@onenote.com. The first time you send an email to OneNote you will receive an email with a link to the notebook. You will find all email you send to me@OneNote.com in your “Quick Notes” section. The Quick Notes section is a collection of all your unorganized notes. To open up the page in the OneNote desktop client click “OPEN IN ONENOTE”.

To move the page to the desired location I’ll right-click and select to move it to my section on Motivation.
Tagging information for follow up (05:54)
Now I want to spend some time to go through the information I’ve gathered. In OneNote you can tag content to easier keep track of it. In the article about interesting facts on motivation, I’d like to tag certain things I want to follow up on later. To tag content in OneNote, place your marker anywhere in the paragraph you want to tag, here I’ll go to the paragraph where a book called “Drive” by Daniel Pink is mentioned. On the “HOME” tab, in the “Tags” section, click the drop down to see the full list of built in tags. You can use existing tags, modify existing tags, or create tags all of your own. Here I’ll select the tag called “Book to read”.
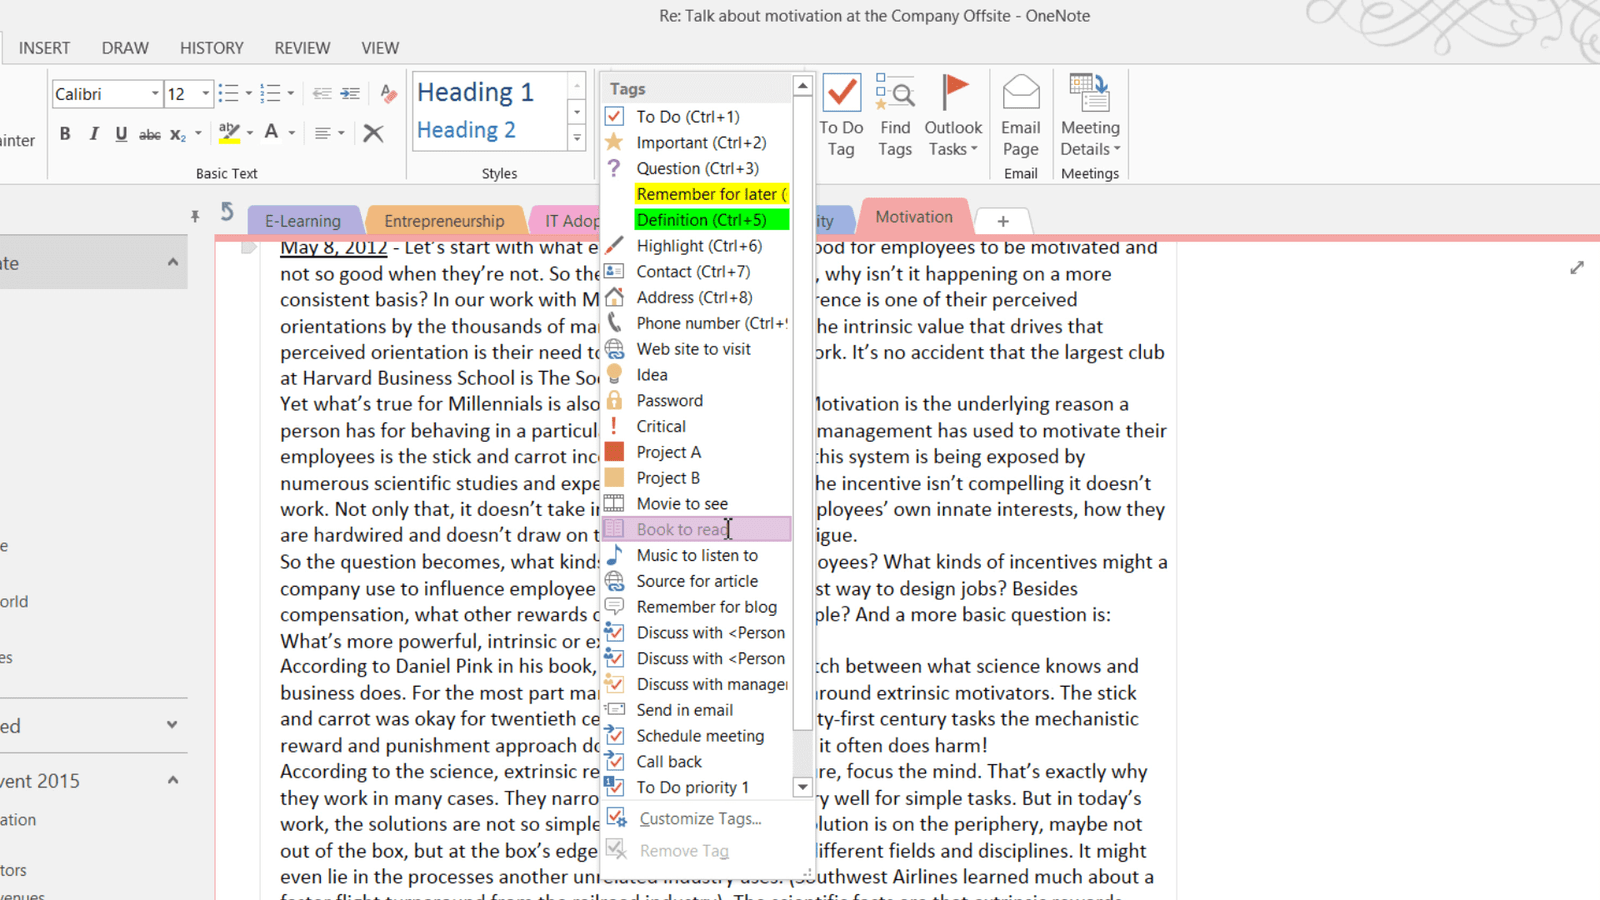
You can see a little book icon next to the paragraph.
Next I want to highlight a section in the text with important information that I want to make sure to add to my presentation. I’ll mark the text and click the “Tags” drop down to see all the tags. Here is a tag called “Highlight” that I can use. In addition to marking the text with the pen symbol I also want to highlight the text with a yellow marker. To modify a tag, right-click and select “Modify this Tag”.

Here you can select between various symbols, I’ll just leave the pen “Symbol”. You can also select “Font Color” and “Highlight Color”. I’ll click the “Highlight Color” and change it to yellow. Now if I tag the paragraph the text is tagged and highlighted. I’ll delete the space in between the sentences to make it into a single paragraph.
I’ll continue to go through the presentation on motivation. I’d like to do more research on Hertzberg’s theory on motivation, so I want to tag this. Since there is no default tag for research, I’ll create one. To create a new tag, open up the tag list and select “Customize Tags” and then click “New Tag”. Give your tag a name, I’ll name this “Research” and then select your preferred icon, and then click “OK”.

Now I’ll mark the slide and tag it with my “Research” tag. I’ll continue to go through my information and tag things for follow up and further research.
Finding and summarizing tags (08:21)
By tagging information in your notebook you can easily find things you want to follow up on. To summarize your tags, on the “HOME” tab, in the “Tags” section click “Find Tags”, here you can decide how to group the tags. I’ll leave the default which is by name.
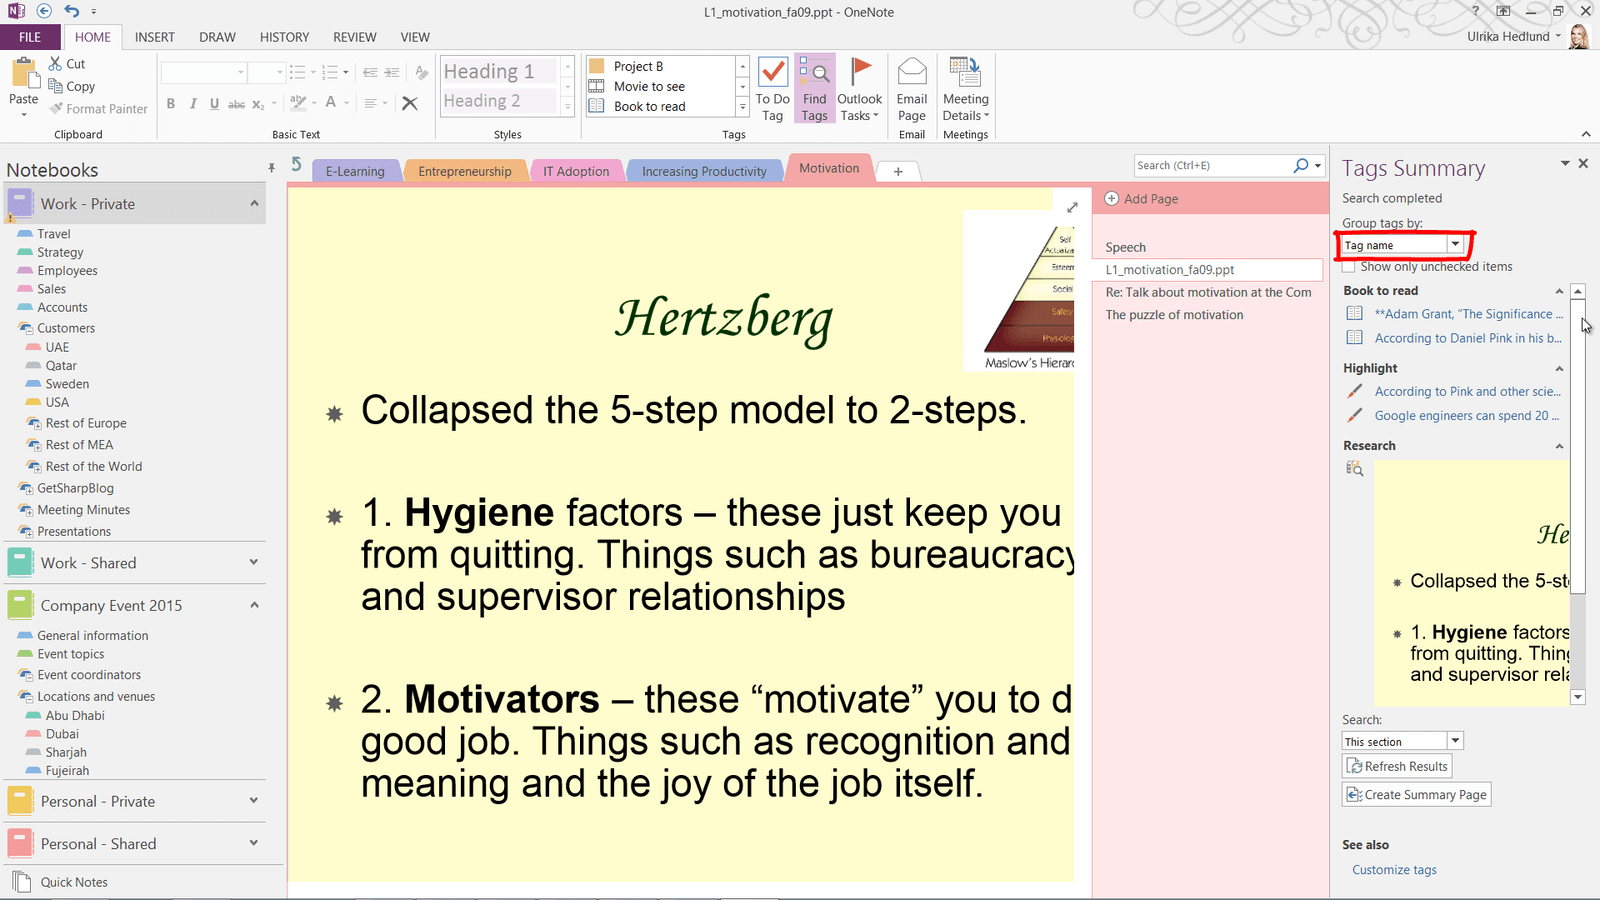
Further down you can select which tags you want to list. Here I’ll select only to find the tags within this section. As you can see you now get a good overview of all your tags and you can easily access the content by just clicking on a tag. To get a better overview of all tags, click “Create Summary Page” to create a page that consolidates all the tags and summarizes them on one single page.
Gathering online information (09:05)
Now I want to do some more research on the Internet on Hertzberg. I’ll create a new page for the research. To easier collect information online you can dock OneNote to the desktop by clicking the “VIEW” tab, and then select “Dock to Desktop”.
OneNote automatically resizes and places itself on the right hand side of your desktop while hiding menus so that you can focus on your notes page. A little staple icon tells you that the notes in OneNote are being linked to the research you do online.

I’ll take some notes on Hertzberg’s theory and then copy some of the text. To open up OneNote in normal view again, click the double-sided arrow. If you hover over the text you typed or copied while in docked desktop mode, the link to the web source is visible. As you can see, OneNote is a great tool for organizing your research.