Take creative notes across devices
Introduction (00:04)
With this version of OneNote you can be more creative than ever before. You can now take smart and effective notes using a wide range of different devices. In this video you will learn how to use the OneNote Windows app, with its new innovative interface designed for touch screens. You will also learn how to use more advanced tools in OneNote 2013 to really take your notes to a whole new level. Let me show you!
Taking handwritten notes with the OneNote Windows App (00:31)
I’m going to use the OneNote Windows app on my Surface device to take notes when I’m out visiting possible venues for our company offsite. The OneNote Windows app is free to download if you have Windows 8 or later from the Windows store.
To open up the OneNote app on your Windows touch screen device, press the tile called “OneNote”. If you have saved your notebooks to OneDrive, they will automatically be synchronized to your various devices.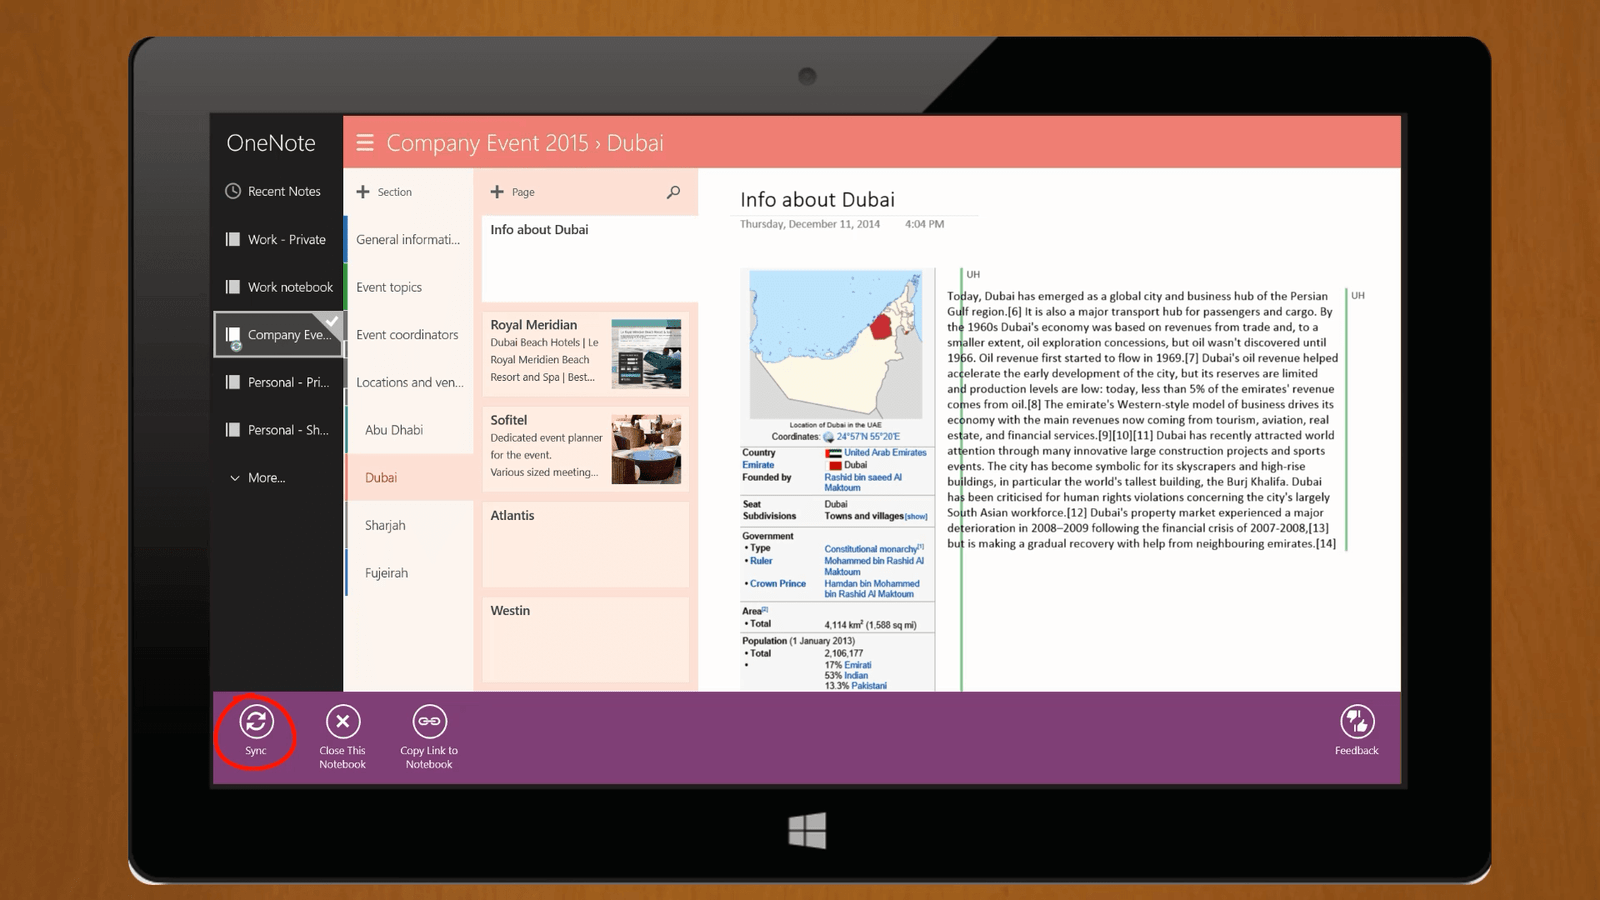
The OneNote app is designed with simplicity in mind. Here you can easily navigate the notebook using your finger. I’ll touch the page with notes about Sofitel to open up that page.
I’ll create a new page by pressing the “Plus Page” sign. I’ll name it “Onsite visit”. I want to take handwritten notes so I want to add lines to the paper. To open up the options menu, swipe from the bottom, press “Paper” and select “Show Rule Lines”.
Now lines are added making it easier to write by hand.
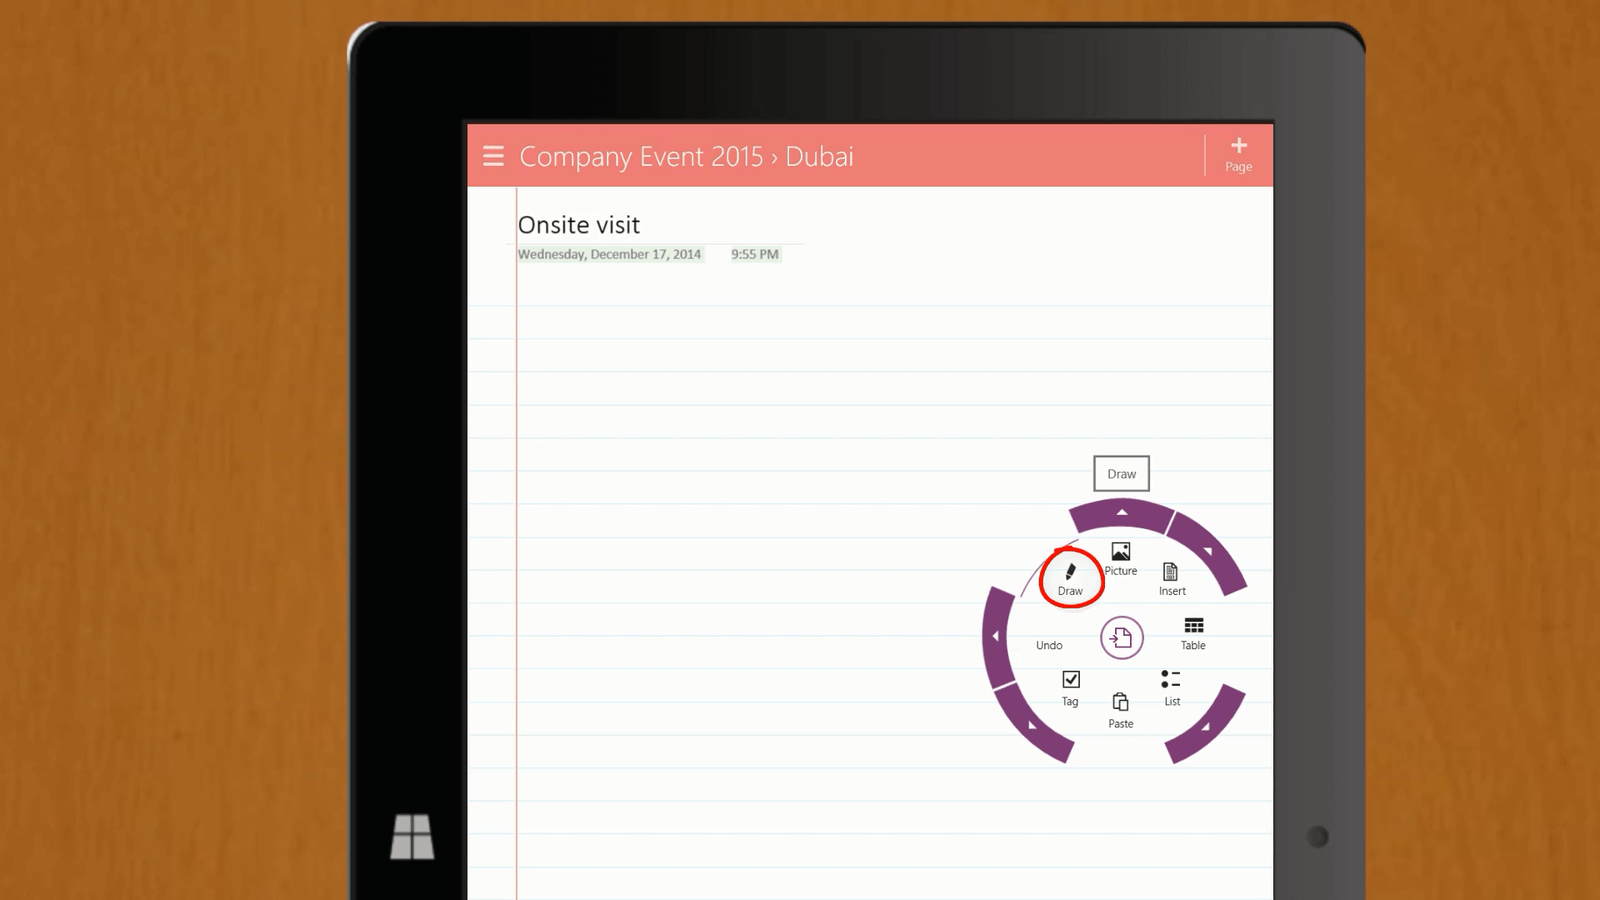
When I turn my device, OneNote automatically flips to portrait mode. If you have a stylus you can just start writing on your device right away just like on paper. If you want to change the pen settings, or if you want to write using your finger tap the screen so that the Radial Menu opens up. The Contextual Radial Menu was introduced in the OneNote app to make it easier to navigate OneNote using touch.
Here I’ll select “Draw” and then I can select between various pen options, I’ll pick a blue pen. Here I’ll take some handwritten notes while I’m looking at the premises and talking to the hostess. Next I want to draw a location map so I’ll turn my device to landscape mode again. OneNote adjusts the layout accordingly.
I’ll press the plus sign to create one more new page. I’ll name the page “Location map” using the touch keyboard. I’ll tap the page to open up the Radial Menu again.
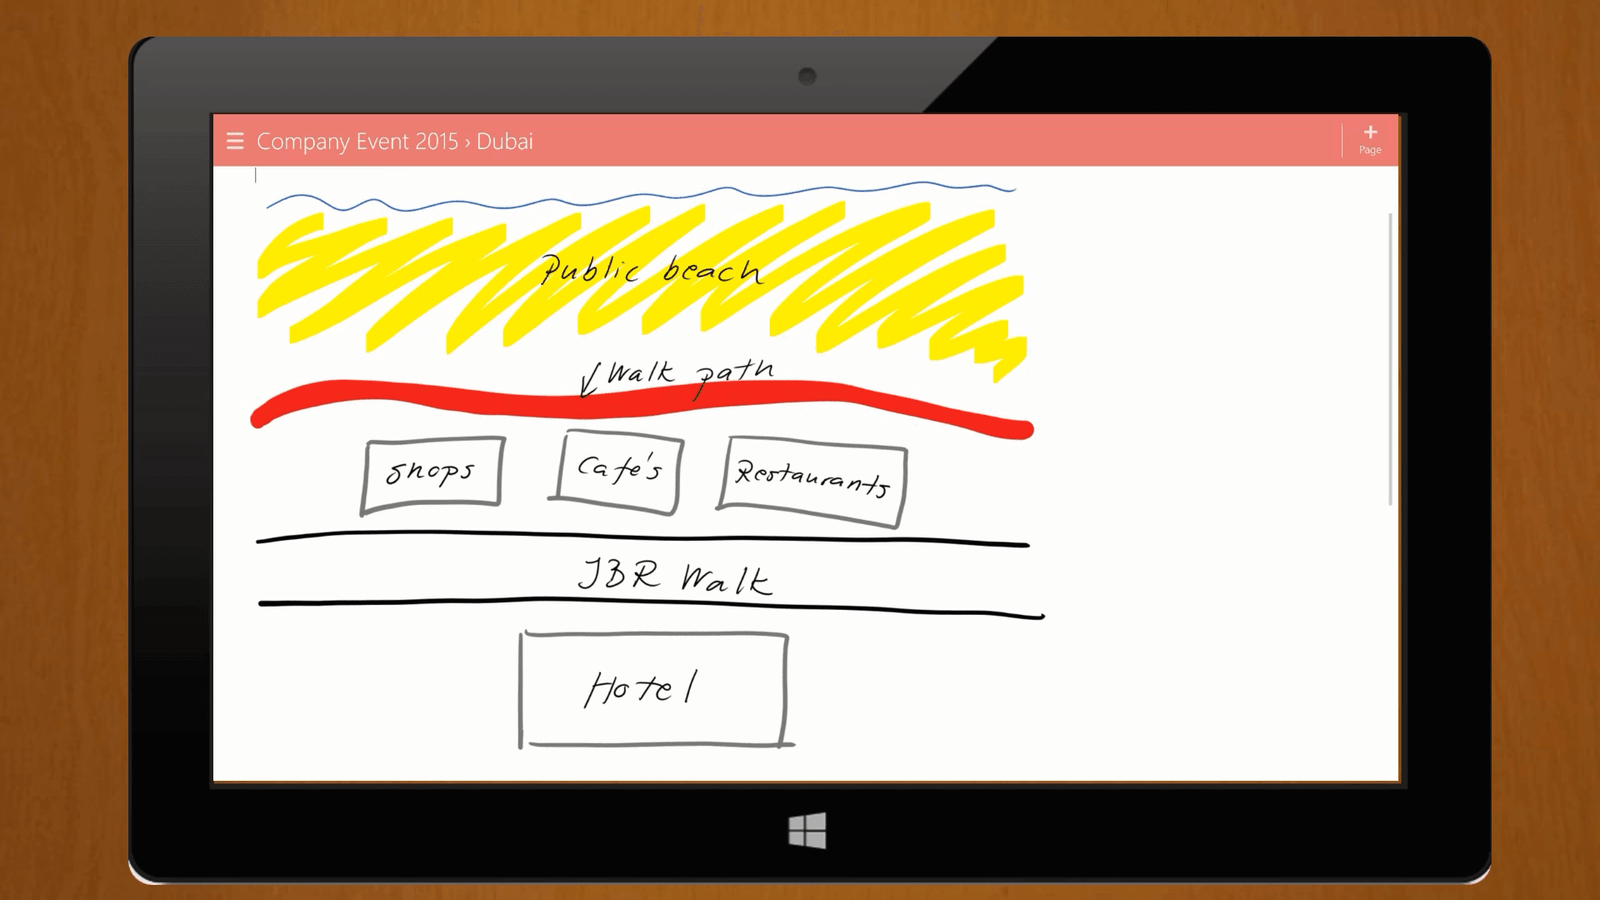
I’ll select the pen tools and change the pen option to a highlighting pen with “Medium” width. Now I’ll draw a picture of the hotel location surroundings using various pens and colors. Using the drawing tools in OneNote you can really be creative.
Next I want to take some photographs and add to my notes.
Inserting camera shots using OneNote Windows App (03:03)
To take photographs using the OneNote Windows app on your tablet device tap the screen until the Radial Menu appears, select “Picture” and then “Camera”.
To take a picture just press the little camera icon. Here I’ll take a couple of pictures of the hotel surroundings by just positioning my Surface device and then pressing the camera icon. To insert the photos into your notes press “Insert All”.
The pictures are inserted into my notes.
Using the Lasso Selection Tool (03:36)
Back in the office I open up my notes on my PC in the full OneNote desktop client. The notes I took while out and about using my Surface device have been synchronized.
Now I can re-arrange my notes a bit. I’ll mark them all while holding down CTRL and then move them so that they’re all under “Sofitel”, then I’ll right-click and select “Make Subpage”.
I’ll remove the page ruler lines by clicking the “VIEW” tab, “Rule Lines” and then selecting “None”. I want to insert the location map I drew under the first paragraph but to do that I need to insert more space. To insert more space in a page click the “INSERT” tab and then “Insert Space”. Position your mouse pointer where you want to add more space, here I’ll position my mouse cursor under the first paragraph. Hold down the left mouse button and drag the mouse down. Everything underneath the double-sided arrow will be moved down providing you with more space.
I’ll go to the page where I have my location map drawing. To see the whole drawing I’ll click the “VIEW” tab and then zoom out a bit clicking the “Zoom Out” button.
Using the Lasso Select tool (04:58)
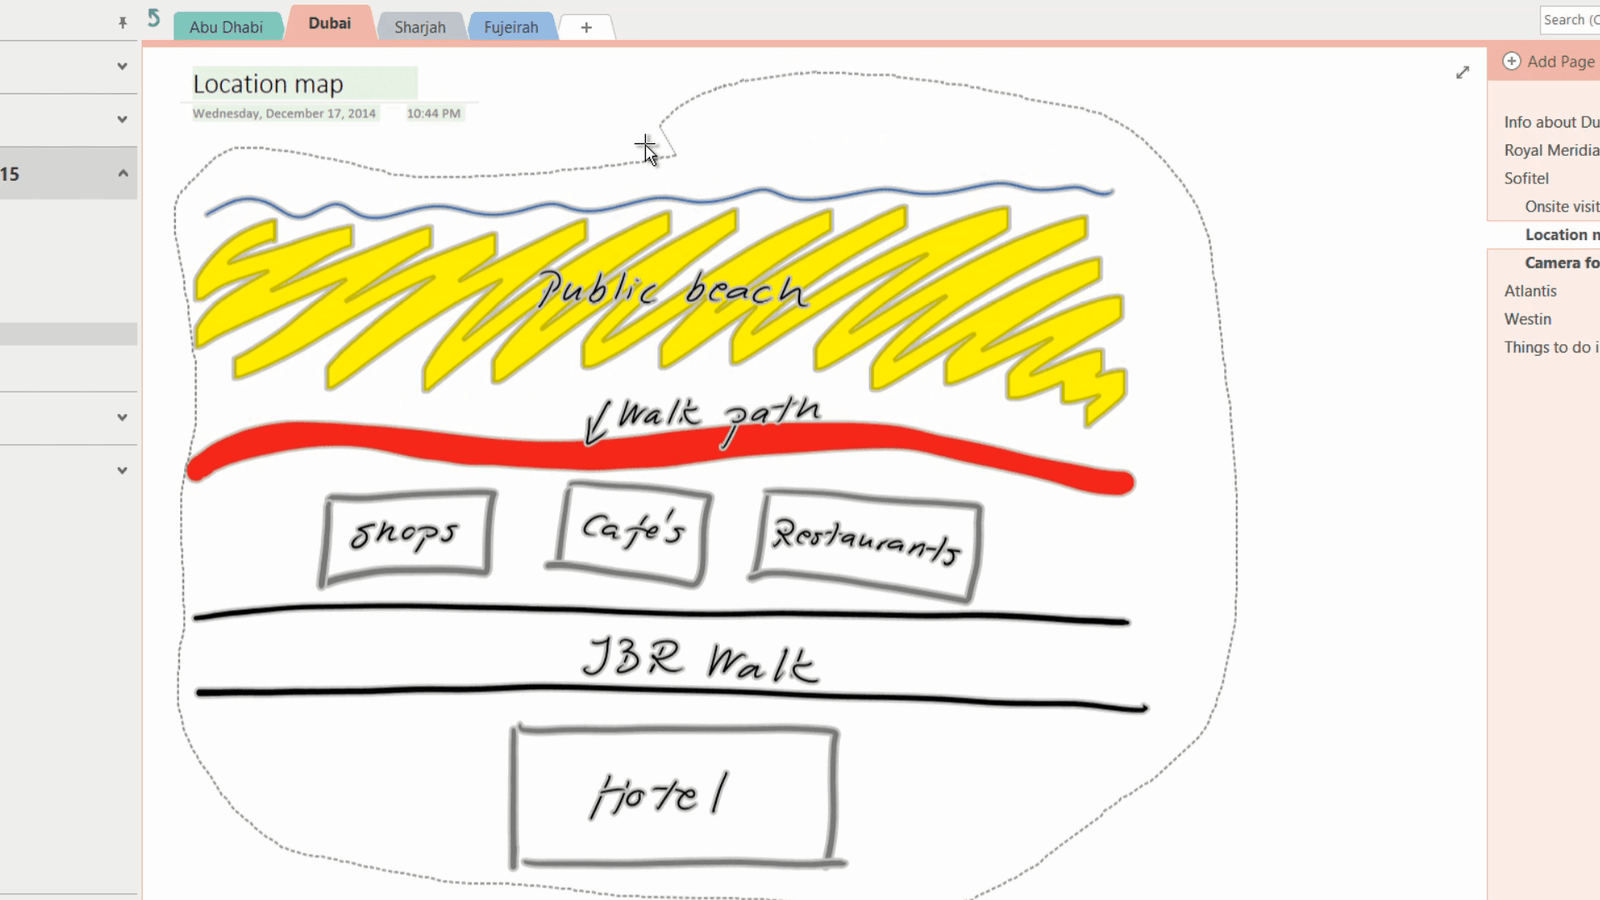
To select something handwritten or drawn on your page you can use the Lasso Selection Tool. To use the Lasso Selection tool, click the “DRAW” tab, and then “Lasso Select”. A little cross is shown next to your mouse cursor, hold down the left mouse button while circling the item or items you want to mark.
When everything is marked release the mouse button. To exit the Lasso Select tool, on the “DRAW” tab click “Lasso Select” again or click “Type”. I’ll right-click the marked drawing and select “Copy”. I’ll zoom out again by clicking the “VIEW” tab and selecting 100% then I’ll go back to the “Onsite visit” page to paste in my drawing. I’ll right-click and paste in the drawing. I’ll also copy in one of the pictures I took of the construction outside the hotel.
Now I want to share this page with my colleagues Nourah and Jacob.
Emailing pages from OneNote (05:52)
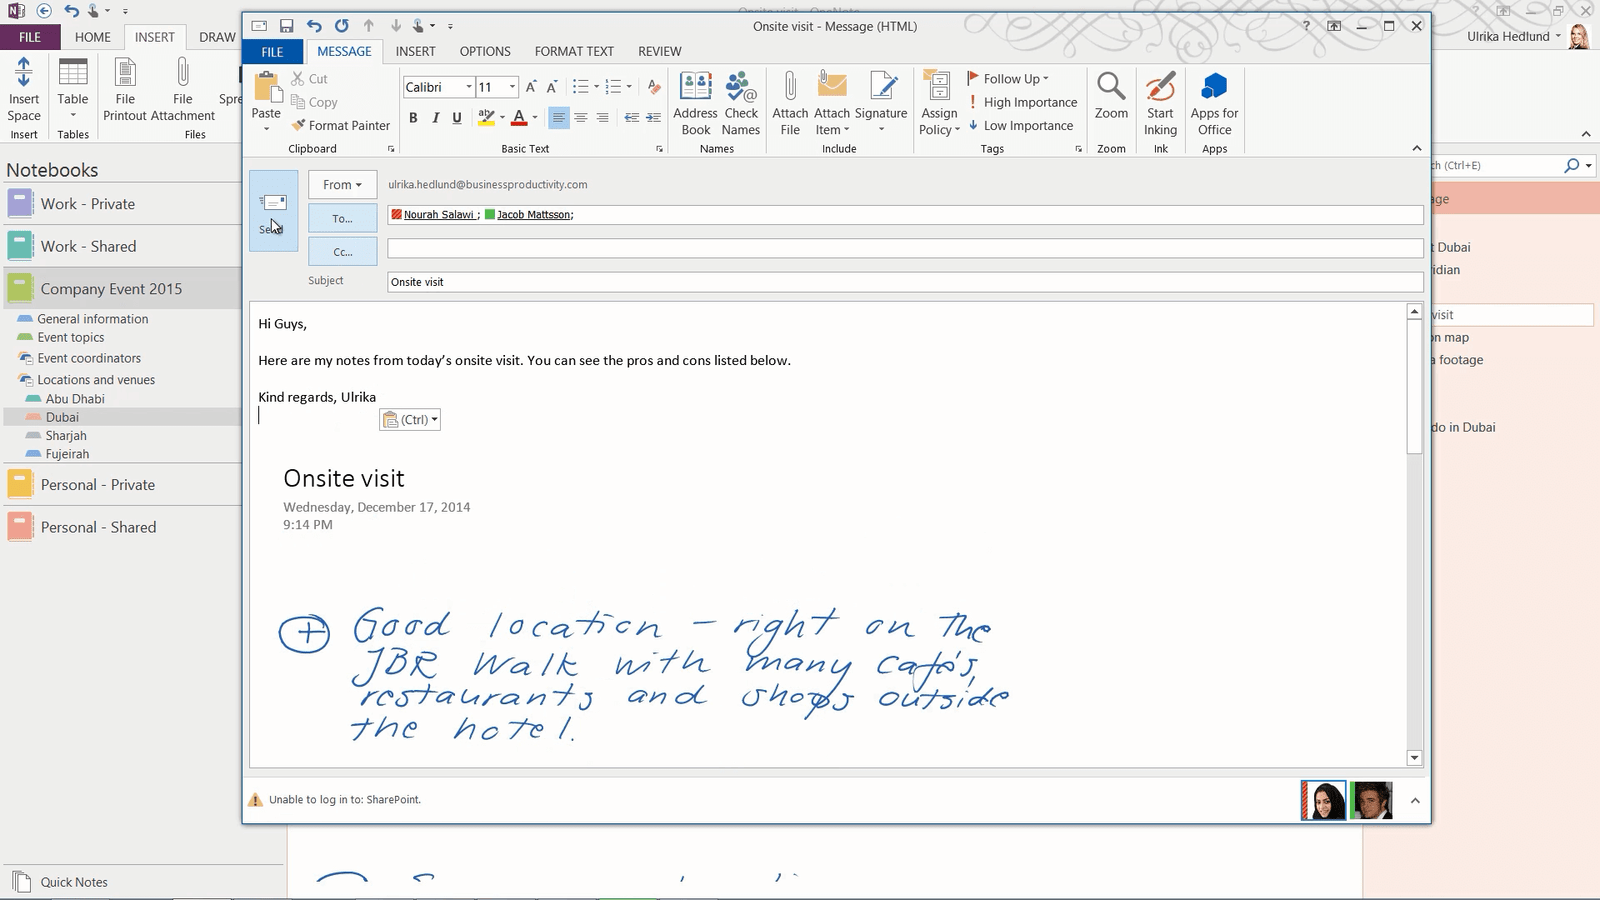
To email a page from OneNote, click “FILE”, “Send” and then “Email Page”. If you are using Outlook, a new email opens up where the contents of the current OneNote page is included in the body of the email message. Add the recipients you want to share the page with. You can add more text to your email, I’ll just write a short message before I send off the email by clicking “Send”.
Creating Outlook tasks from OneNote (06:20)
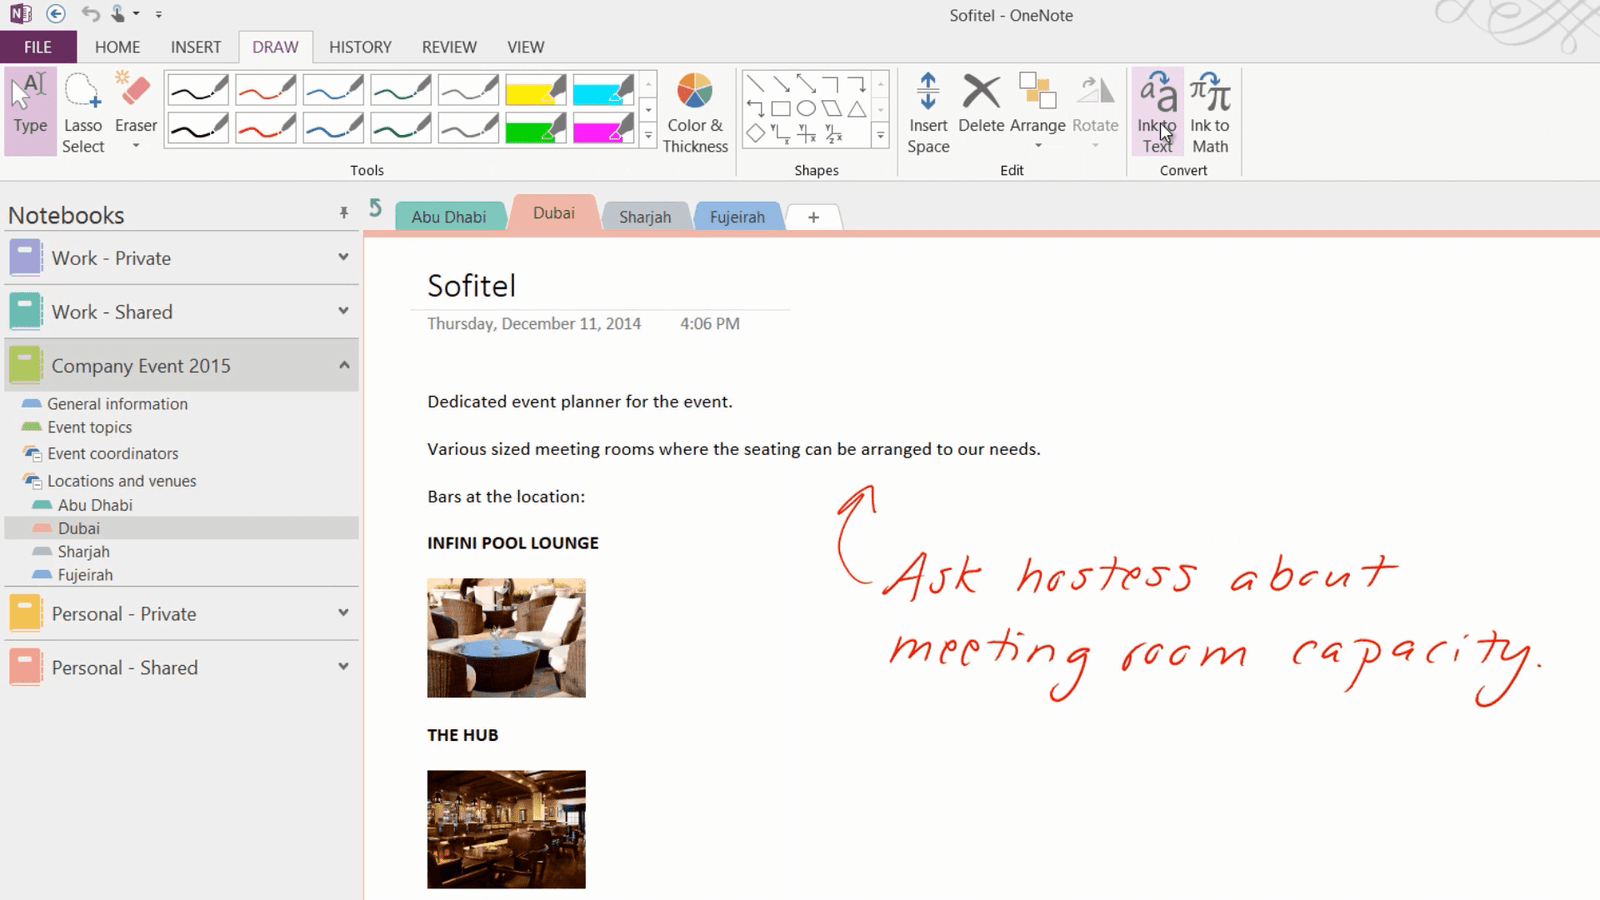
While looking through my notes I can see that I’ve written down a reminder to ask the hotel hostess about the capacity of their meeting room. To make sure you keep track of tasks in OneNote you can synchronize them to Outlook. First I’ll convert my handwritten note to text. To convert ink to text, click the “DRAW” tab and then click “Ink to text”.
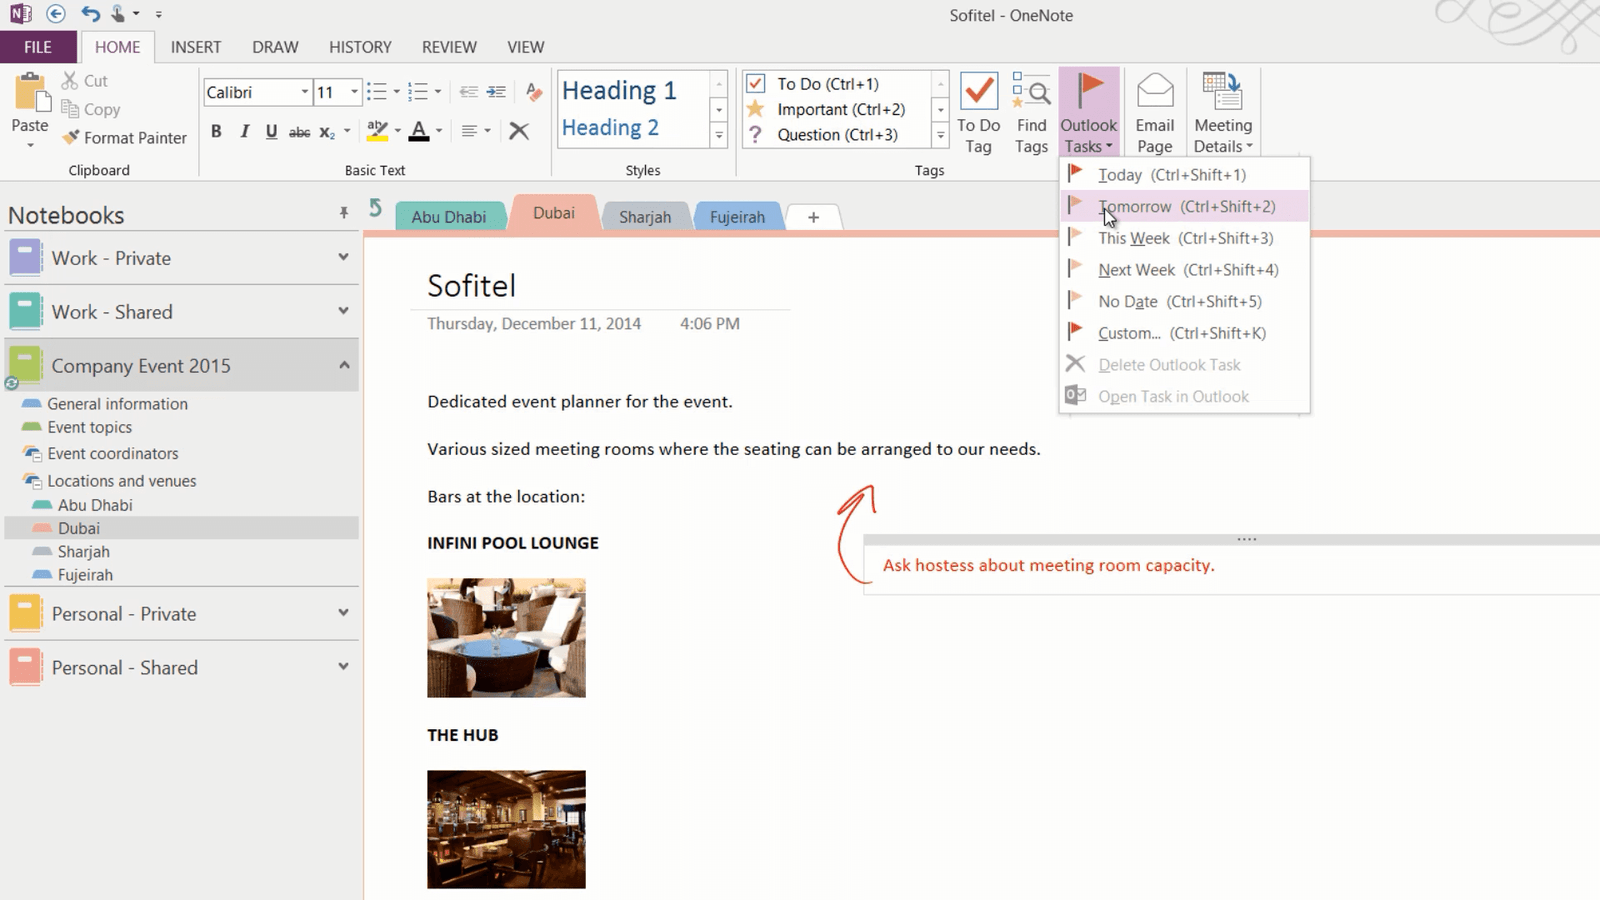
All handwritten ink on the page is converted to text. Now I want to make this into an Outlook task. To create an Outlook task from within OneNote, type in your action or mark the text you want to convert into a task. On the “HOME” tab, click “Outlook Tasks”, select when the task is due. Here I’ll select “Tomorrow”.
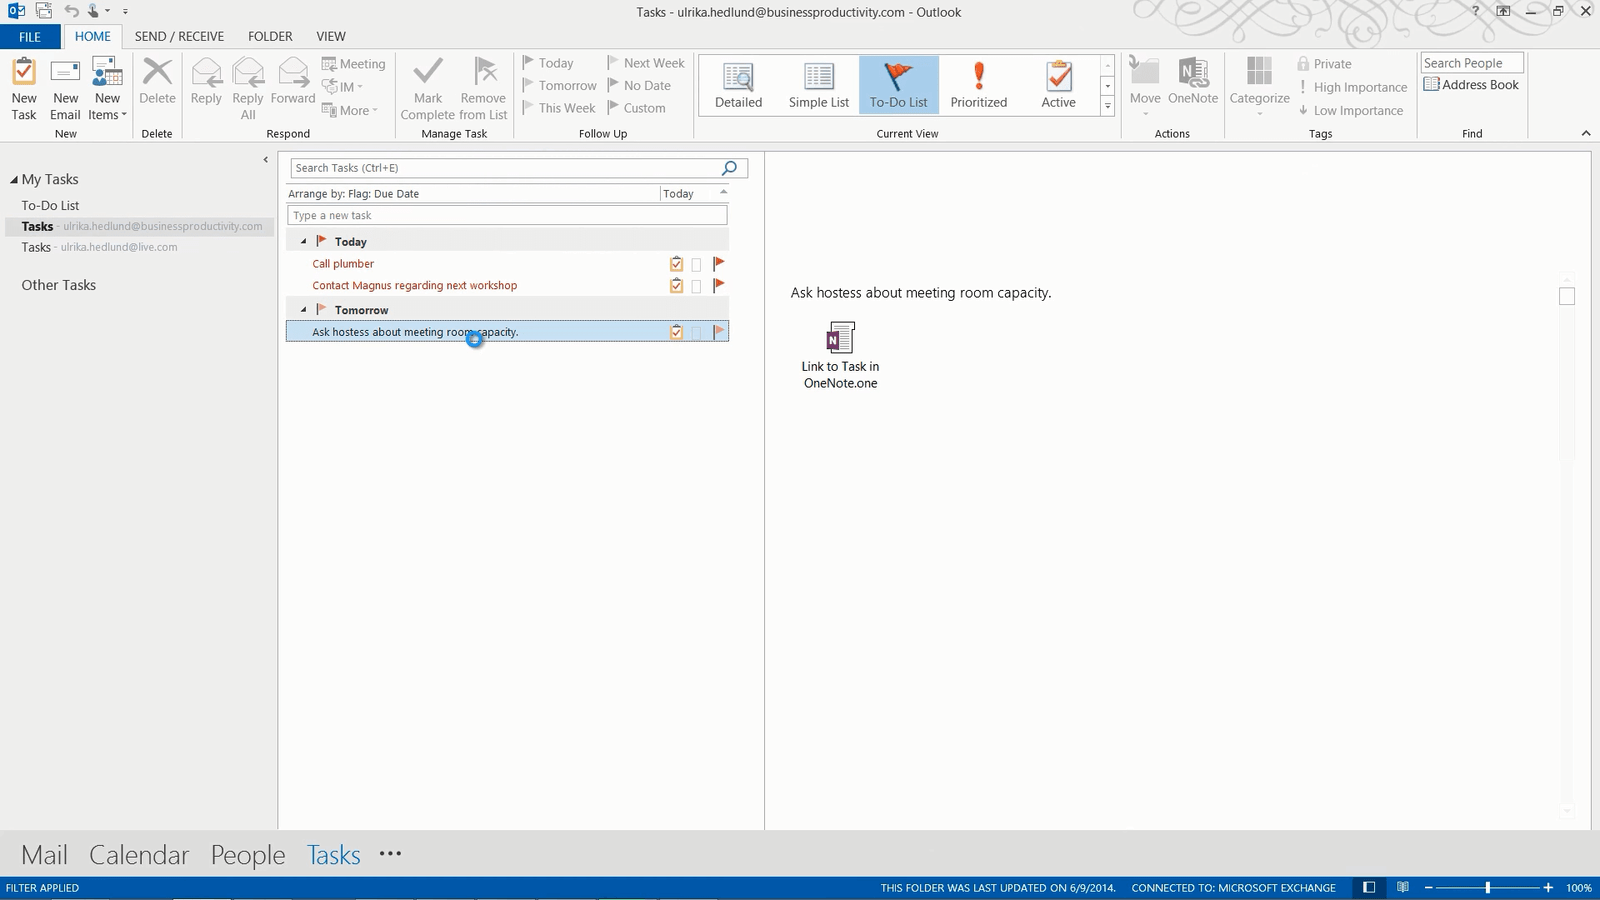
If you switch over to Outlook, you can see that the task has been added to your task list.
When you have completed the task you can mark it as complete in Outlook. When you open up OneNote again the task has been marked as complete. Similarly, if you mark the action as complete in OneNote it will be updated in your Outlook task list as well.
Inserting tables into your notes (07:32)
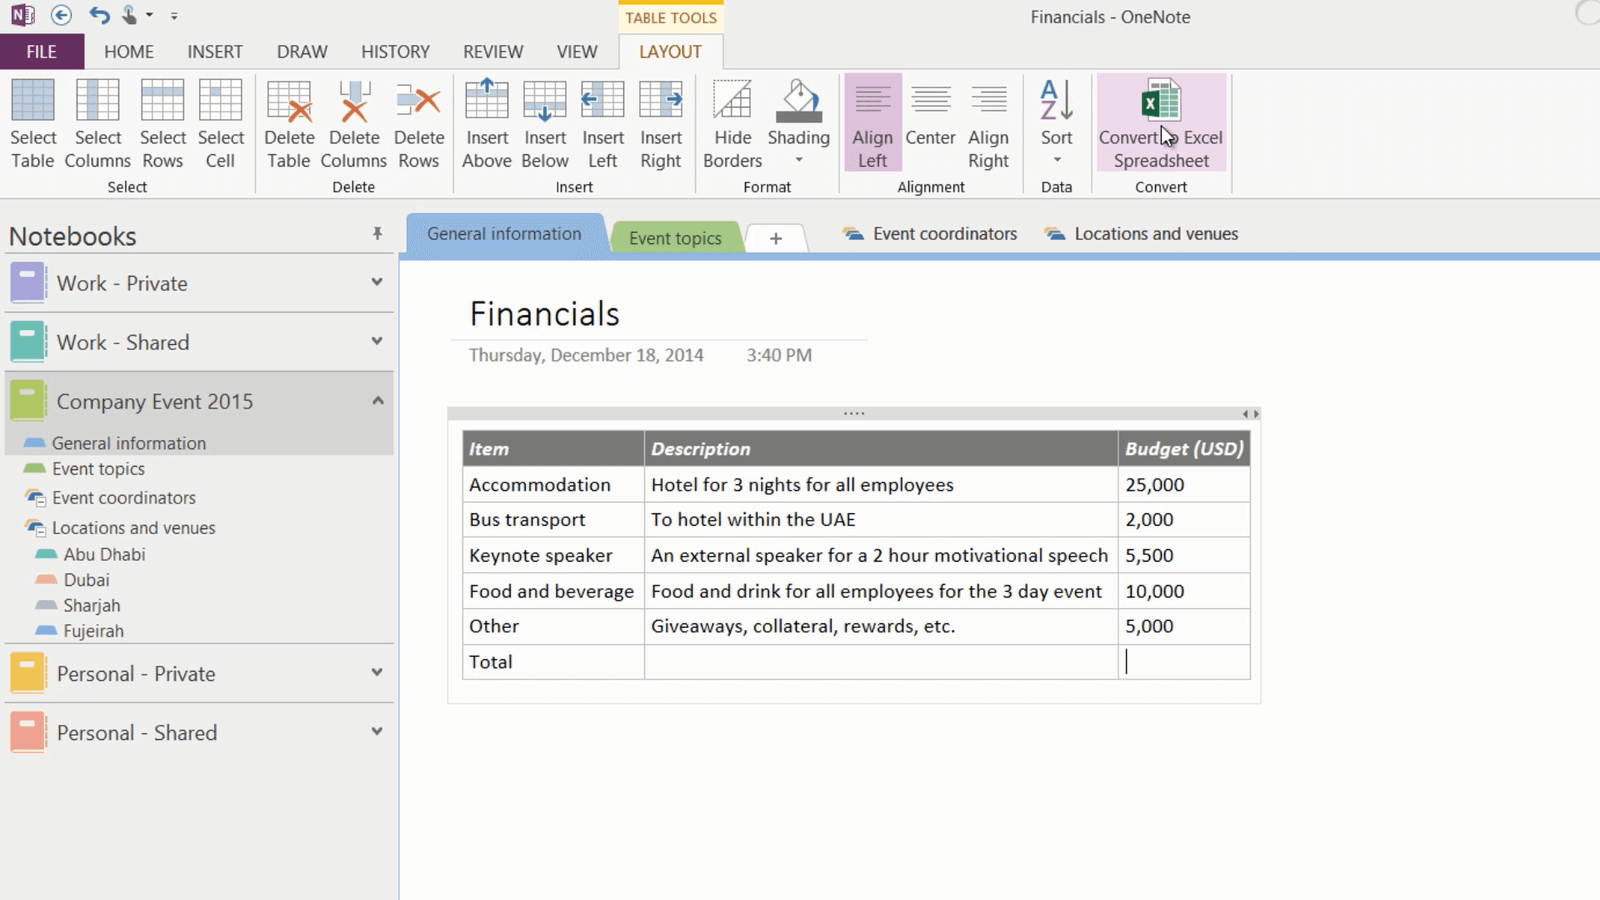
Now I need to add a page where I can keep track of our budget and costs for the event. I’ll create a new page that I’ll name “Financials”. To insert a table click the “INSERT” tab, and then “Table”. Select how many rows and columns you want in your table. I’ll start filling out the table with my information. When you have your cursor placed in the table the “TABLE TOOLS” appear on the Ribbon. On the “TABLE TOOLS” “LAYOUT” tab, I’ll click “Shading” and change the color of the first row to grey, then I’ll mark the text, right-click and on the mini-toolbar I’ll change the font to white, bold and italic.
Performing simple calculations (08:12)
You can perform simple calculations in OneNote. To calculate numbers, just type what you want to calculate using common math operators. Here for instance I want to know what the total accommodation budget is broken down per day, so I’ll type in 25000 divided by 3 equals, and OneNote shows the result.
This works fine for simple calculations, but quite often you need to perform more advanced calculations. Here for instance I would like to calculate the total budget.
Using Excel spreadsheets in your notes (08:47)
In OneNote 2013 you now have support for Excel spreadsheets. You can either import a spreadsheet you have already created, or you can convert a table to a spreadsheet or start from scratch. To convert a table to a spreadsheet, place your marker anywhere in your table. On the “TABLE TOOLS” “LAYOUT” tab, click “Convert to Excel Spreadsheet”.
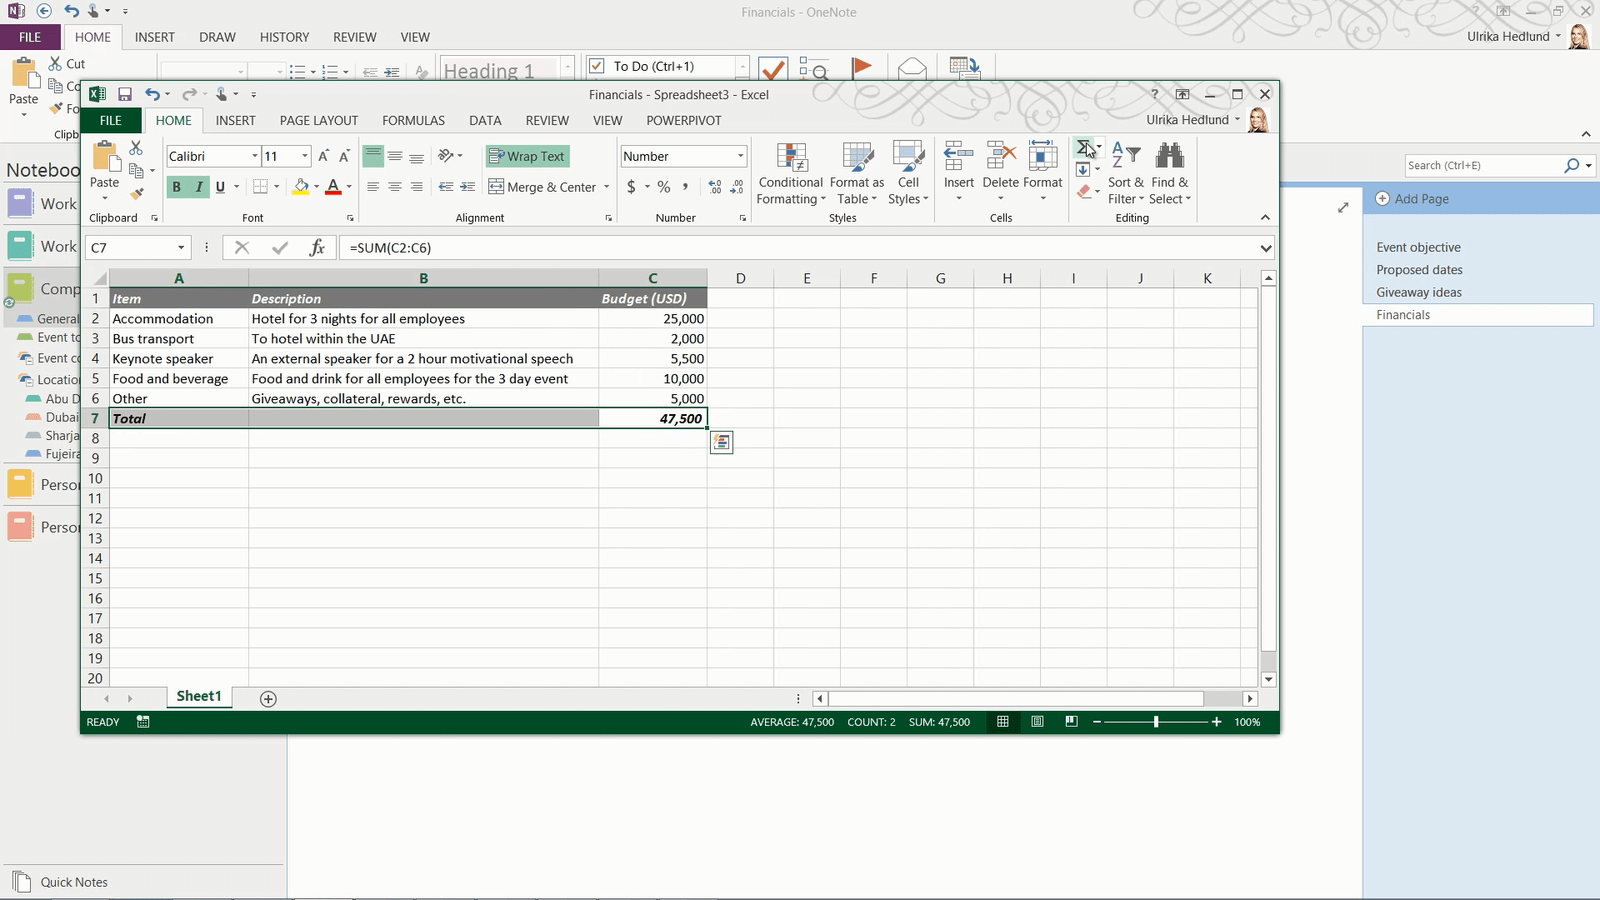
Your table will be converted into an Excel spreadsheet and inserted into your notes. To edit the spreadsheet click “Edit” in the top left corner. Now you can use all the familiar calculation tools in Excel. Here I’ll sum up the total budget using Autosum.
Then I’ll save my changes and close down the spreadsheet and the changes are updated in my notes.
Closing (09:36)
As you can see, OneNote provides you with numerous options for taking creative notes on a wide range of different devices.





Leave a Reply